Showing posts with label Made w/ Punches. Show all posts

Saturday, April 19, 2014

Easter Cards for the kiddos

I cannot believe Easter is almost here!!!  I have a great niece and nephew that live out on the West Coast and I am in Ohio, so I sent them each a little treat and a handmade card.  They are little tykes in Kindergarten and First Grade, my sweet angels Tristin and London.  Tristin loves Lego's and London loves Hello Kitty, two things that I adored when I was a kid also.  So, I had a great time making these cards.  I hope you like them.  Yes, Trisitn's name on the front is meant to be jumbled and not lined up evenly.  Here they are:


I cut out the rectangles on the lego card and used a 1/2" circle punch for the dots, and a white prismacolor pencil to add a little depth to them.  The letter stamps are from a retired Stampin Up set.

The hello Kitty card was made with some Sizzix Di-cuts, a Stampin Up trio flower punch, and a Spellbinder's label di-cut.  I forget which label, sorry.  

To my sweet little angels I just want to tell you once again, that even though I live so far away, I love you very much!!!!  Have a very happy and fun Easter and be good kids for your mom!!

Until next time..........Blessings,   Lisa

Thursday, February 14, 2013

Happy Valentine's Day

Just a little card to help celebrate Valentine's Day!! Literally, it is little, it is a 3x3 mini card. I punched a couple of Martha Stewart Hearts (gotta love her paper punches), an EK Success border punch, and a few Recollections faux pearls to top it off. Inside a stamped sentiment. Enjoy your day!!! Until next time.................Blessings, Lisa

Saturday, February 13, 2010

Last minute Valentine!

Hello. If you are a very last minute kind of person, and need a very quick valentine, here is one for you.
All you need is some card stock, a heart punch, and a sentiment that says "Happy Valentine's Day". I used here a punch that my fabulous husband got me for V-day (early so I could use it), and it is a Martha Stewart Punch. She comes up with the cutest punches. For my purposes here I used Stampin Up Whisper White card stock for the card base, pretty in Pink for one of the hearts, two different color foil card stock (Unknown brand), and the sentiment is from Stampin Up's stamp set called "Teeny Tiny Wishes" stamped in their Real Red Classic Ink. See the enlarged photo below to see the shine of the foil card stock a little better.


Short and sweet today, yes the pun is intended since tomorrow is Valentine's day!
Until next time..................Blessings, Lisa

Tuesday, January 19, 2010

Valentine Cards Stampin Up Style

Hello. Back again as promised. What I did for these Valentine cards was to first stamp some Backgrounds with Melon Mambo Ink onto Pretty in Pink card stock. First I stamped with two stamps from the Stampin Up "Park Avenue Patterns" stamp set, then I stamped with the "Medallion" stamp. On the Medallion stamp I also used the "Thumping" technique with a Rich Razzleberry Marker. Thumping is to simply tap the brush tip of your marker onto the stamp after you have inked it with an ink pad. Obviously using two different colors. Then, I punched out various heart shapes out of these backgrounds with Stampin Up "Full Heart Punch", and the "Heart to Heart" punch. After doing this, you have a bunch of fancy hearts to arrange on cards. I came up with seven cards, all the same layout, but with different patterns on each ones hearts. The patterns don't even have to cover the whole heart shape, they look very interesting either way. So, here are how mine turned out: Feel free to click on each one to enlarge it and get a better view.
Park Avenue Patterns used on this one, and edges of hearts brushed slightly on the Melon Mambo ink pad.
Same on this one, plus a small heart added with the new SU small heart punch.


Ditto on this one.


Medallion background stamp used on this one.


Medallion used on this one too. Can you see the Rich Razzleberry accents from the "Thumping" technique on this one?


Same comments on this one as the previous above.

Same comments again on this last card.
I am not sure if you could see them, but I also put two score lines on the left side of the card to add some interest. The card stock colors used were Pretty in Pink, Close to Cocoa, and Melon Mambo. The sentiment on them is from the Stampin Up set called "Teeny Tiny Wishes". If you have any questions leave me a comment that I can respond to.

Until next time.........Blessings, Lisa


Saturday, October 31, 2009

Petals a Plenty

embossing folder in the Stampin Up Holiday Mini Catalog is what I used to make the Christmas ornament on my card today:

I have had this idea in my head for several weeks now, and finally had time to put it down on card stock. I am quite sure that someone over on Splitcoast Stampers already had the same idea, it is not a complicated one. I ran a piece of Stampin Up Real Red card stock through my Cuttlebug machine with the Stampin Up "Petals a Plenty" embossing folder, then punched out circles of it with a 1-1/4" circle punch. If you put 1/4 of a piece from a sheet of 8-1/2"X11" card stock through with your embossing folder, you can easily punch out 6 of these cute x-mas balls, and make six Christmas cards in a flash. I chose to paint the raised dots on each circle with some of the Shimmer paint from the holiday mini catalog, but they look great plain as well. The bow was made with some gold ribbon by American Crafts. Please Stampin Up bring back the metallic ribbon! I miss it so! Gotta check my stash and see if I have any hiding somewhere.

Anyways, I need to run, we have Trick or Treaters coming to beg for candy at 6pm tonight. I hope you enjoyed my quick, clean and simple card. Oh, the sentiment is from Teeny Tiny Wishes stamp set. Phew! Until next time...............Blessings, Lisa

Sunday, October 18, 2009

Fall Ornament Punch Vase

Happy Sunday evening. I was asked by a friend to make a Fall version of my Stampin Up Ornament Punch Vase from a previous post (click here). So, I thought that I would go ahead and post it on here. Stampin Up has a beautiful stamp set new to their current main Catalog called "Autumn Days". I thought of the "Pussy willow" stamp when I was asked to make this.

When I was a little girl in the 70's (oops just shared my age), my grandmother had a Pussy willow tree in her back yard. She used to cut some of them off and put them into a vase inside her house. I had the very big job of holding the ones that she cut while she was cutting more. I so loved those fuzzy soft little things, they felt like kitten fur. So here is the card I have been chatting about:

I used Stampin Up Soft Suede to stamp all of the Pussy willow branches. I stamped some of them two times before re-inking the stamp, so that some would look lighter. I stamped the Butterfly from the "Charming" stamp set with yellow, then didn't like it, so I colored over the yellow with my Soft Suede marker. The design on the vase is the same as it was on my previous post also from the stamp set "Charming", and the sentiment is from the stamp set "Teeny Tiny Wishes". The card base itself is Very Vanilla card stock, and the vase is Bravo Burgundy card stock. I think that covers it. For instructions on how I made that chubby vase please click on the link above for my previous post. Thanks for visiting my blog, and have a blessed Sunday evening. Lisa

Monday, October 5, 2009

Punched Doxie

If you have been following my blog for very long, then you probably know that I have a very super sweet Miniature Dachshund dog. Her name is Brandy, she is 15 years old and still feisty. We have kept up on her regular maintenance, fed her good stuff, and just all around taken good care of her. She sleeps alot more than she used to, lost some of her teeth and piddles on the floor sometimes (yuck), but other than that still has a great zest for life, and loves giving wet kisses. I have been waiting very patiently for someone over on Splitcoast stampers to come up with a doxie punch art thingy, as there are so many cute punch art thingies over there, but nope, no-one has yet. So I put my little brain to work and started punching out some shapes with my Stampin Up punches, arranging them on a piece of scrap card stock to see what might work together. The photo below is what I came up with:
Ok, I am back, and I adjusted the Doxie body to be a bit more slim. I am challenging myself here to use only Stampin Up paper punches, as most of my punches are from Stampin Up. The legs look a little long, but this can be easily adjusted by cutting off a little bit, or simply attach them more underneath the body further. Below is a chart that shows what punched pieces are used to put together this ultra cute doggie. The doxie head is one of the hearts from the Heart to Heart punch, and so is the ear. The doxie legs were made with the Horizontal Slot punch. The body and tail were both made with the Small Oval punch. The white lines are where I cut them, the pieces with the X's can be thrown away.
Here is a close-up photo of how I cut the doxie body. The small oval was too chubby, so, I put it back into the punch, moved it around with my xacto knife until I had it where I wanted it (as shown in the photo below), then punched it.
Now, for the tail, the discarded doxie body piece was too wide for the tail, so to make the tail, punch out a small oval. Then place the negative space back into the punch, line it up as I have shown in the photo. Make sure it is real skinny at one end (left side of photo), and slightly skinny at the other end (right side of photo), then punch.
The photo below is my real Dachshund, Brandy. She is my sweetheart!


I hope you enjoyed my punch art, I so rarely do this. If you have any questions, leave me a comment that I can respond to.

Until next time...............Blessings, Lisa

Thursday, September 24, 2009

Ornament Punch Ideas

Hello. Well, I promised you some more ideas for the ornament punch that is in the new Stampin Up Holiday Mini Catalog. Here they are:


On this first one I stamped one of the snowflakes from the Stampin Up Holiday Mini Catty called "Serene Snowflakes", then while holding my ornament punch upside down, centered the snowflake and punched it out. The snowflake by the way, was stamped with the new Platinum shimmer paint that is also in the holiday mini. I found it easiest to paint the stamp with the shimmer paint with a paint brush, then stamp. Boy does that stuff shimmer! I highly recommend it. The scallop is also from Stampin Up/Sizzix Bigz die-cut called "Large Scallop Circle". The tree branch is from the stamp set "Bird on a Branch", and the sentiment is from the stamp set "Teeny Tiny Wishes". The ornament is popped up just a little bit with an SU Stampin Dimensional. The card stock used was Stampin Up Whisper White and Night of Navy.

The next card was super fun, and super easy. I punched out 3 ornament punches from Night of Navy card stock. Then, with a paint brush, I brushed some Champagne Mist (Gold) Shimmer paint on them completely covering them. I set them aside for a few minutes to let them dry. While that was going on, I ran my SU/Sizzix Sizzlet from the Holiday Mini Catty called "Merry Details" through my cuttlebug with some Whisper White card stock. Next, I simply attached them to the ornaments and assembled them onto a card base. The lines for the ornaments to hang from were obviously hand drawn with my black marker. Clean & Simple, and finished in about 10 minutes, if that! Don't ever be afraid to hand draw on your cards, it adds a special uniqueness to them. Oh, notice the shimmer from the paint on the ornaments. It looks really cool in person on that dark card stock. It looks equally nice on Handsome Hunter, and Bravo Burgundy, which are the only other two colors that I have tried this with so far.
Well, that is it for today. Until next time............. Blessings, Lisa

Thursday, September 10, 2009

Charming Card

is what I have to show you today, because I used the new Stampin Up stamp set called "Charming" from the Holiday Mini catalog. I have been waiting for an idea to pop in my head using this stamp set, because it is so gorgeous. Last night I was browsing some blogs, and saw that someone (sorry I forget who) used the new Ornament punch to make a chubby flower vase. Sounds odd at first until you see it. So, here is my version of the chubby ornament punch vase thingy. instructions and photo to show you how will follow. First check out the finished card.
There is a tone-on-tone decoration (in Night of Navy) stamped on the vase that is hard to see in a photo, so the next photo shows it blown up and lightened so that it can be seen.
I love this set so much that i just had to take a photo of it to show you as well. Of course you can order one of these and many other things if you want. Info is on my sidebar.
Now, to show you how to make the chubby vase with the ornament punch. By the way, there is a stamp set that coordinates with the ornament punch in the holiday mini catalog. I will post a card or two using that stamp set soon. As you can see in the photo, you can simply line up the ornament punch at the edge of a piece of card stock or DSP, leaving out the point of the ornament, so that when you punch, you automatically get a straight edge for the vase bottom. Easy Peasy! If you have any questions, just leave a comment or contact me.


The flower stamp was colored with Stampin Up markers (Garden Green, Ballet Blue), stamped, then I added some Night of Navy highlights to the tips of the flowers and to the body of the butterfly. The sentiment is from Teeny Tiny Phrases stamp set by Stampin Up also. The card base is SU Very Vanilla, and that sums it up. Until next time......Blessings, Lisa


Thursday, August 20, 2009

Forest Friends meets the Woodgrain Background

I had to make 20 card swaps for a Stampin Up meeting with my uplines, etc. I had just gotten the new Woodgrain background stamp from the new catalog, and was so anxious to use it. Plus, I had to come up with something that I could repeat 20 times quickly. So, this is what I came up with:


I stamped the Woodgrain stamp onto three different card stock colors with their coordinating inks: Dusty Durango, Soft Suede, Crushed Curry. I covered the whole sheet for each color. Then I punched them out with various sized circle punches. Then I stamped the deer and the owl on some whisper white card stock with Soft Suede ink and punched the images out. Next I stamped my sentiment (from Pocket Silhouettes) with Crushed Curry ink on Whisper White card stock, and punched it out with the small oval punch, layered over top of crushed curry punched with the large oval punch. Then I assembled all of my circles in a random style, and voila.......all done! I hope you like it!

Until next time.............................Blessings, Lisa

Wednesday, August 19, 2009

A Scrapbook Page Layout?

Yes, you read that correctly, I am sharing a scrapbook page that I threw together the other day! This is the first time that I have ever posted a scrapbook page on my blog, so I want to know what you think! Should I post more scrapbook pages from time to time, or are you more interested in the cards and stuff? You will not hurt my feelings either way. Truth be told, I make way more cards than I do scrapbook pages these days. The reason for this is that 90% of my Stampin Up customers are card makers only. So, I spend more time card making to give them ideas and inspiration. I realize however, that not all of my blog visitors are my customers, so I need their opinion on this too. So, if you have a couple of minutes, leave me a comment. All comments are greatly appreciated every time.


OK, now onto the scrapbook page. I hold my breath as I upload this, because I want you to like it. Here it is:


I first placed three and a half Lattice Bigz die cut shapes (Stampin Up - Whisper White card stock) along the edge of the page. The page base is Stampin Up 12X12 Night of Navy card stock. Next, I laid out the Little Leaves Die-cut shapes (Stampin Up Garden Green card stock), then I placed the flowers with each of the leaves. The sunflowers were made up a while back, and I posted a card using them. You can click here to see that post and instructions on how the sunflowers were made. I left the rest of the page blank, because I don't know yet what pictures and title that I will put on it.

Until next time.................................Blessings, Lisa

Friday, August 14, 2009

Stampin Up Lattice Die & Stamp Convention Tutorial

I am combining several different things here today! First I wanted to show you something using my new SU/Sizzix Lattice BigShot die, an idea for card stock scraps, and also a technique that I saw at the stamp convention that I went to last weekend. I was looking around at a booth at the convention and the lady at the booth began a demonstration on how to add some dimension to flowers that we punch from card stock. She had stamps and punches and instructions put into kits that she was selling. But instead of buying them, I just watched her demonstration thinking that I could do it at home with what tools that I already owned. So, I decided to just dig right in and make a card using her technique. Here is what I came up with:
I first cut out a lattice die with my Cuttlebug and the new Lattice die-cut that Stampin Up introduced in their new catalog. Then I adhered it to my Kraft card stock base. I added my sentiment (from SU - Trendy Trees stamp set), and punched with the Stampin Up Word Window Punch. Then I went to work on the flowers. You will see in the photo below that I punched a bunch of Small flowers with my SU Trio Flower punch out of card stock scraps. This is me preaching that "save your scraps" thing again.
This is the pile of flowers that I ended up with after I punched all that I could with my small scraps of card stock. Aren't they pretty? I then store them in a plastic container until I need them. If you really want to get obsessive, Stampin Up sells an organizer and round /flat containers to store stuff in, you can store them by color group or however you like. There is a link to their catalog on my sidebar, the storage stuff is towards the back of the catalog.
Now, if you look closely at the finished card above you will see that the flowers have a 3-dimensional look instead of being flat like they are when you first punch them. The photo below shows how I achieved the dimensional look. I simply took my embossing stylus, and each flower and rubbed them on a soft surface (I used the sponge side of Bigz Daisies #2 die here) in a circular motion, until they have a sort of cup like look to them. I then adhered them to the card with a small drop of Stampin Up Crystal Effects. The final touch was to punch some 1/8" circles and add them to the flower centers with a very small dab of CE again. Crystal effects dries clear, so don't worry if you get a little too much on the center. Oh, and yes, I definitely used a pair of tweezers to work with these little pieces. Here is a list of card stock colors that I used for the flowers and their centers: Almost Amethyst, Lavender Lace, Lovely Lilac, Pretty in Pink, Regal Rose, Crushed Curry.

I hope that I explained it so that it is easy to understand, but if you have any questions, feel free to ask me. Leave a comment, or go directly to my email (link on sidebar).

Until next time.......................................Blessings, Lisa

Tuesday, July 21, 2009

Summer Colors on Simple Cards

Hello. Sorry for my absence. Drop me an email and tell me how I can make it up to you. Please make sure it doesn't involve money, I am unemployed.


Anyways, here I am. I have been crafting, dealing with my very spoiled for attention kitty, nagging my 10 year old daughter to get into the shower (thank heavens I only have one). Finally, I got back to the computer to post something. Phew!


After browsing the Splitcoast Stampers Website, that I would play around with this weeks Clean And Simple Challenge, as I have before. I love those challenges, I love simple cards, I love quick cards. Heck, I love alot of things. Jennifer McGuire posts alot of Simple cards on her blog's card gallery, so does Jana Millen, and so does Lydia Fiedler of Understand Blue, all three of which are on my favorites blog list over on my side bar, or I added links to their names. Check them out. Not that we don't all enjoy a complicated design, or technique once in awhile, but clean and simple are fun. So, without further adieu, I have THREE, yes THREE cards to show you tonight!


The challenge was to use three colors...........Yellow, Orange, Turquoise, in a clean and simple pattern. Well, could I have gotten any simpler than the one above? Maybe, but who cares. I ran my Whisper white card stock through my cuttlebug with my Swiss Dots embossing folder, stamped a quick sentiment (from Pocket Silhouettes), and punched 3 flowers with my Stampin Up Trio Flower Punch out of Yoyo Yellow, Only Orange, and Tempting Turquoise. This will be one of the very few times that you see me use Only Orange, not my favorite. However, I did use it in the bottom two cards as well. Like I said, I was just playing along with the challenge. I think that anyone of these three would be great done as monochromatic cards!

This card was made with Stampin Up's 5-Petal Flower punch, Trio Flower Punch, and some Hero Arts Sticky Gems.


This final card was made with Stampin Up's Full Heart Punch, some DCWV buttons, and some tone on tone stamping with a stamp from Pocket Silhouettes stamp set from Stampin Up.


Until next time, blessings to all. Lisa


Sunday, July 5, 2009

Mini Sunflowers - Punched

I just couldn't stand it, I had to use this simple sketch again. I imagine I will use it alot, but I promise I won't post about it after this card. It is just that it was so perfect for these mini punched sunflowers that I was playing around with. I used my Stampin Up Boho Blossom Punch for the flower, and the 1/2" circle punch for the centers. Anyways, here it is:


Now I know that I am probably not the first person to think of these mini sunflowers, but who cares....aren't they cute? They would look cute on several different card layouts, or on a small scrapbook page. The sunflower is made with Stampin Up's new Crushed Curry, and the centers are Chocolate Chip card stock with my white gel pen making the small dots. The one inch square that the flowers are on, is Garden Green card stock, and the sentiment is in Chocolate Chip ink with the Retired stamp set called "Warmest Regards". The card base is Stampin Up's Very Vanilla. I did forget to mention that I decided to alter the card sketch a little, by leaving the size at the typical A2 size so that a sentiment could be placed at the bottom. Until next time...............

Blessings, Lisa

Tuesday, June 30, 2009

Corner Bookmark

Hello. I was thinking about what to post today, when I thought about those cute little corner bookmarks, that you simply slide over the corner of whatever page you are stopping at. I also wanted to use the new Stampin Up set called "Circle Circus" again, to show you another one of the cute stamps in that set. So, here is what I came up with:


That image is one stamp, stamped 3 times with different colors, then punched out and layered.


Here is a photo of how I got started:

First I cut a piece of Stampin Up Crushed Curry card stock 4inches square. Then I scored it in both directions in the center (2 inches). Next, as you can see in the photo I cut out one of the two inch corner pieces and folded on the score marks. Next fold in one of the pieces, and apply snail adhesive along at least two of the edges. Then fold in the other piece to adhere, and you will end up with your bookmark shape. So, we just need to decorate it. This brings me to my next photo below:

As I said at the beginning of this post, I stamped the image 3 times with 3 different colors. Here I used Soft Suede, Melon Mambo, and Rich Razzleberry. Now, first punch the Soft Suede image with Stampin Up's Scallop Circle Punch. Second, punch the Melon Mambo with a 1-1/4" Plain Circle Punch. Third, punch the Rich Razzleberry with a 1/2" Plain Circle Punch. Each time you punch, make sure you are as close to being centered over the image as possible. Turn the punch upside down when you punch, so that yo can see what you are doing. The last step is to layer your punched circles on each other with some adhesive and then to the front of the book mark to get the finished look you saw in the first photo. Now, since this is going to be squished inside a book, I did not use any dimensionals to pop up the layers, but that would be super cute to do on a card. That is about it for today. If you have any questions, let me know. Blessings, Lisa

Tuesday, June 9, 2009

Flower Punches and Faux Stitching

I was inspired today by a card that I found while I was browsing blogs. The blog and card is by a lady named Sheri Thompson, the card that inspired me can be found here. Browse her blog, maybe she will inspire you too. Here is my take on her idea:


Now, Sheri did some real stitching on her card; however, I cannot sew on fabric let alone on card stock. So, on my card I used the "Faux Stitching" technique with my white gel pen. First thing I did was to punch the shapes out from my card-stock. Oh, save those shapes to use at another time, don't waste them. Then, I chose some DSP to put behind the openings left by the punches. Sheri used several different papers behind hers, I just used one style. It is a great way to use up small pieces of patterned paper that you have left over from previous cards or projects. SAVE THOSE SCRAPS! I just keep mine in one of those disposable leftover containers from Reynolds, they stack up nicely. After adhering the patterned paper behind the openings, I applied the faux stitching. I left the inside alone because I only used one strip of Patterned paper, but if you use multiple patterns, you could cover them on the inside with blank card stock, or patterned paper. The ribbon that I used is from American Crafts, and my card base is Stampin Up's Lavender Lace. Just in case you are curious, the patterned paper is Stampin Up's Retired DSP So Saffron. So, go look through your punches, and your paper scraps, and make some quick cards. Until next time.......Take care. Lisa

Friday, May 15, 2009

Scallop Circle Punch Sunflowers

Even if you don't like or love sunflowers, you will think that these punchy sunflowers are cute! I saw them on a card over at Splitcoast Stampers, cased her idea for the flowers, then designed my own card with them. The card that inspired mine can be seen here. I also made up an easy to follow photo tutorial for cutting the flowers. So, here is the card in it's finished state:


The first photo below, is of the Stampin Up Scallop Circle Punch, already punched and I used a straight edge to draw the cut lines on it with a pencil. Just line up your straight edge with the indents on both sides of the scallop circle until you have worked you way all the way around it. I also punched out a 1/2" circle with my SU punch and used it as a guide to draw that circle as close as possible to the center. This serves as a guide so that we don't cut too far into the scallop circle and ruin our flower. So, cut on all of the lines from the outside of the scallop to the circle that we drew.


After that is done, turn it over and it will look like this next photo below.

In the next step, we punch another circle that is no larger than 1", and draw little white dots on it with a Stampin Up White Gel Pen. Then, your sunflower should look something like the next photo below.

At that point, I also cut some leaves with my Stampin Up/Sizzix "Little Leaves" Sizzlet die cut. Then, I cut a card base out of SU Certainly Celery card stock, ran a piece of SU Chocolate Chip CS through my Cuttlebug with my Swiss Dots embossing folder (please Stampin Up bring us more embossing folders to the catalog - I love them!). Then, I laid out my flowers and leaves until I liked what I saw, and adhered everything. I cut a couple of the leaves off the branches, and slid them under the flowers. Then I tied a ribbon into a bow and arranged it around and under the flowers until I was happy with it. The layer with the flowers on it is popped up with some foam dimensionals. These cute little sunflowers could also be used on a scrapbook page of any size if you are a scrapbooker. Should I feel up to the task, I will put one together and post it another day. That about sums it up. I will post a supply list below. As always, if you have any questions, leave a comment, or click on the contact me at my sidebar to get my email.

Supplies Used: Card stock ~ Stampin Up Certainly Celery, Old Olive, Chocolate Chip, Summer Sun, Naturals Ivory. Ink ~ SU Classic Chocolate Chip (for sponging around the Naturals Ivory card stock). Accessories~Stampin Up Scallop Circle, 1" Circle, 1/2" Circle Punches, SU Little Leaves die-cut, SU White Gel Pen, Ribbon from Retired SU Seaside Ribbon Originals.

Blessings, Lisa

Monday, March 23, 2009

Bunnies, Bunnies, Bunnies

Hello. Well, You know how I love the Martha Stewart bunny punches! No, I still haven't found the bunny border punch! Urgh! But, I remembered that I had this cute little sitting bunny punch from MS, so I decided to play with it. Here is what I came up with:


Oooo, sorry for the photo quality. I have got to get my handmade card photo studio put together. Please forgive me!

Anyhoo........ I punched out the bunnies from DCWV textured/pearl card stock and put them on Stampin Up Whisper White card stock circles that I punched. Then I adhered those to some squares that I cut out of the Stampin Up Sale-a-bration 2009 Designer Paper. Next I placed the squares onto a SU Bashful Blue card stock base. The sentiment is from the retired SU "Bunny Hugs" stamp set and is stamped in Basic Black Classic ink. The gemstones are from Hero Arts, and that sums it all up. Pretty darn simple Easter card. Have a great evening, I gotta run and get my brownies out of the oven.

Blessings, Lisa

Sunday, February 8, 2009

Talk to me, and a simple card

Hello! Is anyone there? I know you are, my little counter thingy keeps increasing. Is there any reason why none of you leave comments and talk to me? Just curious, because I am getting lonely out here in bloggers world all by myself. Criticize my creations (positive or negative), ask me a question, just say hello.................anything will do! Phew, I feel better to get that one off my chest.

Now, on with a card! My stepsister is having a birthday on the 16th of this month, so I went ahead and made a quick card to send to her. She lives a couple hours away from me, so I can't help her celebrate in person. Darn those winter birthdays. Anyways, since her birthday is in February, I decided to make her card with a heart theme. Of course I was also still in my chipboard mood. I promise I will set that mood aside after this card. I am so tired of Valentines now too. I shall post a wee St. Patty's card next time, it is already started. My hubby is 75% Irish, and I am a whole 1/8th Irish (approx.) so St. Patty's day is always remembered in our house. Anyways, here is the birthday card:

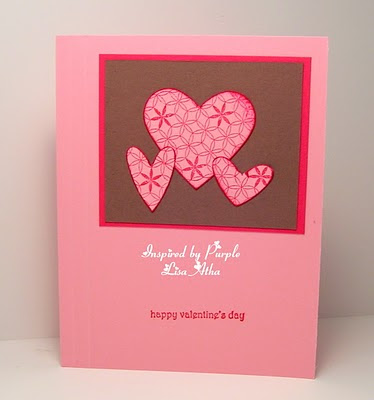
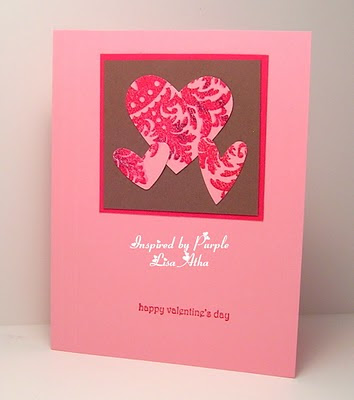
I started with a Stampin Up Whisper White card stock base, rounded the corners with my SU corner rounder. Then I ran the card through my Cuttlebug with my dotted square embossing folder. Then I took my 1-3/8" square paper punch and punched out a window. Then I colored the embossed dot frame with my Stampin Up Pink Passion Marker. Next I punched the same size square out of SU Pink Passion card stock. The SU chipboard heart is heat embossed with retired SU pink embossing powder, and the pink sticky gem, is from Hero Arts.

The ribbon slide was made with SU Pretty in Pink card stock and the Stampin Up Key Tag punch, and the small slot punch. The sentiment is from retired Birthday Whimsey stamp set, with SU Pink Passion Classic Ink. I sponged a little Pink Passion around the edges as well. Finally, the ribbon is from the Michael's dollar bin, and is adhered with just a little bit of snail adhesive at each end, as it cannot be seen through this particular ribbon, and it holds very well. I did want to mention that the ribbon slide could also be made with Stampin Up's Designer Label Punch, which you can see in the photo below. Oh, I almost forgot...the chipboard was adhered with SU Crystal Effects. Enjoy the rest of your Sunday, and I hope you enjoyed the card!

Lisa

Sunday, February 1, 2009

Yeah, I'm digital again!


Yeah! I finally got to the store to get a new memory card for my digital camera, so I took a picture of my latest card creation and here it is:


This was inspired by a card that I saw on Splitcoast Stampers website, however, I can't remember who it was and I changed the layout about 50%.

Anyways, I used the spiral punch from Stampin Up to punch the border on both sides of the black card stock strip. The hearts were punched with an unknown paper punch that I have had in my stash for around 6-7 years. How weird there is no manufacturer listed on it. Then after punching each heart I did some tone-on-tone sponging on one edge of each heart with Stampin Up Classic inks then I adhered them. The happy Valentine's day stamp is a Hero Arts stamp, stamped in SU Real Red Classic Ink. That is all there is to it. Complete supply list to follow. I hope you like it.

Supplies Used:
Card stock ~ Stampin Up Basic Black, Whisper White, Yoyo Yellow, Only Orange, Unknown Red, Pink Passion, Lovely Lilac, Brilliant Blue.
Ink ~ Stampin Up Real Red, Yoyo Yellow, Only Orange, Pink Passion, Lovely Lilac, Brilliant Blue.
Accessories ~ Stampin Up Spiral Punch.