Wednesday, September 30, 2009

Ornament Suspension Card

Sorry for my absence, I have been a tad bit under the weather for the past few days. Some extra sleep has been helping tremendously though.


I decided to post a technique that I have never posted before and that is a suspension card or rather in my case a double suspension card. Here it is:
I stamped one of the ornament stamps from the Delightful Decorations stamp set from the Stampin Up Holiday Mini Catalog. I stamped it two times with Rose Red ink, then punched it out with the coordinating ornament paper punch. Then, I punched a circle out of the center of both ornaments at the same time so that the circles line up afterwards. This was easier because I applied a very small amount of removable adhesive to the ornaments and placed them back to back before trying to punch the circles out of them. Next, I stamped one of the smaller stamps of the same set with Certainly Celery ink two times, and I hand cut those out because I couldn't find the correct size circle punch (I have got to organize my punch collection). Next, I applied some permanent adhesive (terrifically tacky tape works best) to all of the backs of the pieces that I wanted to suspend on the string. I used some retired gold cord from Stampin Up for mine, the Tutorial over on the Splitcoast Stampers Website, suggests dental floss. Click here for a link to their tutorial. Next, I laid my gold cord to the back center of one of each of my items to be suspended, then carefully lined up the other pieces on top of those. Then I laid this across the front card base which I had already punched a larger circle into. The final step was to place a piece of designer paper; I used some Retired SU Certainly Celery patterned paper here. As a final touch, I took one of the circles that I had punched out of the ornament center, cut it into fourths, and applied each one to each of the four corners on the front of the card for en extra embellishment. I added an enlarged photo of the card below to show you the suspended items better.


Well, I hope you liked it, and go check out the tutorial on Splitcoast, they added more photos that I did. Until next time................Blessings, Lisa

Saturday, September 26, 2009

Poinsettia from McMahon Five

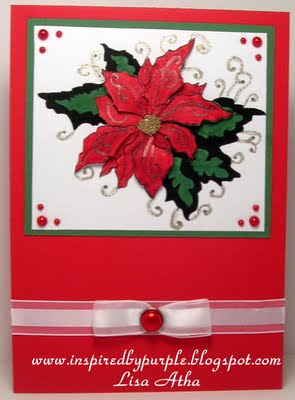
I was going for that "OOOoooo" kind of reaction while I was putting this card together. So, if I didn't achieve it, please don't tell me. Haha. This is a digital image from McMahon Five Designs designed by Sue McMahon herself. I have a link to her store on my side bar. Sue has not only great Digi images (some are free), but she also sells other products at her store as well. Right now, she has some Pearl embellishments that are absolutely gorgeous, and offers them lower than some of the chain stores such as Archiver's. Ok on with what I did on the card.
First I colored two of the same image with my Stampin Up markers, Garden Green and Real Red are used here. Then I colored the swirls with Stampin Up's new Shimmer paint. My next step was to cut one of the images flower petals, but left them attached to the center of the flower. Next I got out my different sizes and thicknesses of foam dimensionals and applied them under the petals, to create a dimensional look. This can be seen better in the close-up photo below. Oh, but I couldn't stop there, no, no, no.......I decided to add some Gold Micro beads to the flower center with some liquid glue. I shall warn you that these things are awesome, but messy. The final touches were the faux red pearls in each corner, and the white satin bow with red pearl brad (Recollections from Michael's). Just a wee bit more embellished than the cards on my previous post, don't ya think?


Oh, a tip on the digi images if you have never used them, but want to try them. I have found that printing them out on Georgia Pacific card stock from Wal mart is best for coloring purposes so that your computer ink doesn't smear. Tip No.2 is that I first copy/paste them into Microsoft Word, click on the image, then I can adjust the size to whatever I want before printing. If you have any questions, please leave me a comment that I can reply to.
Until Next time.......................Blessings, Lisa

Thursday, September 24, 2009

Ornament Punch Ideas

Hello. Well, I promised you some more ideas for the ornament punch that is in the new Stampin Up Holiday Mini Catalog. Here they are:


On this first one I stamped one of the snowflakes from the Stampin Up Holiday Mini Catty called "Serene Snowflakes", then while holding my ornament punch upside down, centered the snowflake and punched it out. The snowflake by the way, was stamped with the new Platinum shimmer paint that is also in the holiday mini. I found it easiest to paint the stamp with the shimmer paint with a paint brush, then stamp. Boy does that stuff shimmer! I highly recommend it. The scallop is also from Stampin Up/Sizzix Bigz die-cut called "Large Scallop Circle". The tree branch is from the stamp set "Bird on a Branch", and the sentiment is from the stamp set "Teeny Tiny Wishes". The ornament is popped up just a little bit with an SU Stampin Dimensional. The card stock used was Stampin Up Whisper White and Night of Navy.

The next card was super fun, and super easy. I punched out 3 ornament punches from Night of Navy card stock. Then, with a paint brush, I brushed some Champagne Mist (Gold) Shimmer paint on them completely covering them. I set them aside for a few minutes to let them dry. While that was going on, I ran my SU/Sizzix Sizzlet from the Holiday Mini Catty called "Merry Details" through my cuttlebug with some Whisper White card stock. Next, I simply attached them to the ornaments and assembled them onto a card base. The lines for the ornaments to hang from were obviously hand drawn with my black marker. Clean & Simple, and finished in about 10 minutes, if that! Don't ever be afraid to hand draw on your cards, it adds a special uniqueness to them. Oh, notice the shimmer from the paint on the ornaments. It looks really cool in person on that dark card stock. It looks equally nice on Handsome Hunter, and Bravo Burgundy, which are the only other two colors that I have tried this with so far.
Well, that is it for today. Until next time............. Blessings, Lisa

Tuesday, September 22, 2009

Christmas Ornaments

Hello. I struggled with ideas today with the stamp set that I wanted to use. Remember the ornament punch from Stampin Up that I used as a vase on a previous post? Well, Stampin Up sells a coordinating stamp set to go with that punch called "Delightful Decorations". It is featured in their current Holiday Mini catalog. I used two of the stamps in it for today's card. As I said, I was struggling for an idea for the card layout, so I borrowed one from my friend Lydia Fiedler over at UnderstandBlue. Click HERE to see her card. So, here is my card:


I decided to step out of my comfort zone and use a couple of non-traditional Christmas colors, and I was glad that I did. The lighter colored ornament is Stampin Up's Regal Rose, the other ornament is Rose Red. The sentiment is stamped with Rose Red ink on Whisper White card stock and punched out with a Stampin Up Word Window Punch, and layered on a piece of Rose Red card stock punched out with Stampin Up's Modern Label Punch. Ah, my second favorite thing after "bling" is my paper punches. I managed to work 3 of them into this card; which is not my personal best, but not too bad either. The string for the ornaments is the retired silver cord from SU; however the current elastic cord that is featured in the Holiday Mini Catty would work just as well. The middle panel is SU Garden Green card stock and is popped up just a little bit with some thin foam dimensionals from SU.

I have a couple of other cards in the works using the Ornament punch with other non-coordinating stamp sets (gotta show you again how to get the most out of your products), and a couple of requests that I am working on...so keep checking back for new projects.

I have to thank Donna, over at Butternut Sage Designs blog for referring her readers over to my blog after she found my Ornament Punch Vase card post from last week. Go check out her blog, she makes some awesome cards! Donna, my readers have doubled since you did that! YES!!!! Even if you don't leave a comment, each visit that I see on my counter inspires me to keep crafting and blogging. However, I won't deny the fact that I absolutely love getting comments, they make me smile!!!!!!!

Until next time...............Blessings, Lisa

Monday, September 21, 2009

Christmas cards Stampin Up style

I have two cards to share with you tonight. When I first saw the new Stampin Up catalog this past summer, I completely fell in love with the stamp set called "Gifts of Christmas". Despite the fact that I have at least a half a dozen Christmas stamp sets, I just had to buy it. I am sure you all know how that is, right? Then, I received my Holiday mini catalog, and was hooked once again on almost everything in it. So, I placed my order and one of the things I ordered was the new Sizzix Textured Impressions Embossing folder, called "Petals a Plenty". Oh and lets not forget the new shimmer paint. If you have been following my blog for awhile, you know that I simply adore anything that shines, shimmers, or sparkles. Love my bling! So, this card idea popped into my head and it has alot of shimmer on it. Shimmer paint, shimmer card stock, shiny embossing powder. Yep, gotta have some shimmer! Ok, I will quit blabbing and show you my stuff; so to speak.


The card base is Stampin Up's Handsome Hunter, the embossed panel is Real Red card stock, and is accented with the Platinum Shimmer Paint in the SU Holiday Mini catty. Basically, as you can see it is Silver Shimmer paint. It is hard to see, but the image is stamped on SU Shimmer White card stock, heat embossed with Silver embossing powder. I heat embossed the image a second time, and cut out the dove, so that I could pop it up with some dimensionals. It s hard to see in the photo, but I used different a thickness of dimensionals at different places on the dove, to give it a little different look. There are two ways to achieve this, either buy your dimensionals in two different thicknesses, or simply layer your stampin Dimensionals on top of each other. Layer two together where you want your image to be higher, and only one where you want it to be lower. I have an enlarged photo below to show this better. See how the center of the wings are higher than the tips of the wings. Trust me when I tell you that it looks way better in person.


The image is also matted on some Stampin Up Silver Shimmer card stock. The next card involves the smaller image of the same stamp set. I had cut my embossed Red piece into two different sections, so I put my thinking cap back on and decided on the card layout below to use the other red piece. It is basically the same layout, but inverted in the vertical direction. All of the supplies are the same except a couple of embellishments and cutting tools. I used my regular and scalloped Spellbinder's Rectangular Nestibilities to cut out my stamped image, which is popped up with some dimensionals. I added some Silver Faux pearls to each corner, and a white bow down at the bottom to balance out the card layout.

I hope you like what you see.

While I still have your attention, I have got to tell you about something that I ate at a wedding reception over the weekend. We were served a plate with a piece of roasted chicken stuffed with something, white rice cooked in chicken broth, and buttered cooked asparagus. Keep in mind that I am a plain ordinary food kind of person. This was my first time trying asparagus, and I am happy to report that I liked it. Now, this chicken stuffing stuff was pretty darn tasty, so I asked our server what ingredients were in it. She said she would ask the chef. After a few minutes, she came back and told me about some ingredients that I would have never guessed and certainly would not have purchased at the grocery store. They were: Spinach, Sweet Red Peppers, and the biggest surprise.....Goats Cheese! First, I hate spinach and sweet red peppers, and just the thought of trying Goats Cheese would have made me hurl had I known this before I ate it. So, now all I can do is laugh, because dog-gone it, that stuff was absolutely positively fabulous!!!!!! Broaden your horizons this week and try something out of the ordinary to eat, ya never know what you might like!

Keep Stamping...................Blessings, Lisa

Wednesday, September 16, 2009

Halloween Cards

Hello. I have a couple of Halloween cards to share with you today! I decided that I would stick to only 3 colors.........Whisper White, Basic Black, and Going Gray from Stampin Up for those of you who are new to my blog.


The first card features the Bat stamp from Stampin Up's "Halloween Frights" stamp set, the second features a Hero Arts Ghost stamp. So, here is the first card:


You will have to excuse my photography on this one, as I was in a huge hurry tonight. The bat border punch is by EK Success, I got it on a clearance shelf at Michael's for quite a bargain. The sentiment is from Stampin Up's Teeny Tiny Wishes Stamp set. That is a great stamp set, there is a short and sweet sentiment for every occasion you need to make a card for. It is a definite "must have". I used a 1-1/4" regular square punch to punch out my stamped bats, and they are mounted on scalloped squares made with the SU scallop square punch. The little gray bats in the squares were leftovers from punching the border, and the rest of the little gray batty leftovers, are on the inside of the card as you can see on the photo below. I hate to waste anything, if I can avoid it.


Now the next card I used the same color scheme, but different tools, stamps and design. The large ghost in the upper right hand corner is a small Hero arts stamp that I found in the "Hot Spot" at Archiver's, is he cute or what? He is punched with a 1-1/4" square punch and mounted on the SU scallop square punch. The sentiment is punched out with the Stampin Up Word Window punch, and mounted on the Stampin Up Modern Label punch. The very cute graveyard border at the bottom is a Martha Stewart border punch, and the also adorable flying ghosts above the border are some tiny little die-cuts that I can't remember the name of. They work in my Cuttlebug or the Big Shot, that is all that I care about. I hope you enjoy them.


Until next time...........................Blessings, Lisa


Friday, September 11, 2009

9-11-01 Never Forget!

9-11-01 Never forget!!!!
God Bless the USA
and those who lost their lives or loved ones in this terrible tragedy!


Thursday, September 10, 2009

Charming Card

is what I have to show you today, because I used the new Stampin Up stamp set called "Charming" from the Holiday Mini catalog. I have been waiting for an idea to pop in my head using this stamp set, because it is so gorgeous. Last night I was browsing some blogs, and saw that someone (sorry I forget who) used the new Ornament punch to make a chubby flower vase. Sounds odd at first until you see it. So, here is my version of the chubby ornament punch vase thingy. instructions and photo to show you how will follow. First check out the finished card.
There is a tone-on-tone decoration (in Night of Navy) stamped on the vase that is hard to see in a photo, so the next photo shows it blown up and lightened so that it can be seen.
I love this set so much that i just had to take a photo of it to show you as well. Of course you can order one of these and many other things if you want. Info is on my sidebar.
Now, to show you how to make the chubby vase with the ornament punch. By the way, there is a stamp set that coordinates with the ornament punch in the holiday mini catalog. I will post a card or two using that stamp set soon. As you can see in the photo, you can simply line up the ornament punch at the edge of a piece of card stock or DSP, leaving out the point of the ornament, so that when you punch, you automatically get a straight edge for the vase bottom. Easy Peasy! If you have any questions, just leave a comment or contact me.


The flower stamp was colored with Stampin Up markers (Garden Green, Ballet Blue), stamped, then I added some Night of Navy highlights to the tips of the flowers and to the body of the butterfly. The sentiment is from Teeny Tiny Phrases stamp set by Stampin Up also. The card base is SU Very Vanilla, and that sums it up. Until next time......Blessings, Lisa


Wednesday, September 9, 2009

Fall card

Hello. I have a Fall card to share with you today. If you have been following my blog for awhile, you will know that one of my favorite techniques is heat embossing a dry embossed image. This card is using that very technique:

I used a brass template that I bought years ago when I was first experimenting with dry embossing. So I apologize, but I don't know where I found this cute little pumpkin gem. So, I dry embossed the image onto some Stampin Up Whisper White Card Stock, colored the image with my Stampin Up Markers, then colored the raised image again with my Versamarker, and heat embossed with some clear embossing powder. I mounted it onto some Pumpkin Pie SU card stock. The other piece of card stock is simply a piece of Whisper White card stock sponged with Pumpkin Pie ink. I didn't have any DSP that I liked, so I created my own. I placed the whole thing onto Garden Green card base, and added a small sentiment and some DCWV buttons for embellishment. I hope you like it. Until next time..............Blessings, Lisa

Tuesday, September 1, 2009

Clean and Simple Birds

Today I have a couple of Clean and Simple cards to share that I made with the Stampin Up Level One Hostess set called "Of the Earth". I chose to use the bird stamp from that set today.

The first card as you can see is purple. Imagine that! Purple on my blog, what else? Anyways, the card base is Stampin Up's Almost Amethyst, the image is stamped on Whisper White with Elegant Eggplant ink; and it is layered on Elegant Eggplant card stock. The image was cut out with my 1-1/4" square punch, and the mat was cut with my 1-3/8" square punch. The embossed square around the bird was made by running one of my Spellbinder's square nestibilities through my cuttlebug with a tan embossing mat, instead of cutting plates only. This was my first try with this, but not my last, I love the result.


This one was actually even easier than the first, as I simply stamped the image 3 times with each color,and punched then out with the 1-1/4" square punch and their mats with my Stampin Up Scallop Square punch. The colors used for this card are Stampin Up Bermuda Bay, Crushed Curry, and Whisper White for the card base. I hope you liked them.
Until next time.............................. Blessings, Lisa