Thursday, February 25, 2010

Soft Pencil Thursday

There were 3 different digi images this week that we DT members had the opportunity to work with. We each received one image, some received the Pirate, some received the Japanese Girl, and some the Mermaid. All of these images are sooooo cute, so be sure to check out all of the Design Team blogs so that you can see samples of each. Their blog links are over on my sidebar. I was so excited to find out that I got to work with my favorite of the three........The Mermaid! Here is my card:


Didn't you just squeal when you saw her? I know I did, she is completely adorable! So, I went to work coloring her with my Stampin Up Watercolor Wonder Crayons and Blender Pens, which are my favorite thing to color with. We were asked to use our favorite coloring medium.

Next I cut out two SU/Sizzix Large Scalloped circles, one from Whisper White card stock, and one form Taken with Teal. Next I ran the Teal circle through the cuttlebug with my swirls embossing folder. Then, may favorite embellishment which are sticky gems in each of the swirl centers. The Pearls around the mermaids neck were colored in with some smooch shimmer paint, but I could not capture that on my camera today. The background designer paper was given to me by a friend with a bunch of other paper, and did not have a company name on the back, so I don't know where it is from. The final touch was some Prima flowers with sparkly gem centers. So, head on over to the other DT blogs and on to the company blog as well and see all of the wonderful eye candy we have to show you this week. Again, all of that can be found over on the sidebar of my blog.

Until next time.......... Blessings, Lisa

Tuesday, February 23, 2010

Some Cute Animal Cards!

Hello. I found some absolutely adorable digi images from a brand new digi image online company over on Paper Craft Planet. The company is called Wink, Wink, Ink. I couldn't resist downloading her freebie cat image, and buying several others. I made some cards with them, and here is what I came up with:
This first card was made with their Freebie Kitty, which you can find on their blog. There is a link to their blog on my sidebar, which I will add as soon as I finish this post. My card base is Stampin Up's Very Vanilla, the DSP is from the Patterns Pack III hostess reward, I used Stampin Up ink refills and blender pens to watercolor the images, and Nestibilities to cut and mount the images. The flowers are Prima, and there centers are sticky gems from Michael's.
I so fell in love with this little Dachshund digi, as I have a doxie myself named Brandy. Brandy has a smooth Brindle coat of black, red and tan, so I tried to make the image look like my Brandy. Brandy is having a bad day with her arthritis today. We had her on meds for it, but they were giving her kidneys trouble, so we took her off of it. She has her good days, and her bad days, so say a little prayer for her if you have time.

This last features a digi called "Chihuahua in a teacup". Is it too cute or what? Love it! Lookat that little face, it is so cute! Anyways, I used an Ek Success border punch on the Pretty in Pink Rectangle, very tricky at the corners, but I didn't do too bad. No, it doesn't come with a coordinating corner punch, I had to be very careful and steady to get them to look that even. Big pat on my back for that one, I think! The ribbon and the cute little ribbon slide is from Stampin Up, and the sticky gems are from Michael's.

If you have any questions, leave me a comment that I can reply to.
Until next time.................................Blessings, Lisa


Sunday, February 21, 2010

Soft Pencil Sunday? Altered Frame

Oh my goodness, I just could not stop at one project for that "Anything but a card" challenge we DT members had this past week. Hop on over to Paper Craft Planet and join the challenge too, and win some digis. See the link on my sidebar, and join the Soft Pencil group when you get there to enter. It costs absolutely nothing and is so much fun.

Anyways, I had some of those wooden photo frames on hand from Michael's craft store, and I thought, alter one with these adorably cute "Bichitos" for a photo of my also very adorable great niece, London Page, even her name is cute. So, here she is in her altered buggy frame:


The designer paper base is from a retired Stampin Up paper pack. After I cut the paper to fit the frame, I adhered it to the wood frame with Mod Podge. I used two layers, one under the paper, and one on top of the paper to seal it. I colored the cute Bugs with my Stampin Up markers and cut them out before adhering them to the frame. The words at the top were typed on Michrosoft Word software, printed, and cut out with some small scissors. It is so much more easier than it looks.
Now, look at that cute little face and just try not to tell me that you wouldn't like to give her a hug! I know I do! Yes, I am very much the proud aunt. She will be a huge 2 years old in June, and doesn't live within driving distance of me, so I miss her very much. Love you my little sweetie!
I have some more cards made to show you too this coming week, so come back and visit me.
Until next time..................... Blessings, Lisa

Thursday, February 18, 2010

Soft Pencil Sun catcher!

Hello. We design team members were given the digi set called "Bichitos" to work with this week, and were asked to make anything but a card. First of all, Bichitos is Spanish for "little bugs", and they are the cutest little bugs I have ever seen. I just love this set of digis. I think that they are so versatile for different projects. I have one project with them to show you today, and one that is in the works that I will be posting tomorrow (Friday). Here is what the set looks like:


For today's project, I used the butterflies and made my own handmade sun catcher for my craft room window. So, here is a photo of the final project, and then I will explain how I made it.


  1. The first thing that I did, was to make 6 copies of the digi set on my computer.
  2. Next I placed each bug in it's own file, this way, I could copy paste them into Microsoft Word in any arrangement that I wanted before printing. I clustered the three butterflies together as you can see in the project.
  3. Then, I printed it out and took it to my nearest office supply store and had them copy it onto a piece of Transparency/Acetate. I wasn't sure how well it would print on acetate with my inkjet printer.
  4. Then, I cut two card stock circle frames; ovals would have been nice too. It really depends on the shape of the image(s) you are working with. Also, the thickness of your frame is entirely up to the individual. Oh, as an extra tip, this can also be done with rubber stamps but you would need to use black Staz-on ink on the acetate.
  5. The next thing that I did was to cut the bugs out in a circle shape at the same size as the outside edge of your frame.
  6. Now we are set to add color. I turned the image over and colored on the back with some permanent markers.
  7. The next thing that I did was to heat emboss the frame. The easiest way to do this so that it looks uniform, is to lay your frame down on a piece of scrap paper, dab your versamark embossing pad directly onto the frame, until you have one side of both pieces covered, then sprinkle on the embossing powder and heat set. I used gold embossing powder here, but I think silver or even black would look great. I have seen some where embossing powder with glitter in it looked really nice.
  8. The next to the last step is to assemble the project. I used Snail Adhesive, but Extra Tacky double sided tape would work too (Stampin Up sells both). I applied the adhesive to the non-embossed side of the frame, then lined up my acetate with it and pressed down all around the circle. Then, I did the same thing to the other frame and placed it on top of the acetate and pressed down all around the circle.
  9. The last step was to punch a hole in the frame, I used my crop-a-dile tool, added an eyelet, and put a loop with some misc. skinny organdy ribbon through it so that it could be hung on a hook.

Do not be intimidated, this is not hard to do at all, I promise! Now, if you notice there are 3 other bugs in the "Bichitos" set, and I am altering a wood photo frame to show you another day with the bugs from the same digi set. So, I hope you will come back and visit me to see that. In the meantime, look over on my sidebar at the Soft Pencil logo, click on it, and visit their blog and store. Their digis are so cute and a blast to work with.

Until next time..................Blessings, Lisa

Tuesday, February 16, 2010

Bunnies in Windows

Hello. so sorry I am posting so late in the day, it is approx. 4pm here in Ohio, and very white outside. We had another winter storm, and my daughter's school closed for today. Urgh! They have missed so many days now, that they are going to have to add them on in June when the weather is awesome. Poor kids.

Anyhoo, I have a card to share today using Stampin Up's Eggcoutrements stamp set again. I decided to try a window card and see how I liked it. So, here is what I came up with:


I punched out 2 square windows, and stamped the bunny stamp, punched it out with my 1" circle punch, and placed them on the inside of the card. It is hard to tell in the photo, but I stamped the other two stamps with Melon Mambo ink on Pretty in Pink card stock. I know this is short, but I am off to do a family dinner thing with my in-laws. Please if you have any questions, leave me a comment, and I will add the answers to this post later.
Until next time..............Blessings, Lisa

Monday, February 15, 2010

One Blue Bunny!

Hello. Happy President's Day on Monday! I hope everyone had a fabulous Valentine's Day; and that none of you ladies had to cook dinner on Valentine's Day. I know I got taken out for dinner, and loved every minute of it! So, I have a photo of a new stamp set below from Stampin Up called "Eggcoutrements", that is so dog-gone adorable that I just had to have it. I assembled it as soon as I got it, sat down to work with it, went completely blank. So, I went to Splitcoast Stampers website, and every other website that I could think of to find samples to inspire me. Well, hardly anything could be found! Apparently everyone else either didn't buy it yet, or was just as confused as what to do with it as I was. I went to an SU upline meeting, and desperately wanted to make a swap sample with it to share and I made the most awful card as far as I was concerned. So, I decided not to share it on here. But, wouldn't you know, the next night after the meeting a couple of ideas came to my brain. Doesn't it always work that way? So, scroll down, and you will see one of them.
Tah dah!!!!!!!!!!!!!!!!!!!!!!!!!!!!!!!!! Simple, clean, and kind of cute! Who can resist that cute little bunny face! Why did I make one of them blue? Why not? I felt like it!


So, here is what I did. Several of the stamps in this set coordinate with Stampin Up's paper punches. The bunny goes with the 1" circle, the "For You on Easter" sentiment goes with the Designer Label Punch, the floral border stamp goes with the Scallop Edge Punch, the Easter Basket stamp goes with either the Small or Large Tag Punch (depending on whether or not you want a white border around the image), and the cute little Chickie doesn't coordinate with any punch. So, I stamped my bunnies, punched them with my 1" circle punch, then mounted them on shapes made with the Curly Label Punch, mounted them on some Kraft card stock, stamped my Happy Easter sentiment (Teeny Tiny Wishes stamp set) in Lovely Lilac, rounded the corners of the card base with my SU 3/16" Corner Rounder punch and that was it. Pretty darn quick and easy.

As always; until next time.................... Blessings, Lisa

Saturday, February 13, 2010

Last minute Valentine!

Hello. If you are a very last minute kind of person, and need a very quick valentine, here is one for you.
All you need is some card stock, a heart punch, and a sentiment that says "Happy Valentine's Day". I used here a punch that my fabulous husband got me for V-day (early so I could use it), and it is a Martha Stewart Punch. She comes up with the cutest punches. For my purposes here I used Stampin Up Whisper White card stock for the card base, pretty in Pink for one of the hearts, two different color foil card stock (Unknown brand), and the sentiment is from Stampin Up's stamp set called "Teeny Tiny Wishes" stamped in their Real Red Classic Ink. See the enlarged photo below to see the shine of the foil card stock a little better.


Short and sweet today, yes the pun is intended since tomorrow is Valentine's day!
Until next time..................Blessings, Lisa

Thursday, February 11, 2010

Soft Pencil Thursday

Wow, what a week here in Ohio, the snow has kept us busy, busy. Our kids haven't had any school until today, and it was a short day for them on a two hour delay. I am so ready for winter to be over.


Well, enough chit chat, lets move on to Soft Pencil Thursday, my favorite blogging day of the week. We had a very cute Valentine image to work with, and also an awesome challenge to go with it. We were asked to make a Spring Card, not the season, a card that has a portion of it that "springs" up. I have never made one of these before, so thank heavens for Splitcoast tutorials. I loved this style card, so easy! So, here is my take on it:


So, are Spring cards with Soft Pencil Images the cutest, or what? If you haven't visited the Soft Pencil store and blog lately, you can find a link to it over on my side bar. Click on the image that has the Soft Pencil logo on it.

The card base is some designer paper from the retired Stampin Up Bella Rose collection, the Michu image was cut out and mounted on some SU Shimmer White card stock, the corner pearls are a mixture from Hero Arts and Michael's. The flowers are silk from Prima, with a Die Cuts with a View Button for their centers. I simply folded the flowers in half, using a very small piece of extra tacky tape to keep them that way, adhered them to the paper with another piece of the same tape, then added the button with some liquid tombow glue. Thanks for visiting, and I will be back before Sunday with one more last minute, five minute simple valentine card. It is so fast to make, you won't believe it.

Until Next time..............Blessings, Lisa

Thursday, February 4, 2010

Soft Pencil Thursday!!!!!!

Hello. I have a very cute image to share with you on a card for Soft Pencil Thursday today. The image is called "Two Cute Musicians". We were asked to follow the challenge of a recipe........1of this, 2 of that, 3of these. So, I decided to go with 1 designer paper, 2 flowers, and three music note embellishments. So, here it is:

If you haven't visited the Soft Pencil store and blog, simply look for the logo over on my side bar and click on it. Elizabeth the owner has some must have too cute digi images over there!

Supplies: Card stock ~ SU - Whisper White, Going Gray, and Designer paper from Me and My Big Ideas. Accessories ~ Prima Flowers, Sticky black faux Pearls by Mark Richards, Music Note embellishments by Jesse James Dress it up buttons from Hobby Lobby, and Spellbinder's Large Regular Square and Large Scalloped Square Nestibilities.

Until Next time....................Blessings, Lisa


OMGosh, I completely forgot to mention that Soft Pencil has 4 guest Design team members for the month of February! I just visited their blogs, and let me tell you are their cards with this weeks image gorgeous! See links to their blogs on my sidebar and go visit them! What awesome inspiration they have provided!


Wednesday, February 3, 2010

Baby Cards with Fox and Friends

Hello. I have a couple of quick and simple baby cards made with Stampin Up's "Fox and Friends" stamp set to share with you today. I have not made any baby cards in awhile, and the cute animals in that set seemed appropriate today. Here is a look at the stamps in the set:


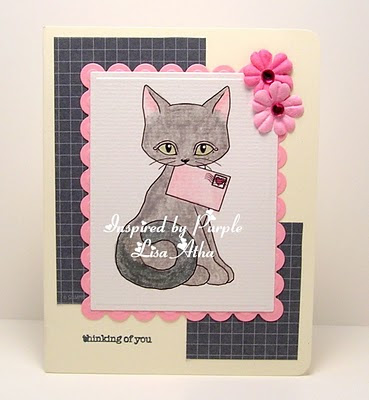
Here is my first card:


I couldn't get the colors to come out correctly in my photo today, the colors that I used are Bashful Blue, Ballet Blue, Certainly Celery, and Whisper White. The sentiment is from Stampin Up's stamp set called "Teeny Tiny Wishes". The ink that I used was Bashful Blue for the Lions, and Ballet Blue for the sentiment. The ribbon used is from a retired Stampin Up set, and the rhinestone brad is Stampin Up also.


The next card showcases the adorable Giraffe in the same stamp set, stamped with Apricot appeal ink, and I drew a shadow on one side with a Sahara Sand marker, because the apricot ink seemed so light. The ribbon is SU 1/4" grosgrain matching Apricot. The card stock colors used were Whisper White, Certainly Celery. The sentiment is obviously stamped in Basic Black ink.

I hope to have more cards made with this stamp set, but I am working on some swaps made with another new Stampin Up set called "Eggcoutrements" and also my creation for tomorrow's Soft Pencil Thursday. So, more stuff is coming so come back to visit again.
Until next time.........................Blessings, Lisa