Wednesday, March 31, 2010

A "Just Rite" Easter card

About a year or so ago, I won a set of "Just Rite Stamps" as blog candy from Becca Feeken. Here blog can be found here and on my side bar. I forget the name of the set, but it is still for sale in their shop and it has something for every American holiday we have. Halloween, Thanksgiving, Christmas, Mother's day, Father's day, Valentine's Day, Birthday, Easter, etc... So, I decided to give the Easter stamp a try. I followed the card sketch from Splitcoast Stampers from last week or the week before. I am short on time, so please forgive me for not knowing exactly which sketch. I was excited about the sketch when I first saw it, but then when I made a card with it, I was no longer happy. Maybe I am just too critical of my own work. But never the less, here it is:

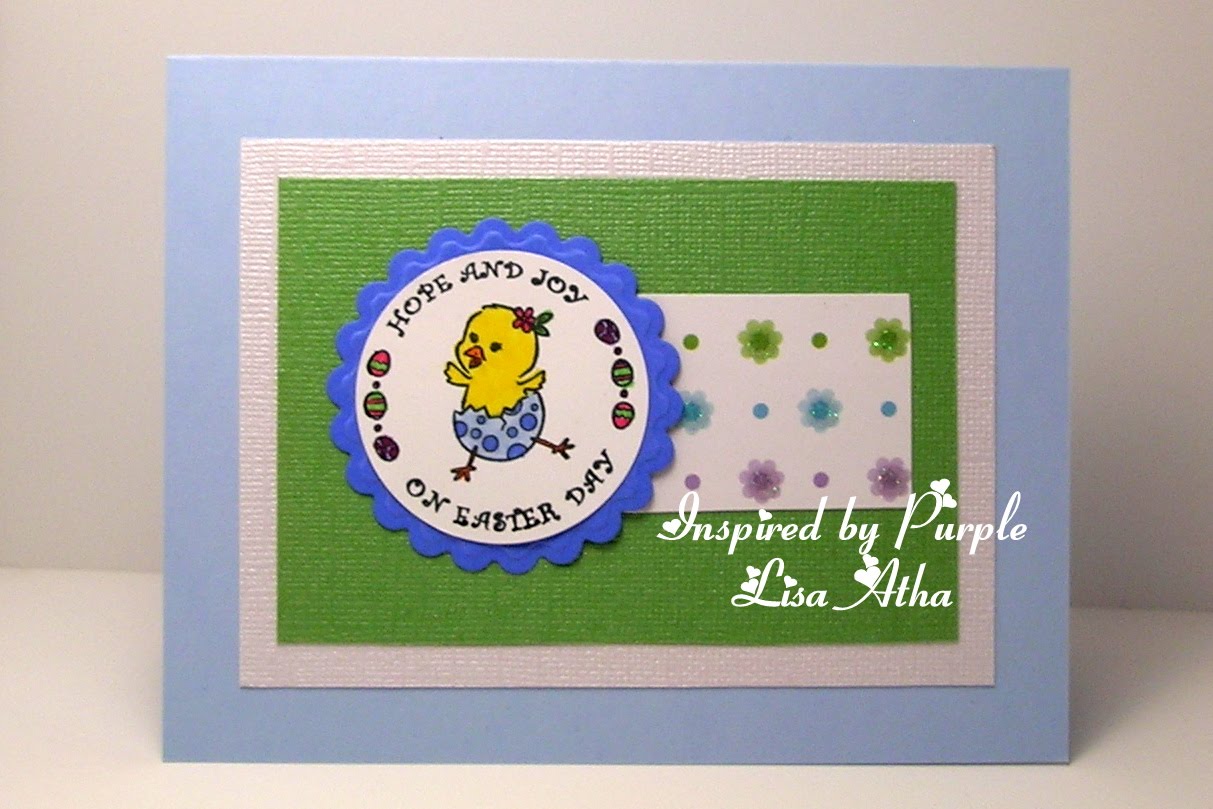
I used some "Die Cuts With A View" card stock (the green and white pearlescent textured), and the cute floral piece. The rest of the card stock is Stampin Up. Maybe it is the card stock, I am just not as happy with card stock if it is not Stampin Up, maybe because the colors don't coordinate as well together. Stampin Up's card stock is made to coordinate together and with it's designer patterned paper. I do however completely adore that stamp image, and had a blast coloring that cute little chickie. I hope you like it, even if I am not completely happy with it.

Anyhoo, please continue to excuse my blog dust, one of my buttons still isn't working if you click on it, and they don't appear to be the same size. It is a work in progress, two very busy ladies are working on them.

Come back and visit me tomorrow, for "Soft Pencil Thursday"! I am making something with the absolute cutest Easter digi image on the planet!

Until next time............ Blessings, Lisa

Monday, March 29, 2010

Inspirational Easter Card

Hello. I wanted to show you today an Easter card that I made that is more about the "reason for the season" as the saying goes. I used a stamp set from Stampin Up called "Abundant Hope". Here is a photo of the entire stamp set, it has a beautiful image of Daffodils, two sayings, and a fancy swirl image.

For the front of the card, I stamped the image on Watercolor paper, and colored it with Stampin Up ink refills dropped into the lid of the ink pad and I used a blender pen. The Designer paper is from a retired Simply Scrappin set, and the border was punched with SU's new Scalloped border punch. I cut out the image with an oval Spellbinder's Nestibility and mounted it onto Yoyo Yellow card stock cut out with a scalloped Oval Nestibility. The Sticky gems are from Michael's Craft Store, and the image is popped up a bit with some foam dimensionals from Stampin Up. The other card stock used is SU Garden Green, and Whisper White.

I decided to show you the inside of the card because I stamped the longer sentiment on the inside with the fancy swirl on the top and under the sentiment. Love that Swirl!

Now, this week is my first week back on the DT team over at Soft Pencil Designs, so among other things this week, I will be having "Soft Pencil Thursday" again for the month of April. I love working with Soft Pencil Designs, they are so adorable. I have another Easter card to show you tomorrow, with an oh so cute image that was a gift to me from a friend. I am still working on my blog remodeling, so keep excusing my dust.
So, until next time.............Blessings, Lisa

Saturday, March 27, 2010

Please Excuse my Dust....

because my blog is undergoing some changes. I am trying to perk it up a little, make some changes because quite frankly and I can't believe that I am saying this, but I am so tired of looking at that lavender background! Yes, you read that correctly, I am actually tired of looking at that background. Plus, a friend of mine is helping me create some awesome sidebar buttons. So, please be patient if the new stuff doesn't work correctly right away, I am working on it. Busy, busy, busy, plus I have been doing some much needed Spring cleaning and going through our "stuff" to get ready for a yard sale. But, while you are waiting to see some interesting Easter creations, chew on this masculine card for a bit:

I saw something similar to this somewhere......................oh I forget, sorry whoever you are. I had been wondering if the negative pieces to this SU/Sizzix Sizzlet die cut (Little Leaves) would look cute on a card anyways, so I put my own twist into it, and Voila. The negative piece is popped up just a bit with some foam dimensionals. Here is a list of supplies:

Card stock: SU ~ Chocolate Chip, Garden Green, Creamy Caramel

Punches: SU ~ 3/16" Corner Rounder Punch, Word Window Punch, Modern Label Punch
Accessories: Sticky gems from Michael's

Wednesday, March 17, 2010

Happy St. Patrick's Day!

Hello! I am back! Happy St. Patrick's Day to everyone even if you aren't Irish. I am a wee bit Irish, and my husband is approximately 75% Irish, so we decorate for this occasion around our house and I make shamrock shaped cookies. Beyond that.....no matter what ethnic background you carry in your genes, be proud of it, celebrate it, and don't let anyone tell you there is something wrong with it! I have a handful of different ethnic genes, and I like each and every one of them. Beyond the Irish genes, I am also part English, Czech, Swiss, and Italian (Venice). I guess you could say that I am a very European combination kind of girl. What brave ancestors I must have had to leave their homelands to come to America! I am very fascinated with every ones ethnic backgrounds, so if you feel like it, drop me a line and tell me your ethnic background(s), and if you are visiting me from another country, tell me a little bit about your homeland as I will probably never get to travel abroad in my lifetime.

Ok, on with the reason for this blog, paper crafting! I have three cards to share with you today! Yep, three! Elizabeth, the owner of my favorite digi company, Soft Pencil Designs, was sweet enough to grant my wish and ideas for a couple of St. Patrick's Day images and send them to me, so I made a couple of cards with them, and I also made a card with some Stampin Up supplies. So, Is the first one:

So, is this image cute or what? Michu the kitty is very excited as you can see to have found that big pot of Gold at the end of the rainbow (can you blame him?), and I think Ratiny is just happy to have found a mouse Girlfriend. Look at her cute little bow on her head, which I couldn't help myself but to color it purple. The Daisy DSP is from Provo Craft, ands the rest of the card stock is from Stampin Up. The sentiment is also from Stampin Up from their "Teeny Tiny Words" stamp set. The border at the bottom was made with the daisy border punch from Martha Stewart. Of course I couldn't resist embellishing it with some Sticky gems from Michael's craft store. The two shamrocks up in the right hand corner were made with a shamrock paper punch from EK Success. I colored the image with Stampin Up markers, and some Smooch shimmer paint.

The next image above is Michu and Ratiny dressed up as Leprechauns! Oh my gosh when I saw this one, I squealed with delight out loud, literally! It is is absolutely priceless! I used a sketch similar to one that I used on a previous post, except that I mounted the image on a scalloped square instead of a scalloped circle (scroll down and see the card with the Soft Pencil Mermaid on it). I made the scalloped square with my Sizzix/Stampin Up BigZ scalloped square die-cut, love that die-cut! The DSP was leftover from last year and it is from Provo Craft, I couldn't help myself again and added some Gold fake Pearls to embellish the scallops. The image was colored with a combination of Stampin Up's markers and their Watercolor wonder crayons and blender pens.

This last card above used the negative or left over piece from cutting out the scallop square, and I popped it up with some foam dimensionals. The shamrock was made by cutting out 3 hearts from Stampin Ups Sizzix Embosslit called Scalloped Heart of Hearts. I hand cut the stem. I am in a bit of a rush, so I didn't post the colors that I used. However, if you want to know what they are, just leave me a comment letting me know, and I can add them tomorrow. Thanks for visiting.
Until Next Time..................Blessings, Lisa

Wednesday, March 3, 2010

Farewell to Soft Pencil Designs

Ah, my time as a Soft Pencil Design Team member has come to an end. I will miss it more than I have words to say! However, they have asked me to come back and be a guest designer for the month of April, so of course I said yes! Plus, the owner of Soft Pencil Designs, Elizabeth is working on some St. Patrick's Day digi images that I suggested! I can't wait to see how they turned out! She should be posting them to her blog and store any day now. I am a wee bit Irish, and my husband is approximately 75% Irish, so St. Patrick's Day is important in our house.


Ok, on with a card. I decided to post a cute little child's birthday card that I made with "Ratiny" from the Soft Pencil Animals collection. Ratiny is so stinkin cute, I just had to create with him.

I hope you like it:


Yes, I love Ratiny so much that I had to put him on the card 3 times. I cut him out using some Circle Nestibilities from Spellbinders, and then I mounted him on Melon Mambo card stock that I punched with my Stampin Up Scallop Circle Punch. The card base is Certainly Celery, the designer paper is Retired Stampin Up. I printed the sentiment out from Microsoft Word, punched it out with my Stampin Up Modern Label Punch, and also layered it on a Modern Label punch that I cut in half and adhered behind the sentiment. The final piece under the sentiment was made using the SU Large Oval punch, and of course I rounded the corners of the card base with my SU 3/16" Corner Rounder punch.
Until next time............ Blessings, Lisa

Thursday, February 25, 2010

Soft Pencil Thursday

There were 3 different digi images this week that we DT members had the opportunity to work with. We each received one image, some received the Pirate, some received the Japanese Girl, and some the Mermaid. All of these images are sooooo cute, so be sure to check out all of the Design Team blogs so that you can see samples of each. Their blog links are over on my sidebar. I was so excited to find out that I got to work with my favorite of the three........The Mermaid! Here is my card:


Didn't you just squeal when you saw her? I know I did, she is completely adorable! So, I went to work coloring her with my Stampin Up Watercolor Wonder Crayons and Blender Pens, which are my favorite thing to color with. We were asked to use our favorite coloring medium.

Next I cut out two SU/Sizzix Large Scalloped circles, one from Whisper White card stock, and one form Taken with Teal. Next I ran the Teal circle through the cuttlebug with my swirls embossing folder. Then, may favorite embellishment which are sticky gems in each of the swirl centers. The Pearls around the mermaids neck were colored in with some smooch shimmer paint, but I could not capture that on my camera today. The background designer paper was given to me by a friend with a bunch of other paper, and did not have a company name on the back, so I don't know where it is from. The final touch was some Prima flowers with sparkly gem centers. So, head on over to the other DT blogs and on to the company blog as well and see all of the wonderful eye candy we have to show you this week. Again, all of that can be found over on the sidebar of my blog.

Until next time.......... Blessings, Lisa

Tuesday, February 23, 2010

Some Cute Animal Cards!

Hello. I found some absolutely adorable digi images from a brand new digi image online company over on Paper Craft Planet. The company is called Wink, Wink, Ink. I couldn't resist downloading her freebie cat image, and buying several others. I made some cards with them, and here is what I came up with:
This first card was made with their Freebie Kitty, which you can find on their blog. There is a link to their blog on my sidebar, which I will add as soon as I finish this post. My card base is Stampin Up's Very Vanilla, the DSP is from the Patterns Pack III hostess reward, I used Stampin Up ink refills and blender pens to watercolor the images, and Nestibilities to cut and mount the images. The flowers are Prima, and there centers are sticky gems from Michael's.
I so fell in love with this little Dachshund digi, as I have a doxie myself named Brandy. Brandy has a smooth Brindle coat of black, red and tan, so I tried to make the image look like my Brandy. Brandy is having a bad day with her arthritis today. We had her on meds for it, but they were giving her kidneys trouble, so we took her off of it. She has her good days, and her bad days, so say a little prayer for her if you have time.

This last features a digi called "Chihuahua in a teacup". Is it too cute or what? Love it! Lookat that little face, it is so cute! Anyways, I used an Ek Success border punch on the Pretty in Pink Rectangle, very tricky at the corners, but I didn't do too bad. No, it doesn't come with a coordinating corner punch, I had to be very careful and steady to get them to look that even. Big pat on my back for that one, I think! The ribbon and the cute little ribbon slide is from Stampin Up, and the sticky gems are from Michael's.

If you have any questions, leave me a comment that I can reply to.
Until next time.................................Blessings, Lisa


Sunday, February 21, 2010

Soft Pencil Sunday? Altered Frame

Oh my goodness, I just could not stop at one project for that "Anything but a card" challenge we DT members had this past week. Hop on over to Paper Craft Planet and join the challenge too, and win some digis. See the link on my sidebar, and join the Soft Pencil group when you get there to enter. It costs absolutely nothing and is so much fun.

Anyways, I had some of those wooden photo frames on hand from Michael's craft store, and I thought, alter one with these adorably cute "Bichitos" for a photo of my also very adorable great niece, London Page, even her name is cute. So, here she is in her altered buggy frame:


The designer paper base is from a retired Stampin Up paper pack. After I cut the paper to fit the frame, I adhered it to the wood frame with Mod Podge. I used two layers, one under the paper, and one on top of the paper to seal it. I colored the cute Bugs with my Stampin Up markers and cut them out before adhering them to the frame. The words at the top were typed on Michrosoft Word software, printed, and cut out with some small scissors. It is so much more easier than it looks.
Now, look at that cute little face and just try not to tell me that you wouldn't like to give her a hug! I know I do! Yes, I am very much the proud aunt. She will be a huge 2 years old in June, and doesn't live within driving distance of me, so I miss her very much. Love you my little sweetie!
I have some more cards made to show you too this coming week, so come back and visit me.
Until next time..................... Blessings, Lisa

Thursday, February 18, 2010

Soft Pencil Sun catcher!

Hello. We design team members were given the digi set called "Bichitos" to work with this week, and were asked to make anything but a card. First of all, Bichitos is Spanish for "little bugs", and they are the cutest little bugs I have ever seen. I just love this set of digis. I think that they are so versatile for different projects. I have one project with them to show you today, and one that is in the works that I will be posting tomorrow (Friday). Here is what the set looks like:


For today's project, I used the butterflies and made my own handmade sun catcher for my craft room window. So, here is a photo of the final project, and then I will explain how I made it.


  1. The first thing that I did, was to make 6 copies of the digi set on my computer.
  2. Next I placed each bug in it's own file, this way, I could copy paste them into Microsoft Word in any arrangement that I wanted before printing. I clustered the three butterflies together as you can see in the project.
  3. Then, I printed it out and took it to my nearest office supply store and had them copy it onto a piece of Transparency/Acetate. I wasn't sure how well it would print on acetate with my inkjet printer.
  4. Then, I cut two card stock circle frames; ovals would have been nice too. It really depends on the shape of the image(s) you are working with. Also, the thickness of your frame is entirely up to the individual. Oh, as an extra tip, this can also be done with rubber stamps but you would need to use black Staz-on ink on the acetate.
  5. The next thing that I did was to cut the bugs out in a circle shape at the same size as the outside edge of your frame.
  6. Now we are set to add color. I turned the image over and colored on the back with some permanent markers.
  7. The next thing that I did was to heat emboss the frame. The easiest way to do this so that it looks uniform, is to lay your frame down on a piece of scrap paper, dab your versamark embossing pad directly onto the frame, until you have one side of both pieces covered, then sprinkle on the embossing powder and heat set. I used gold embossing powder here, but I think silver or even black would look great. I have seen some where embossing powder with glitter in it looked really nice.
  8. The next to the last step is to assemble the project. I used Snail Adhesive, but Extra Tacky double sided tape would work too (Stampin Up sells both). I applied the adhesive to the non-embossed side of the frame, then lined up my acetate with it and pressed down all around the circle. Then, I did the same thing to the other frame and placed it on top of the acetate and pressed down all around the circle.
  9. The last step was to punch a hole in the frame, I used my crop-a-dile tool, added an eyelet, and put a loop with some misc. skinny organdy ribbon through it so that it could be hung on a hook.

Do not be intimidated, this is not hard to do at all, I promise! Now, if you notice there are 3 other bugs in the "Bichitos" set, and I am altering a wood photo frame to show you another day with the bugs from the same digi set. So, I hope you will come back and visit me to see that. In the meantime, look over on my sidebar at the Soft Pencil logo, click on it, and visit their blog and store. Their digis are so cute and a blast to work with.

Until next time..................Blessings, Lisa

Tuesday, February 16, 2010

Bunnies in Windows

Hello. so sorry I am posting so late in the day, it is approx. 4pm here in Ohio, and very white outside. We had another winter storm, and my daughter's school closed for today. Urgh! They have missed so many days now, that they are going to have to add them on in June when the weather is awesome. Poor kids.

Anyhoo, I have a card to share today using Stampin Up's Eggcoutrements stamp set again. I decided to try a window card and see how I liked it. So, here is what I came up with:


I punched out 2 square windows, and stamped the bunny stamp, punched it out with my 1" circle punch, and placed them on the inside of the card. It is hard to tell in the photo, but I stamped the other two stamps with Melon Mambo ink on Pretty in Pink card stock. I know this is short, but I am off to do a family dinner thing with my in-laws. Please if you have any questions, leave me a comment, and I will add the answers to this post later.
Until next time..............Blessings, Lisa