Wednesday, February 25, 2009

Busy, Busy, Busy

Hello. I am so busy this week trying to come up with some card ideas for a little contest that I am entering. Big secret, can't tell in case I bomb on the whole thing. I won't know the answer until March 6th anyways. So, unfortunately I have no new creations to share tonight and may not tomorrow as well. I will be back as soon as I can.

In the meantime, my kitty was being too cute in my craft room tonight, so I snapped a few photos. She loves to crawl under the cabinet that I keep my stamp sets in, and just stick her head out. Then when I move to the chair in front of the computer, she moves to the one at my craft table. That one is definately more comfortable. So, for your viewing pleasure here is Mittens in her cute mode:


Cute gray kitteh has cute white stripe above nose.


Hi mom, when are you going to pick up all of this trash?

Yes, that is a very purple trash can in my craft room!


Kitteh sleeps with one eye open to make sure mommy doesn't eat her cheeseburgers.


I am no good at this LOL cat language. A friend of mine told me about this hilariously funny website. http://www.icanhascheezeburger.com/ also visit: http://www.ihasahotdog.com/


Blessings, Lisa

Tuesday, February 24, 2009

Simple Card w/ Sizzlet die-cut

Hello. Everyone who uses Stampin Up products I am sure by now how heard about them selling a die-cut machine and all kinds of die-cuts. Well, I finally stretched a few bucks and purchased one of the small sizzlets die-cuts. I chose the Little Leaf. So, I played around with it today with the purpose of making a super simple card. Here is what I came up with:


I also went over to my leader's house today, and cut some of the other die-cuts that she has that I don't have yet, such as the "Top Note", and the big "Scalloped Circle", both on my wish list. Those two have so many uses, I could never name them all. All of you should call me and order them! Sorry had to say that. Anyways, when I showed this card to my Stampin Up Leader, she told me that she thought it needed some tone-on-tone background stamping. I think it just needs a short sentiment at the bottom. She suggested using the leaf stamp from "Embrace Life" stamp set. I totally respect her opinion, but I was also kind of wanting more opinions. I hope if she's reading this post that she doesn't get mad at me. Anyways, what do you guys think? Be honest!

Ok, with that said, I cut the leaf branch in SU Garden Green, Punched the flowers with the Trio Flowers Punch in Almost Amethyst and Lovely Lilac. I placed them all on Very Vanilla card stock, mounted on Almost Amethyst, then the base is Ballet Blue. Wow, like I said, S I M P L E.......... Oops, the flower centers are sticky gems from Michael's as usual. I have got to get some of that new glitter that Stampin Up sells, a little dab of the two -way glue and some glitter would be awesome as flower centers as well. Well, that's about it for this post. Until next time.....Take care, and God Bless.

Lisa

Sunday, February 22, 2009

I need some Help with something

Does anyone out there know how I could remove 2 layers of old wallpaper from a wood shadowbox without harming the wood. I received one that used to belong to my grandmother, but the wallpaper that she put into the back of it is pretty outdated. I would rather add some pretty DSP, or just leave it natural. She didn't do a very good job of placing it in either, the pieceds of paper didn't exactly fit, so she forced them to work. I will post two photos of the shadowbox below, and if any of you have any tips or advice, click on the contact me and send me an email, or leave a comment. I would greatly appreciate it. Thanks ahead of time.


Blessings, Lisa


Saturday, February 21, 2009

St. Patrick's Day Blessing

I know that I am early with the St. Patty's day stuff, but I can't help myself, because I am trying to rush into Spring. However, the weather in Ohio is not cooperating with my wishes. It warmed up some and then "BAM" hit with 28 degree temperatures. My daughter and I have been coughing and dealing with sinus drainage for several days. So, if I am in a hurry for anything Springish, can you blame me? So much for Global Warming! Hahahaha! Ok, on with a card!

I found this very sweet St. Patrick's Day blessing on the internet, so I copied it into a word document, played around with the font style and color a wee bit, and then printed it out onto some Stampin Up Very Vanilla card stock. I then cut it out with a large rectangle Spelbinder's Nestibility, and mounted it with foam dimensionals onto some Stampin Up Garden Green card stock that I cut out with a Scalloped Rectangle Nestibility. I just can't seem to quit using my die-cuts and Cuttlebug machine this week. Anyways, next I punched out some small shamrocks with an EK Success Paper punch and adhered them below the sentiment. At this point, I set it aside for several days because I got stuck. Don't ya hate it when that happens? So, this evening it kind of fell into place. I had some shamrock DP (from Provo Craft) leftover from my previous card, so I laid that down onto some SU Certainly Celery card stock, and adhered the sentiment with some foam dimensionals. The corner accents were made with cuttlebug's antique corner die-cuts and some SU Very Vanilla


cardstock and popped up with dimensionals also. The ribbon is some retired SU Wild Wasabi double stitched. The bow is entirely held together with the sparkly brad in it's center. The brad is from Michael's Recollections collection. They had them on sale a few weeks ago and are so gorgeous.

I think that covers the instructions, if not leave me a comment or email. Actually, leave me a comment even if I did explain it all. Tee Hee. Am I begging for attention, or what? Yes I am and not a bit ashamed of it. Ha ha.

Anyways, have a great weekend and blessings to all everyday, not just on St. Patty's day.

Lisa


Thursday, February 19, 2009

Blue and Pink Versions of Butterfly Card

Hello. Well, as promised I finished the blue and the pink versions of the butterfly card on my previous post. I love how the blue one turned out, but not so much the pink one. But hey, we are all our own worst critics. So, here are the photos:

The colors used on the blue one are Stampin Up Brilliant Blue, Ballet Blue, Versamarker and Clear SU EP on the large butterflies. The sentiment is a stamp from Studio G series 6 and stamped in Craft Brilliant Blue ink, the sticky gems are from Michael's and so is the blue ribbon, and the brads on the ribbon are blue Rhinestone Brads from Stampin Up.


The colors on the pink card are Stampin Up Pretty in Pink, Regal Rose, and Rose Red. I used Versamarker and Clear EP again on the large butterflies. Same


sentiment as before except in Rose Red Craft Ink from Stampin Up. The sticky gems are again from Michael's, the ribbon is from Stampin Up (Rose 1/4"), and the silver brads are also from Stampin Up.

To find out what tools were used, please scroll down to my previous post showing the purple version of this card.


Before I go, has anyone seen the new Martha Stewart Easter Bunny Border Punch yet? Yes, I am obsessed!


Ok, Until next time............Have a great Friday and keep stamping!


Blessings, Lisa

Wednesday, February 18, 2009

Memory Glass Window Ornament


Hello. Memory Glass Window Ornament? I didn't know what else to call it. I plan to hang it in a window with one of those little suction cup hooks, so it is a window ornament in my house. I have been wanting to try this little doodad for awhile, but thought that I would have to mail order the glass pieces. Well, I happened to come across some in a store and it is called "Memory Glass" by Ranger. It comes in 4 different sizes as far as I could see. Here is a link to their website, maybe it will spell it out better than I did. I used the 1"x3" size; which resembles the size of a microscope slide. Anyways, I first cut a piece of vellum paper to the size of the glass. Next I took a stamp from Stampin Up's "Embrace Life" stamp set, and stamped it randomly onto my vellum with black StazOn ink. I knew that if I used StazOn ink, that I would not have any ink smears. I need this when I work with vellum because I am accident prone. Then, I turned it over and water colored in the design with Stampin Up Markers and blender pen. Don't those blues and a hint of purple look pretty blended together? When I was done coloring, I put the vellum in between two pieces of the glass and put something called "Memory Foil Tape", also made by Ranger, around the edges to hold it all together. The last thing was to add the cord hanger that you can barely see in my photo at the top. I used another small piece of the foil tape to adhere that so I could then hang it in the window. That was all there is to it. It is pretty easy to do. I thought if you used Christmas designs in it, then they could be used as Christmas tree ornaments as well. Of course there are many uses and ideas for these cute little doodads. I was wishing that I had picked up a pack of the square ones as well. Maybe next time. Well, I need to sign off, I have a couple of card projects started and need to get them finished. Have a great day!

Lisa

Monday, February 16, 2009

Purple Butterflies

Hello. Sorry for my long absence; I have been busy with some important personal things. Now, Spellbinder's is having a card contest over on Splitcoast Stampers website. Apparently, they will be choosing the winner by the random integer method rather than choosing their favorite creation, so I thought I might as well show you the card I am entering since it will be visible on Splitcoast as well. I decided to go monochromatic, as I love that look; and I also started a pink and a blue versions of this card as well. I will post those as soon as I finish them. So on with the purple version!

So, what do you think? I love purple, and butterflies, so I love it! My second favorite color is blue, so I am anxious to finish that one as well. So, the large butterflies and the labels below are from Spellbinder's Shapeabilities collection. The rectangle and the scalloped rectangle are from Spellbinder's Nestibilities collection. Their die cuts are on the expensive side, but if you use the Hobby Lobby 40% off coupon, or a couple of websites I will post links to at the bottom, you can save some $$$$$$$. The great thing is that you don't have to buy their Wizard die cutting machine. Their die cuts work in both the Cuttlebug machine and the Sizzix/Stampin Up Big Shot machine.

Back to the card........ All card stock is Stampin Up, and everything is popped up with foam dimensionals. The large butterflies, had some areas that get dry embossed while they are being cut, so I colored those areas with my Versamarker, and heat embossed them with some Stampin Up Clear Embossing Powder, then did some tone on tone sponging with SU classic ink on their edges, all to give the die-cut shapes a little dimension. I also sponged the edges of the plain white rectangle, and white sentiment label to add a little interest onto those as well. See the complete supply list below. As always, feel free to ask me questions if I didn't give enough detail on the card. I promise to answer all comment questions, or emails.

Blessings, Lisa

Supplies Used:
Card stock ~ Stampin Up Whisper White, Elegant Eggplant, Lavender Lace, Almost Amethyst.
Ink ~ Stampin Up Classic Almost Amethyst, Lovely Lilac, Craft Elegant Eggplant.
Accessories: Stampin Up Clear EP, Eggplant Grosgrain Ribbon and Rhinestone Brads; Hobby Lobby Lavender sticky gems, Martha Stewart Trio butterfly punch (small butterflies), Nestibilities Large Rectangle and Large Scalloped Rectangle die cuts, Shapeabilities Butterflies and Ribbon Tags Trio die cuts.

Spellbinder's Die cuts purchase tips:
Marco's Paper in Dayton, Ohio has them on sale right now and can be purchased off their website.
U Cut at Home, an online store has a VIP 40% off coupon that you can sign up for and they email a coupon code to you. I have noticed that you have to re-sign up each month if you want the coupon. However, you do not have to re-create and account each month.

Tuesday, February 10, 2009

St. Patty's Day Card

Hello. I was in the mood to make a wee St. Patty's Day card. I started it two days ago or so, put it down, then the creative juices began to flow again this evening. So, here it is:


I saw this cute patterned paper on clearance at my local Michael's store, and decided that I had to have a sheet of it.

Speaking of Michael's, I have been literally stalking that place waiting on them to get the Martha Stewart Easter Paper crafts stuff in. There are plenty of other Easter crafts in, but no Martha Stuff. My good friend Lydia Fiedler was fortunate enough to go to Winter CHA a couple of weeks ago, and saw all the latest goodies coming to stores for the paper crafting industry. She has a photos on her blog covering this event, and one of them was of a Martha Stewart Easter border punch. I HAVE GOT TO HAVE IT! So, if any of you happen to see it hit the stores, send me an email, or leave me a comment. I would greatly appreciate it, and may even reward you for it!


Ok, back to the card. So, the patterned paper is by Provo Craft, the card stock is all from Stampin Up. The shamrock was made with the heart stamp from Stampin Up's retired Mini Medleys stamp set, and the stem was created dabbing a small paint brush onto my SU Garden Green Craft Ink pad. Then I heat embossed the shamrock with SU Clear EP and cut it out. I am so hooked on heat embossing. The rectangle layers were made with my Nestibilities large rectangle die-cuts. All of the layers are popped up a wee bit with foam dimentionals.


Supplies Used:
Card stock~ Whisper White, Garden Green, Certainly Celery
Ink~ SU Craft Garden Green
Accessories~ Hero Arts Light Green Sticky Gems, SU 3/16" Corner Rounder punch
Sentiment ~ Unknown

As a closing comment, I would just like to say:


Wherever you go,
Whatever you do,
May the luck of the Irish
Be always with you!


Even if you aren't Irish!


Blessings, Lisa

Sunday, February 8, 2009

Talk to me, and a simple card

Hello! Is anyone there? I know you are, my little counter thingy keeps increasing. Is there any reason why none of you leave comments and talk to me? Just curious, because I am getting lonely out here in bloggers world all by myself. Criticize my creations (positive or negative), ask me a question, just say hello.................anything will do! Phew, I feel better to get that one off my chest.

Now, on with a card! My stepsister is having a birthday on the 16th of this month, so I went ahead and made a quick card to send to her. She lives a couple hours away from me, so I can't help her celebrate in person. Darn those winter birthdays. Anyways, since her birthday is in February, I decided to make her card with a heart theme. Of course I was also still in my chipboard mood. I promise I will set that mood aside after this card. I am so tired of Valentines now too. I shall post a wee St. Patty's card next time, it is already started. My hubby is 75% Irish, and I am a whole 1/8th Irish (approx.) so St. Patty's day is always remembered in our house. Anyways, here is the birthday card:

I started with a Stampin Up Whisper White card stock base, rounded the corners with my SU corner rounder. Then I ran the card through my Cuttlebug with my dotted square embossing folder. Then I took my 1-3/8" square paper punch and punched out a window. Then I colored the embossed dot frame with my Stampin Up Pink Passion Marker. Next I punched the same size square out of SU Pink Passion card stock. The SU chipboard heart is heat embossed with retired SU pink embossing powder, and the pink sticky gem, is from Hero Arts.

The ribbon slide was made with SU Pretty in Pink card stock and the Stampin Up Key Tag punch, and the small slot punch. The sentiment is from retired Birthday Whimsey stamp set, with SU Pink Passion Classic Ink. I sponged a little Pink Passion around the edges as well. Finally, the ribbon is from the Michael's dollar bin, and is adhered with just a little bit of snail adhesive at each end, as it cannot be seen through this particular ribbon, and it holds very well. I did want to mention that the ribbon slide could also be made with Stampin Up's Designer Label Punch, which you can see in the photo below. Oh, I almost forgot...the chipboard was adhered with SU Crystal Effects. Enjoy the rest of your Sunday, and I hope you enjoyed the card!

Lisa

Saturday, February 7, 2009

More fun with Chipboard!


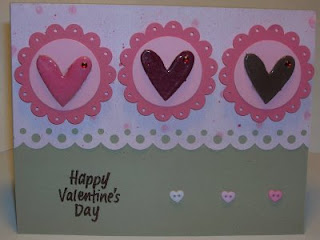
Hello. I was in a chipboard mood again. So, I heat embossed 3 Stampin Up Chipboard hearts with Stampin Up Craft Ink and Clear Embossing powder, and added a red sticky gem to each of them. Next, I punched 3 circles from Stampin Up Pretty in Pink card stock, and 3 scallop circles also punching a 1/16" circle into each of the scallops. The chipboard hearts were adhered with Stampin Up Crystal Effects (love that stuff). The sentiment was heat embossed with the SU retired dark brown EP. The tiny heart buttons were adhered with SU crystal effects, and I am sorry, but I can't remember where the buttons came from. The base of the card is Stampin Up Kraft card stock, and the designer paper under the hearts is made by Provo craft. The scallop/circle border was made with a Martha Stewart border punch. Thanks for visiting my blog, and have a great weekend! Lisa


Tuesday, February 3, 2009

Heat Embossing on Chipboard!


I decided to play around with my Stampin Up Chipboard this evening, and try to keep it simple. So this is what I came up with.

One thing I need to mention in case some of you have not used Stampin Up's chipboard before. It comes in a sort of cardboard color, and not white. So, when you add ink to it, the ink color appears darker on the chipboard than it would on white or vanilla card stock. For instance, I used Stampin Up Almost Amethyst Craft Ink on the chipboard piece you see on today's card. The butterfly on the upper left corner of the card is Stampin Up Almost Amethyst card stock. There is a big difference as you can see. Since the craft ink is so wet, I added some SU Clear embossing powder, and heat set 2 times to get a really glossy look to it. While I am at it, the base of the card is Stampin Up Barely Banana, and the other butterflies are Bashful Blue. I rounded the corners of the base with Stampin Up's corner rounder punch, and the butterflies were made with Martha Stewart single and trio butterfly punches. The sentiment was stamped on Almost Amethyst with a Hero Arts Sentiment and SU Lovely Lilac Classic Ink. Then I punched out the sentiment with a 3/4" square punch. I also used some foam dimensionals to pop up the chipboard frame, and the birthday sentiment. I guess that sums it all up. See you next time. Blessings, Lisa

Sunday, February 1, 2009

Yeah, I'm digital again!


Yeah! I finally got to the store to get a new memory card for my digital camera, so I took a picture of my latest card creation and here it is:


This was inspired by a card that I saw on Splitcoast Stampers website, however, I can't remember who it was and I changed the layout about 50%.

Anyways, I used the spiral punch from Stampin Up to punch the border on both sides of the black card stock strip. The hearts were punched with an unknown paper punch that I have had in my stash for around 6-7 years. How weird there is no manufacturer listed on it. Then after punching each heart I did some tone-on-tone sponging on one edge of each heart with Stampin Up Classic inks then I adhered them. The happy Valentine's day stamp is a Hero Arts stamp, stamped in SU Real Red Classic Ink. That is all there is to it. Complete supply list to follow. I hope you like it.

Supplies Used:
Card stock ~ Stampin Up Basic Black, Whisper White, Yoyo Yellow, Only Orange, Unknown Red, Pink Passion, Lovely Lilac, Brilliant Blue.
Ink ~ Stampin Up Real Red, Yoyo Yellow, Only Orange, Pink Passion, Lovely Lilac, Brilliant Blue.
Accessories ~ Stampin Up Spiral Punch.