Sunday, May 31, 2009

The Greeting Farm Bunny Card

Hello! Is everyone having a great weekend! We had some storms here in Ohio last night, but Saturday, and Sunday afternoons have been gorgeous! Gotta love that sunshine! Well, I am back to brighten your day with a card made with another Greeting Farm Stamp set. I may not have explained their stamps very well on my post yesterday, if that is the case, I apologize. They are a rubber stamp, they just aren't wood mounted, they have a foam base that has a cling adhesive on it, that can be uses over and over and over, etc.. on acrylic blocks. This makes their quality so much more higher than clear stamps. I have argued so many times with ladies who insist that clear stamps are the only way to go. Well, so what if you can see through them! So what if you get more of them for your money! If you pay a cheap price, you get cheap stamps. I have several clear stamp set, and hardly ever use them. First of all, they only work with certain brands of ink, second, one of them cracked the very first time I used it. It has a tear all the way through the image forever distorting the image if I use it. I vote for wood mounted or rubber cling mounted as your best quality for your money. Ok, on with a card:


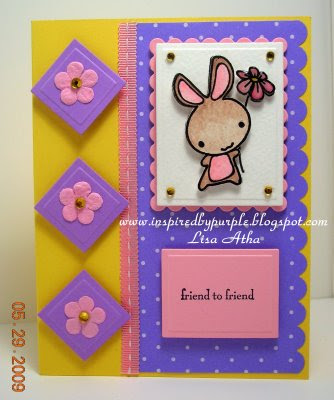
Now, isn't this the cutest bunny stamp image you have ever seen? It is from the "Lucky Bunnies" stamp set from "The Greeting Farm" stamp company! Bunnies do not have to be for Easter only. This stamp set has several different bunny images, that could be used for numerous occasions such as female birthday cards, baby gift cards, thinking of you cards, etc.. I have included a link to their store, just click on their name above, and look on the left hand side, click on the bar that says "animals", this will bring up all of their animal sets where you can view the whole Lucky Bunnies stamp set. Way too cute. Oh, they have some new releases coming up tomorrow, June 1st. I will be there checking them out.


Moving on with the card. I wanted to keep it somewhat simple and summery without making it boring, so that is what I came up with. I stamped the image twice on water color paper, so that I could water color one image, cut it out, and layer it on top of the other image. I am getting very hooked on doing that these days. The flower that bunny is holding has 2 layers of Stampin Up's Crystal Effects on it. I put one layer on, let it harden over night, then added the second layer, let it harden, then cut it out separately and popped it up with foam dot like I did the bunny. The lavender polka dot paper is a retired DSP from Stampin Up, the scalloped rectangle is SU Pretty in Pink card stock, as is the rectangle the greeting is on as well. The three lavender squares are SU Lavender Lace CS, with Prima Flowers and Hero Arts Sticky Gems. They are also popped up with foam pop dots. The pink ribbon strip is from AMM, which I believe stands for All My Memories and has been in my stash for years. The scallop border on the Lavender DSP was made with my SU scallop Border Punch. The lavender squares and the rectangles were all cut with some Spellbinders Nestibilities and my Cuttlebug. That sums it up . If you have any questions, drop me an email which you can find a link to on my side bar. Just click where it says, "contact me". Thanks a bunch for visiting my blog, have a happy Sunday! Blessings, Lisa


P.S. Stampin Up customers, please be aware that the retired stamps list will be available tomorrow, June 1st. I will email a copy of it to you if you are already on my email list. Also, some of the accessories that have the In-Colors in them, are already gone for good. One in particular that I am aware of is the 12x12 Baja Breeze DSP pack. Don't wait until the retired accessories list becomes available. If you want any items that have In-Colors in them, please submit your orders ASAP. I would hate to see you miss out on something you really wanted!

Saturday, May 30, 2009

Summer Flowers

Hello. Sorry I have been absent all week, I have been super busy. I have been stamping though, trying to get some things ready for something. I can't say what though at the moment. I have been having fun water coloring some stamped images from The Greeting Farm online stamp store. They have the cutest designs, besides Stampin Up, they are on my favorites list. I was trying to achieve the summery look with this card:

I started out stamping the image on water color paper two times; the second time I heat embossed it with black embossing powder. I water colored one of the images with Stampin Up ink in the ink pad lids and blender pens. Next, I cut out the first image with a Spellbinders Nestibilities Rectangles Large set, and mounted it onto a Nestibilities Scalloped Rectangle Large (SU Bashful Blue) with foam pop dots. Next I cut out the water colored image, and popped it up on top of the plain image with foam pop dots. The base of the card is Stampin Up's Summer Sun. The next layer with the colorful stripes is from Die Cuts With a View Glitter Stack. The next layer is from a small paper pad by SEI, and has a punched border at the bottom with Fiskers "Lazy Days of Summer" Border punch. The ribbon is Stampin Up's 1/4" Mustard Grosgrain. The Flower is from Paperbilities, the Flower center is a sticky gem from EK Success, and the "Hello" greeting is also a Greeting Farm Stamp. The Greeting Farm stamps are cling mounted stamps, that you cut from a sheet and then put on an acrylic block to stamp. Unlike clear stamps, These are much, much, much higher quality and will last longer. Their prices and shipping costs are very reasonable as well. Well, I think that about covers everything. I hope you enjoyed my card. Thanks, and enjoy your weekend.

Blessings, Lisa

Monday, May 25, 2009

My Memorial Day Hero

My nephew (born on my 15th Birthday) is in the US Navy, and is stationed in San Diego on the USS Ronald Reagan Aircraft Carrier. He accompanied his ship 2 times to the Persian gulf, like many others leaving behind his children and other loved ones. Thank heavens he came home safe. The irony is that he recently hurt his shoulder while working on the ship while it was in port, and is on state-side duty from now on. He will be having surgery on it very soon. The second time he was away with the ship, he missed the birth of his baby daughter (London Jade). So, instead of a card today, I am proudly showing my favorite serviceman, at his homecoming and seeing his baby girl for the very first time. Thanks for visiting, I'll be back to crafting real soon.
Sean and baby London. Notice the big smile on daddy's face.
Betsy (Sean's wife) was glad to see him too.
Sean and his two older kids (boys) Tristin and Gage
Sean on the ship by one of the planes where the planes are stored.
They take photos on the ship of the crew from time to time and post them on the ship's website.
Betsy and London. Do they have gorgeous eyes, or what?


GOD BLESS THE U.S.A!

Sunday, May 24, 2009

Chipboard Book Cover

I have had one of Stampin Up's Chipboard Books (the 5x5 art journal) sitting on my craft table for oh, two years. I have wonderful niece who is in college now, and I meant to have the book altered and filled by the time she graduated from High School, but that didn't happen. Gee if I wait long enough, I could save it for her college graduation. Please tell me that I am not the only one that does these things. Anyways, I thought that since I didn't have a new card ready to show you, the book cover would have to do.

The background paper is from Provo Craft, the rest is from Stampin Up (Regal Rose, Rose Red, Pretty in Pink, Chocolate Chip, Old Olive). The curvy Rose Red piece was cut with my Creative Memories 12" Curvy Cutter, The initial "S" (her name is Sarah), was cut with my Cuttlebug Alphabet set (sorry, I forget the name). There is some Stickles Glitter Glue on the "S"; and I had so much fun with it, I put some along the curvy Rose Red piece. The sentiment was heat embossed with the retired Brown EP from the Earth Elements stack. The sticky gems below it are from Hero Arts. The flower idea I cased from the Stampin Up catalog. The flowers are made by simply trimming down some punched scallop circles, and 1/2" plain circles. Yes, both punches were from Stampin Up. Love those punches! The top layer of the flowers were popped up with a foam dot. The stems were made with the SU Large Oval punch. Should anyone need instructions on the flowers and stems, please leave me a comment and I would be glad to make a photo tutorial. The chipboard Journal is still a current item, so if you would like to order one, let me know, or order it online at Stampin Up's website. Please choose me as your consultant; I am listed as Lisa D. Atha. These journals make excellent gifts to turn into scrapbooks for grandparents, friends, etc. Oh, the designer series paper packs are still on sale through the end of May: Buy 2, get 1 free with no limit. The designer paper would make the On-board books super easy to turn into a scrapbook too. The leftover scraps could be used on cards. With those thoughts left on your mind, I will close for now. Have a great and safe Memorial day weekend!

Blessings, Lisa

Wednesday, May 20, 2009

Quick Card

Ok, not much free time today, so in order to have time to post, I had to make today's card a very quick one. I was in a Blue mood when I made this card; the color Blue, not sad. Here is the card:

Inkadinkado came out with these stamp sets that are an inch square, and I love animals, and the "Cats Galore" set, was way too cute to resist. So, that's my excuse and I am sticking to it! I decided that the three kitties above represent "Mittens", "Maddie", and "Splotchy". Mittens is my kitty, and Maddie and Splotchy belong to Lydia Fiedler of Understandblue.blogspot. All three kitties were homeless and abandoned when they were found and adopted by myself and Lydia. So, to homeless animals everywhere........May the Lord bring you a loving home!

Now, I started off with a Stampin Up Kraft card stock base. I first stamped them on my Versamark ink pad, then onto the Stampin Up Classic Brilliant Blue Ink Pad. Stampin Up Classic ink will not stick to clear stamps, but the very sticky Versamark helps the classic ink to cling. Craft (pigment) ink will stick, but I don't have Craft in Brilliant Blue. After I stamped the kitties on Whisper White CS, I punched them out with a 1" square paper punch, then mounted them on some Brilliant Blue card stock that I punched with a 1-1/4" square punch. Next, I ran the card base through my cuttlebug machine with a dots border embossing folder, and inked up the raised dots with my SU Brilliant Blue Marker. I just couldn't get away from Blue today (my second favorite color after purple). Then I ran a skinny strip of Brilliant Blue CS through the cuttlebug with a wavy border embossing folder, and adhered it next to the blue dots with some snail adhesive. The kitties were then mounted with some foam pop dots, the sentiment is from a Studio G Mini stamp set, and "Max" the mouse in the far left corner is from my other kitty stamp set from Stampendous. That is it, pretty simple.

Blessings, Lisa

Big Shot and Window Sheets

Stampin Up has introduced quite a few new things over the past year, the card that I prepared today showcases some of them. I used the Big Shot/ Sizzix die cut daisies #2, Beautiful Butterflies , Little Leaves, and recently in the Mini catalog 12x12 pre-printed and plain acetate sheets. I only used the plain acetate in my card as a window. So, here it is:

I first cut my card base out of Stampin Up Kraft card stock. Next, I decided what size that I wanted my acetate window to be and cut that out, applied double sided sticky tape to the edges where I wanted to attach it to the card stock. Then I held the window next to the card base so that I could mark where I needed to cut out the space for the window. After the opening was cut, I carefully added the acetate. Next, I cut my butterfly, daisy, and leaf shapes in my Cuttlebug machine. Yes, Stampin Up's Big Shot die-cuts work in the Cuttlebug. I already had my Cuttlebug long before the Big Shot made it's appearance, so I am making that work for me. Next, I dressed up my die-cuts to my taste. For instance the butterflies were ran through the Cuttlebug with my CB Swiss dots embossing folder, then I added some of the SU Cosmo Glitter to them. The daisies #2 die has 3 different sizes on it, what you are seeing here were made from the smallest of the three. Each one of them was made with two of the small daisies and the center was made from a Stampin Up 1/2" Circle punch. I also altered the leaves by cutting them off their stem to make them easier to arrange. Next, I wanted to see a subtle pattern through the window, so I cut a piece of SU retired Designer Paper (sorry, I am operating on limited current supplies). Where the heck is that winning lottery ticket when ya need it? Then, I stamped a sentiment with Craft Basic Black ink and a stamp from retired stamp set "Warmest Regards". I would have much preferred and it would have been easier to use some of SU's rub-ons on the window with a sentiment. There goes that limited supplies challenge I had again. Rub-ons are on my wish list. There you have it, my first card with an acetate window! Yeah! I may get adventurous and make one with a circle shaped window. So, stretch your imagination, buy some acetate sheets from me and Stampin Up, and CREATE! If you do, email your creations to me, I would love to see them. Card stock colors listed below. Blessings, Lisa

Card stock ~ Stampin Up, Kraft, Whisper White, Bashful Blue, Yoyo Yellow, Old Olive.


Note ~ Butterflies were adhered with glue dots, and daisies and leaves were adhered with snail adhesive.

Friday, May 15, 2009

Scallop Circle Punch Sunflowers

Even if you don't like or love sunflowers, you will think that these punchy sunflowers are cute! I saw them on a card over at Splitcoast Stampers, cased her idea for the flowers, then designed my own card with them. The card that inspired mine can be seen here. I also made up an easy to follow photo tutorial for cutting the flowers. So, here is the card in it's finished state:


The first photo below, is of the Stampin Up Scallop Circle Punch, already punched and I used a straight edge to draw the cut lines on it with a pencil. Just line up your straight edge with the indents on both sides of the scallop circle until you have worked you way all the way around it. I also punched out a 1/2" circle with my SU punch and used it as a guide to draw that circle as close as possible to the center. This serves as a guide so that we don't cut too far into the scallop circle and ruin our flower. So, cut on all of the lines from the outside of the scallop to the circle that we drew.


After that is done, turn it over and it will look like this next photo below.

In the next step, we punch another circle that is no larger than 1", and draw little white dots on it with a Stampin Up White Gel Pen. Then, your sunflower should look something like the next photo below.

At that point, I also cut some leaves with my Stampin Up/Sizzix "Little Leaves" Sizzlet die cut. Then, I cut a card base out of SU Certainly Celery card stock, ran a piece of SU Chocolate Chip CS through my Cuttlebug with my Swiss Dots embossing folder (please Stampin Up bring us more embossing folders to the catalog - I love them!). Then, I laid out my flowers and leaves until I liked what I saw, and adhered everything. I cut a couple of the leaves off the branches, and slid them under the flowers. Then I tied a ribbon into a bow and arranged it around and under the flowers until I was happy with it. The layer with the flowers on it is popped up with some foam dimensionals. These cute little sunflowers could also be used on a scrapbook page of any size if you are a scrapbooker. Should I feel up to the task, I will put one together and post it another day. That about sums it up. I will post a supply list below. As always, if you have any questions, leave a comment, or click on the contact me at my sidebar to get my email.

Supplies Used: Card stock ~ Stampin Up Certainly Celery, Old Olive, Chocolate Chip, Summer Sun, Naturals Ivory. Ink ~ SU Classic Chocolate Chip (for sponging around the Naturals Ivory card stock). Accessories~Stampin Up Scallop Circle, 1" Circle, 1/2" Circle Punches, SU Little Leaves die-cut, SU White Gel Pen, Ribbon from Retired SU Seaside Ribbon Originals.

Blessings, Lisa

Wednesday, May 13, 2009

Heat Embossed Sprinkles in circles

Hello. Sorry for me absence, there are not enough hours in the day. I have been trying to think of another way to use some of Stampin Up's small background stamps. Scroll down a bit and you will see the first idea that I came up with on a previous post. I saw something similar to what I am showing you today over on the Hero Arts blog, but don't quote me on that. Anyways, here is the card:


Of course the "Sprinkles" stamp set from Stampin Up is meant to be for backgrounds, however, if I can show my customers and blog viewers a way to get more use out their stamp sets and tools, than I want to do that. Right now with the current economy, we want more than ever to get more "bang for our bucks" as the expression goes. This idea is very versatile for Stampin Up's large and other small background stamps as well. I know there are also some retired background stamps; large and small that this would be great with this idea. Plus, you get to use your circle punches and other circle tools. If you need help deciding what stamps will work, drop me a comment or email.

Ok, what I did was to first choose six different colors of card stock from Stampin Up's Soft Subtles color group. Next, I stamped the whole sheet of each one with the Sprinkles Stamps, with Versamark ink and heat embossed them with white embossing powder. Some White Pigment ink, such as Stampin Up's White Craft ink would work as well, I just didn't feel like waiting on it to dry. I stamped the whole sheet, so that I could punch or cut out tons of circles and have a bunch for more than one card. Next, I punched or cut out circles of various sizes, and adhered them in a random pattern on an SU Whisper White card base. Next I stamped the sentiment from retired stamp set "Warmest Regards". The last thing that I did was to punch the card base corners with my SU corner rounder punch. That about sums it up. See below for card stock colors used:

Card Stock: Pale Plum, Almost Amethyst, Certainly Celery, Bashful Blue, Pretty in Pink, Apricot Appeal.

The next time, I am going to show you a cute way to get more use out of your Stampin Up Scallop Circle Punch.

Oh, I also wanted to remind you of the charity stamp sale over at "A Place to Bark" animal shelter, that is going on for the whole month of May. I will not be posting anymore of my Maddie cat cards here on my blog, but I still have one other one over at my Spltcoast gallery, and I may post some more over there. If you want to see them, click on the link on my side bar, and if you want to help out the shelter, remember to visit Lydia Fiedler's blog here. She has a link that takes you to the sale page.

Well, until next time, Blessings to all. Lisa


Saturday, May 9, 2009

Clean and Simple Card Challenge

is what inspired me to stamp yesterday. The ladies over at Splitcoast Stampers, decided to make the clean and simple challenge this past week a particular card sketch. The link above will take you right to their forum if you would like to see some more samples of it. Their theory is that a handmade greeting card does not need to be overly detailed and embellished to be pretty. Of course detailed cards are pretty, but so are the simple ones. So, here is a couple of cards that express my take on their clean and simple sketch for this past week:


I used Stampin Up's Whisper White card stock for the card base. The butterflies are actually some butterfly shaped foamies, which are foam shapes with adhesive on both sides. So, all I had to do was to fut them on my xacto knife, take off one side of the adhesive and dip them into some glitter. I used Stampin Up's Fine Cosmo glitter stack on these. I got these foam shapes at a stamp and paper store in Dayton, Ohio called Marco's Paper. Click on their name as I added a link to it, and I am sure if you call them and ask they will more than likely have some. They come in several different shapes, and are approximately $2.50 per sheet. I think you can order them over the phone or on the Marco's web site. The punched circles are from Pretty in Pink, and Bashful Blue card stock, and the sentiment is from SU stamp set "Warmest Regards". The ribbon is from the Michael's dollar bins, and that about sums that one up. The next one is using the same sketch, but it is using my charity "Lydia Fiedler" original stamp "Maddie" the cat. I love animals and was so glad that I was able to help out that I have gotten overly hooked on this stamp. I hope I haven't worn out it's welcome with you viewers. If you would like to buy a stamp to help an animal shelter, page down to one of my older posts for a link. Rumor has it, that they are also going to be creating doggie stamps for the same benefit in the future. I can't wait to see what the creative designers come up with. So, here is another card, I like to call "Peeking Maddie Cat":


So, what do you think? I could not help going monochromatic purple on this one! By now, I assume you have realized that purple is my favorite color, and kitties are one of my many favorites in the animal kingdom (along with a thousand other species that exist).

The circle in the far right bottom row is Maddie's tail, I guess that she got tired of being stamped by me, and started to run off. Haha. Kidding. I just thought it would be fun to put her tail in one of the circles. Oh, by the way, is this not one of the funnest card sketches you have ever seen? Yeah to the ladies over on Splitcoast, because there are so many stamps that we all could use with this sketch. Think how fast it would be to make Christmas cards with this sketch. I will hold that thought and post some Christmas cards done with this sketch when the season arrives.

Anyways, The card base is Stampin Up's Almost Amethyst, and the Maddies are stamped on Whisper white then punched out with a circle punch (almost any size will work). The ink colors are: Elegant Eggplant, Lovely Lilac, Orchid Opulence, Lavender Lace, and Almost Amethyst. Once again, the sentiment is from Retired SU's "Warmest Regards". As always, if you have any questions, leave me a comment or send me an email. Enjoy your Saturday.

Blessings, Lisa

Tuesday, May 5, 2009

Maddie Cat Surrounded by Purple!

Hello. I wanted to come up with another card design to help out "A Place to Bark" animal shelter, and this is what I came up with:


The base of my card today came from a package of pre-cut cards and envelopes that a friend of mine gave me, the color is similar to Stampin Up's Speckled Ivory card stock. The purple slits around the octagon shape were actually blank openings like the octagon is. I cut a piece of 2 sided K and Co. DSP to the size of the card, traced lightly with a pencil the shape of the Octagon, and cut it out with an xacto knife and straight edge. Then, I added some little Prima flowers with some little metal sticky shapes (from Archiver's Clearance) for centers. I then stamped the image and punched and layered it with my Stampin Up Large and Small Oval punches. Then added some flowers. Next, I cut and adhered a 2-sided patterned paper to the other inside cover of the card, with the patterned side being visible through the octagon window. The last thing I did was to stamp Maddie with black ink onto the patterned paper that I put on the inside.
I don't know if it can be seen on my photo, but you can actually see the little flower pattern on from the DSP through the stamped Maddie image. Try clicking on the photo to enlarge it and see if that works. Anyways, it is kind of a cool effect in person. Hope you enjoyed it!


If you would like to help out the animal shelter listed above, and I highly recommend that you do. Here is the link to the online store where they can be purchased.

Until next time: God Bless! Lisa

Saturday, May 2, 2009

A card with my Maddie stamp!

In a previous post I basically got bossy and begged you guys to purchase a stamp or 2 for an animal charity that a friend of mine designed a stamp for. Now, 100% of the money goes to an animal shelter so that it can expand to house more homeless kitties. I must put my two cents worth in here.....If everyone who owned a cat would take responsibility and get their cats neutered or spayed, then there wouldn't be so many needy kitties suffering in our country! Ok I feel better now! So, please scroll down after viewing my card and giving me a round of applause (haha) and click on the link that takes you to the web site where you can buy a stamp and help a kitty! So, without further hesitation.......Here is Maddie saying hello! Thank you my friend Lydia for designing such a cute and sassy cat!


Supplies Used: Stampin Up Kraft, Whisper White, and Naturals Ivory card stock, Basic Gray Designer paper from the 6x6 Paper pack - Sugared, SU Versamark and Basic Gray inks, Clear embossing powder, SU Small and Large oval punches, Foam pop dots, EK Success scalloped border punch, SU corner rounder punch, Cuttlebug Swiss Dots embossing folder, and the sentiment is from Stampin Up's stamp set called Cheep Talk.


If you have any questions about the card or anything else, feel free to contact me.

Blessings, Lisa

Free Packs of Designer and Textured Paper?


Yes, you read correctly, Stampin up is having a paper sale for the whole month of May in honor of National Scrapbook Day which is today. When you purchase 3 packs of 12x12 textured cardstock, or 3 packs of Designer paper packs, you get to choose one set for FREE. Also there is no limit! Buy 6 get 2 free, buy 9 and get 3 free, get the idea? So, contact me or place an order online and include my name. Both the textured card stock and the Designer paper both look awesome on cards, so even if you aren't a scrapbooker, this is an awesome opportunity to make your stamping projects more fun!
You have a choice of 6 different textured 12 X 12" assorted packs of card stock - Neutrals, In Colors, Bold Brights, Rich Regals, Soft Subtles & Earth Elements seen on pages 153 - 155.
The other Designer Series paper and the Specialty Designer series paper is located on pages 158 - 161.

I am so glad they included the Specialty papers. They are amazing in quality & texture.
If you decide to place an order Online, you will add the qualifying product (three packs of Designer Series paper and/or 12" x 12" textured card stock) to your shopping bag. Then when you check out, click a link in the Special Offers section that will bring up a pop-up window directing you to choose your free pack of paper. Don’t forget to put my name on the order so that I can receive credit for the order.

And there is also a sneak peak pre-order for everyone - not just Demo's!
The Jumble Alphabet will be in the new Catalog in July, but we get a chance to order it early at a 20% discount! This set is valued at $43.95 but is on sale during May at just $35.16. Sorry I couldn't get my picture of the alphabet set to work on Blogger today. Got to the Stampin Up website and click on the paper sale advertisement, scroll down, and you will see a sample of the set.

Friday, May 1, 2009

Something Retired

Is what I am posting today. Yes, another one of my "get your retired stamp sets out and use them again cards". I chose "Scented Garden". It was only offered in a mini catalog approximately 4 years ago. It is one of those Stampin Up stamp sets that I may never part with because I love it so much. Here is the card:


The card base is Stampin Up's Rose Red, the image was stamped on watercolor paper and water colored with Stampin Up Watercolor Wonder Crayons and an aqua painter. Speaking of those crayons, they are among the most fabulous things on the planet. If you don't own them yet, you should order them. I promise, you will love them. The mat under the watercolor paper is Stampin Up's Bashful Blue, and the striped Designer paper is from a retired Stampin Up paper pack. The ribbon is also retired from Stampin Up. Do you see a pattern here? Retired, retired retired. Use that retired stuff that you spent your money on. The brad on the ribbon is from Michael's. The punched border is a Martha Stewart Border punch. The small fake pearls are from Michael's. Last but not least, the butterfly was cut out and popped up with foam dimensionals.

National Scrapbook month kicked off today, and my next post will tell you all about the awesome sale that Stampin Up is having on their 12 x 12 paper, both textured and patterned!

Blessings, Lisa