Yep, You got it, I cased a card. Like all of you never do that!!! LOL. I have a very talented friend named Kerry, she is one of the sweetest peeps that I have ever met. She chats with me on facebook, she tries to call me on the phone (sorry I wasn't available that day like I thought I would be), she even sends me little crafty stuff in the mail sometimes. Love ya Kerry!!! Anyhoo, last summer, yep, that long ago, I decided to case one of the cards on her blog. I even used some of the paper that she sent to me one time. Yep, was going great, then............I moved. Well, that card got temporarily misplaced in a box under some crafty supplies. tee hee. I found it recently, and so here I am to post it to show you! I so loved the simplicity of it. Here is a link to her blog post, click
here.
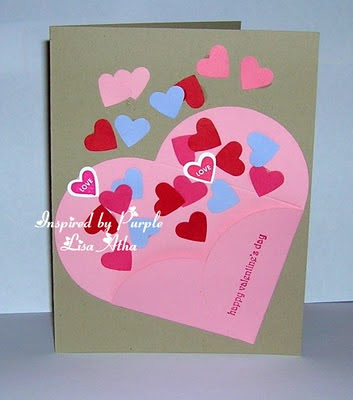
Here is my card:

I didn't have the exact same flower as Kerry used, so I used a sizzix daisies di-cut, and added some DCWV buttons. I am thinking that a Butterfly or two would look good with this layout too. hmmmm..........
Anyhoo, love this sketch, go visit Kerry's blog and check her card out, and to get to her most recent post from the link, click on her blog title at the top.
Until next time..........Blessings, Lisa
.jpg)

 I used my Stampin Up Manhattan Flower embossing folder, cut out one of the flowers and sponged some ink on the raised areas. I cut two of my SU little leaves di-cuts, and one SU/Sizzix lattice di-cut. Place it all together as you can see on the picture, and all done! Turned out that she loved it, so we sat down at her house with two Cuttlebug machines and went to work on making enough for the shower. Never underestimate what your embossing folders and di-cuts can do for your paper crafting projects, you never know what you can create with them! Use your imagination and have fun with them.


.JPG)


 Now, if you look closely at the finished card above you will see that the flowers have a 3-dimensional look instead of being flat like they are when you first punch them. The photo below shows how I achieved the dimensional look. I simply took my embossing stylus, and each flower and rubbed them on a soft surface (I used the sponge side of Bigz Daisies #2 die here) in a circular motion, until they have a sort of cup like look to them. I then adhered them to the card with a small drop of Stampin Up Crystal Effects. The final touch was to punch some 1/8" circles and add them to the flower centers with a very small dab of CE again. Crystal effects dries clear, so don't worry if you get a little too much on the center. Oh, and yes, I definitely used a pair of tweezers to work with these little pieces. Here is a list of card stock colors that I used for the flowers and their centers: Almost Amethyst, Lavender Lace, Lovely Lilac, Pretty in Pink, Regal Rose, Crushed Curry.


