.jpg)
 Until next time.................Blessings, Lisa
Showing posts with label Valentines. Show all posts
Showing posts with label Valentines. Show all posts
Thursday, February 14, 2013
Happy Valentine's Day
Just a little card to help celebrate Valentine's Day!! Literally, it is little, it is a 3x3 mini card. I punched a couple of Martha Stewart Hearts (gotta love her paper punches), an EK Success border punch, and a few Recollections faux pearls to top it off. Inside a stamped sentiment. Enjoy your day!!!
 Until next time.................Blessings, Lisa
Until next time.................Blessings, Lisa


Monday, February 13, 2012
Hero Arts Valentines
Oh my gosh, I just realized this morning that Valentine's Day is tomorrow. I knew this, and just forgot about it. So, here I am posting the Valentine cards that I made over a week ago, at the last minute. I hope you enjoy them anyways and derive some inspiration from them.
I used Hero Arts stamps called "Patterned Hearts", and the background stamp is called "Dots and Flowers". I used Stampin Up's White Craft Ink with the background stamp and with the hearts I used Classic Ink Pretty in Pink, Regal Rose and Rose Red. The card base is SU Crumb Cake, and the other card stock that I used was Whisper White, and Rose Red. Here they are:


I used Hero Arts stamps called "Patterned Hearts", and the background stamp is called "Dots and Flowers". I used Stampin Up's White Craft Ink with the background stamp and with the hearts I used Classic Ink Pretty in Pink, Regal Rose and Rose Red. The card base is SU Crumb Cake, and the other card stock that I used was Whisper White, and Rose Red. Here they are:


Tuesday, February 7, 2012
Stamp-n-doodle Tuesday!
Welcome to Stamp-n-doodle Tuesday and an adorable new image called "Holding Hands". The challenge this week is to use mostly Red. That was a hard one for me for some reason. But here is what I created:

Now, visit the other DT ladies blogs and leave them some much deserved love, then hop on over to the SND blog and join the weekly challenge to win free images!
More Valentine card ideas coming this week, stay tuned to my blog!
Until next time............Blessings, Lisa

Now, visit the other DT ladies blogs and leave them some much deserved love, then hop on over to the SND blog and join the weekly challenge to win free images!
More Valentine card ideas coming this week, stay tuned to my blog!
Until next time............Blessings, Lisa
Friday, February 18, 2011
Stampin Up Valentine's!!!
Welcome back. I have some super pretty Valentine's Day cards to share with you that I made at a Stampin Up workshop. Yes, I know, Valentine's Day is over, but I thought they were pretty, so I had to share them with you. The layouts would work great with other stamps as well, or you can case them as they are and save them for next year. Anyhoo, here they are.

The sparkly heart in the center was punched from one of the new Stampin Up Glimmer paper Sheets. This stuff is so awesome, it is absolutely stunning in person. I love bling, so I don't joke about it!


Notice the small heart in the "o", is actually punched with the small heart punch out of the glimmer paper. See close up below. Love the sparkle!
 Although I did hand make the above cards, I cannot take the credit for the design of them, they were completely designed by my Stampin Up pals, Terri Frietch, and Teddy. Thanks ladies, it was so nice of you to invite me and what a relaxing time it was since for a change I didn't have to do any designing. I just came and played!
Now, to all of my Soft Pencil fans, I got word today form the owner that she will be back in business on March 1st, so we DT members will be showing and creating with her new images very soon! We are all very excited!
Until Next time................Blessings, Lisa
The sparkly heart in the center was punched from one of the new Stampin Up Glimmer paper Sheets. This stuff is so awesome, it is absolutely stunning in person. I love bling, so I don't joke about it!
Notice the small heart in the "o", is actually punched with the small heart punch out of the glimmer paper. See close up below. Love the sparkle!
Although I did hand make the above cards, I cannot take the credit for the design of them, they were completely designed by my Stampin Up pals, Terri Frietch, and Teddy. Thanks ladies, it was so nice of you to invite me and what a relaxing time it was since for a change I didn't have to do any designing. I just came and played!Now, to all of my Soft Pencil fans, I got word today form the owner that she will be back in business on March 1st, so we DT members will be showing and creating with her new images very soon! We are all very excited!
Until Next time................Blessings, Lisa
Thursday, February 17, 2011
Stamp n Doodle Thursday!
Wow! Welcome to Stamp-n-doodle Thursday!!!! I am so sorry that I have been absent from my blog this past week or so. Winter is an especially hard time health wise for myself and my family. I am on the mend however, and ready to show you what I have been working on. Yes, Valentine's day is officially over, but I still have some cards of Love to show you today and tomorrow.
The challenge this week over on the Stamp-n-doodle blog is to use ribbon, embossing, and bling! Yay! All of my favorite paper crafting techniques, and embellishments! We were also asked to use the image called "Valentine's Kiss". So, here is what I created:

The challenge this week over on the Stamp-n-doodle blog is to use ribbon, embossing, and bling! Yay! All of my favorite paper crafting techniques, and embellishments! We were also asked to use the image called "Valentine's Kiss". So, here is what I created:
I did some dry embossing with my Stampin Up "pretty petals" embossing folder, I tied a bow with some white satin ribbon from my stash, and I used some sticky gems for my bling elements. The image was cut out with my Spellbinder's circle and scalloped circle Nestibilities. The image was colored with a variety of markers: Prismacolor- PM-95 Light Tan, PM12Light Peach, Stampin Up - Crumb Cake, Daffodil Delight, Cherry Cobbler, Blushing Bride, Poppy Parade. Card stock used was Unknown Red from my stash, SU - Pretty in Pink, Pink Pirouette.
Hop on over to the SND blog and the other DT members blogs (see my sidebar for links), and leave some love to make their day.
Ok, now I am off to write a post for you to see on Friday!
Until next time........Blessings to all......Lisa
Friday, February 4, 2011
It's a Stamp-n-doodle Blog Hop
Happy Friday everyone! We are a bit late in getting our Stamp-n-doodle challenge posted this week due to winter weather causing some power outages in about one third of the US, but we are back to business as usual and we hare having a Blog Hop to celebrate our New Release images for February, and to welcome our newest DT members: Molly, Ruby and Priyanka!!!! Welcome ladies, we are so happy to have to join us!!! The Blog Hop will run from today through Wednesday February 9 @ 11:59pm EST. In order to win the grand prize; which is all three images used by our various DT members, you must complete the hop and leave comments on all blogs along the way including the Stamp-n-doodle blog. You don't have to leave a comment at the shop which is your last stop on the hop. You also have the option of joining our new challenge; which is Valentines and/or Love. The winner of the challenge will receive one image of choice from Stamp-n-doodle. You are at my blog (Lisa), you should have come here from Molly's blog, if you did not, please go back to the Stamp-n-doodle blog and start from the beginning.
Here is my card with the new image called "Valentine"s Kiss":
 The strip on the far left side of the card is some patterned paper from my stash, and the rest of the card background is my own homemade patterned paper made by simply punching different colored paper/card stock and adhering it to the red card base. The image was cut out with one of the relatively new Spellbinder's di-cuts called Beaded Ovals. I colored the image with some Prismacolor markers, and embellished it with some sticky gems from Michael's craft store, and a Prima flower.
I hope you enjoyed your visit. You are now off to visit Jeanette's blog. We hope you will play along with the challenge as well. You do not need to use a Stamp-n-doodle image, but if you do, you get and extra entry for purposes of random.org winner's drawing.
Saturday, February 13, 2010
Last minute Valentine!
Hello. If you are a very last minute kind of person, and need a very quick valentine, here is one for you.
 All you need is some card stock, a heart punch, and a sentiment that says "Happy Valentine's Day". I used here a punch that my fabulous husband got me for V-day (early so I could use it), and it is a Martha Stewart Punch. She comes up with the cutest punches. For my purposes here I used Stampin Up Whisper White card stock for the card base, pretty in Pink for one of the hearts, two different color foil card stock (Unknown brand), and the sentiment is from Stampin Up's stamp set called "Teeny Tiny Wishes" stamped in their Real Red Classic Ink. See the enlarged photo below to see the shine of the foil card stock a little better.

All you need is some card stock, a heart punch, and a sentiment that says "Happy Valentine's Day". I used here a punch that my fabulous husband got me for V-day (early so I could use it), and it is a Martha Stewart Punch. She comes up with the cutest punches. For my purposes here I used Stampin Up Whisper White card stock for the card base, pretty in Pink for one of the hearts, two different color foil card stock (Unknown brand), and the sentiment is from Stampin Up's stamp set called "Teeny Tiny Wishes" stamped in their Real Red Classic Ink. See the enlarged photo below to see the shine of the foil card stock a little better.Short and sweet today, yes the pun is intended since tomorrow is Valentine's day!
Until next time..................Blessings, Lisa
Thursday, February 11, 2010
Soft Pencil Thursday
Wow, what a week here in Ohio, the snow has kept us busy, busy. Our kids haven't had any school until today, and it was a short day for them on a two hour delay. I am so ready for winter to be over.
Well, enough chit chat, lets move on to Soft Pencil Thursday, my favorite blogging day of the week. We had a very cute Valentine image to work with, and also an awesome challenge to go with it. We were asked to make a Spring Card, not the season, a card that has a portion of it that "springs" up. I have never made one of these before, so thank heavens for Splitcoast tutorials. I loved this style card, so easy! So, here is my take on it:

So, are Spring cards with Soft Pencil Images the cutest, or what? If you haven't visited the Soft Pencil store and blog lately, you can find a link to it over on my side bar. Click on the image that has the Soft Pencil logo on it.
The card base is some designer paper from the retired Stampin Up Bella Rose collection, the Michu image was cut out and mounted on some SU Shimmer White card stock, the corner pearls are a mixture from Hero Arts and Michael's. The flowers are silk from Prima, with a Die Cuts with a View Button for their centers. I simply folded the flowers in half, using a very small piece of extra tacky tape to keep them that way, adhered them to the paper with another piece of the same tape, then added the button with some liquid tombow glue. Thanks for visiting, and I will be back before Sunday with one more last minute, five minute simple valentine card. It is so fast to make, you won't believe it.
Until Next time..............Blessings, Lisa
Well, enough chit chat, lets move on to Soft Pencil Thursday, my favorite blogging day of the week. We had a very cute Valentine image to work with, and also an awesome challenge to go with it. We were asked to make a Spring Card, not the season, a card that has a portion of it that "springs" up. I have never made one of these before, so thank heavens for Splitcoast tutorials. I loved this style card, so easy! So, here is my take on it:
So, are Spring cards with Soft Pencil Images the cutest, or what? If you haven't visited the Soft Pencil store and blog lately, you can find a link to it over on my side bar. Click on the image that has the Soft Pencil logo on it.
The card base is some designer paper from the retired Stampin Up Bella Rose collection, the Michu image was cut out and mounted on some SU Shimmer White card stock, the corner pearls are a mixture from Hero Arts and Michael's. The flowers are silk from Prima, with a Die Cuts with a View Button for their centers. I simply folded the flowers in half, using a very small piece of extra tacky tape to keep them that way, adhered them to the paper with another piece of the same tape, then added the button with some liquid tombow glue. Thanks for visiting, and I will be back before Sunday with one more last minute, five minute simple valentine card. It is so fast to make, you won't believe it.
Until Next time..............Blessings, Lisa
Thursday, January 28, 2010
Soft Pencil Thursday!
It is Soft Pencil Thursday, and did we DT members ever get a cute image to work with this week! It is called "Michu and Michula", and our challenge was to use, rhinestones, brads, etc. as many or as few as we want! Yes, you know how I love those sticky rhinestones! Yes, I used alooooooooooooot of them! Ok, I exaggerated a little bit. I first colored the image in Pinks and Grays because I am a traditional kind of gal when it comes to holiday colors, and this week's image is a Valentine's day image. Then, I thought it looked like an awesome image to put on my husband's card, so I colored another image in shades of blue. Well, that was it, loved it. Much more masculine for a man. So, here it is:
 Since I was going masculine as I possibly could imagine, that meant no sticky pearls, no feminine patterned paper, and not overly fancy. So, I went with stripes on the paper, and of course the rhinestones. The sentiment was hand written by me! So, pop on over to the Soft Pencil Blog and Store and buy this image and others too. Elizabeth just loaded up some more brand new images just this week again; and are they ever cutie patooties! I am going to order a few of them myself!
Since I was going masculine as I possibly could imagine, that meant no sticky pearls, no feminine patterned paper, and not overly fancy. So, I went with stripes on the paper, and of course the rhinestones. The sentiment was hand written by me! So, pop on over to the Soft Pencil Blog and Store and buy this image and others too. Elizabeth just loaded up some more brand new images just this week again; and are they ever cutie patooties! I am going to order a few of them myself! Supplies List: Card stock~ Stampin Up Whisper White, Bashful Blue, Pacific Point, Pacific Point Designer Series Paper, and watercolor paper. Ink~ Bashful Blue & Pacific Point, Close to Cocoa, & Chocolate Chip ink refills. Accessories~ SU Blender Pens, Blue and Clear Sticky Rhinestones, Foam Dimensionals.
On a general note, I am reorganizing my blog categories slightly so that instead of having cards under just holidays, there will be separate categories for individual holidays to make it easier to click over to the ones that you want to view. I hope to have this completed within the next day or two. I hope you like it.
Until Next Time............Blessings, Lisa
Tuesday, January 19, 2010
Valentine Cards Stampin Up Style
Hello. Back again as promised. What I did for these Valentine cards was to first stamp some Backgrounds with Melon Mambo Ink onto Pretty in Pink card stock. First I stamped with two stamps from the Stampin Up "Park Avenue Patterns" stamp set, then I stamped with the "Medallion" stamp. On the Medallion stamp I also used the "Thumping" technique with a Rich Razzleberry Marker. Thumping is to simply tap the brush tip of your marker onto the stamp after you have inked it with an ink pad. Obviously using two different colors. Then, I punched out various heart shapes out of these backgrounds with Stampin Up "Full Heart Punch", and the "Heart to Heart" punch. After doing this, you have a bunch of fancy hearts to arrange on cards. I came up with seven cards, all the same layout, but with different patterns on each ones hearts. The patterns don't even have to cover the whole heart shape, they look very interesting either way. So, here are how mine turned out: Feel free to click on each one to enlarge it and get a better view.
Park Avenue Patterns used on this one, and edges of hearts brushed slightly on the Melon Mambo ink pad.
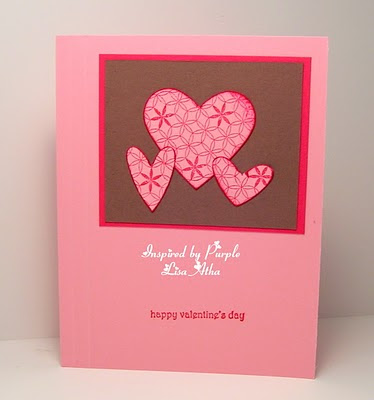
Same on this one, plus a small heart added with the new SU small heart punch.

Ditto on this one.

Medallion background stamp used on this one.

Medallion used on this one too. Can you see the Rich Razzleberry accents from the "Thumping" technique on this one?
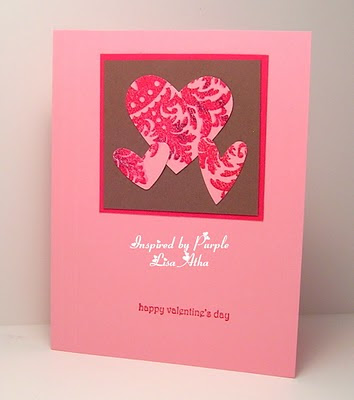
Same comments on this one as the previous above.
Same comments again on this last card. I am not sure if you could see them, but I also put two score lines on the left side of the card to add some interest. The card stock colors used were Pretty in Pink, Close to Cocoa, and Melon Mambo. The sentiment on them is from the Stampin Up set called "Teeny Tiny Wishes". If you have any questions leave me a comment that I can respond to.
Until next time.........Blessings, Lisa
Tuesday, January 12, 2010
Valentine Time
Yes, believe it or not I have returned. I am still fighting off the bronchitis, so I returned to my Dr. today. I got stronger medicine, and hopefully I will be back to normal real soon. In the meantime, I was sooooooooooo bored that I couldn't take it anymore. I actually made some cards to share with you today, imagine that! Gee does it ever feel good to be back to crafting and blogging. I miss the creative outlet and your comments. Stampin Up has a new Mini catalog out, and I have some new stuff to show you. Today, I made a couple of Valentine cards with the new stamp set called I {Heart} Hearts.
I borrowed this set from another demo, so I probably wont be posting anymore cards with it after today. Sorry.
I did, however take a bunch of photos, because I know that at least one person viewing this is going to ask if any of these stamps coordinate with any of Stampin Up's punches, such as the Full Heart Punch, Heart to Heart Punch, or the new Small Heart Punch from the occasions mini catty. The answer is yes, they do, and if anyone wants to see a photo explanation of this, leave me a comment, and I will do a separate post for that. So, the first photo below shows you all of the stamps included in the set. Is it cute or what?
 The next photo is of the first card that I made with this set. I used the different hearts to create a very quick and simple cascade of hearts going down the card. The top heart is simply some SU DSP punched with their Full Heart Punch, and some Melon Mambo punched with the new Small heart punch and layered on top. The next two hearts were stamped with Melon Mambo and cut out by hand. The next three hearts are all on one stamp, inked with Melon Mambo again and punched with the Heart to Heart punch. The "Love" heart at the bottom was also stamped with Melon Mambo ink and then punched with the new Small Heart Punch. Happy Valentine's day was stamped on the inside of the card using a stamp from the SU set called Teeny Tiny Wishes.

The next card uses three stamps in the same set. The three stripes are 1/4" grosgrain ribbon: Real Red, Rose Red, Pretty in Pink. I stamped all of them in Real Red ink, cut out the two on the right by hand, and popped them up with pop dots, the friend heart was punched out with the Full Heart Punch. Just for the heck of it, I added a Real Red small heart punch. The sentiment again is from the stamp set Teeny Tiny Wishes. Both cards have a Kraft card stock base.


I borrowed this set from another demo, so I probably wont be posting anymore cards with it after today. Sorry.
I did, however take a bunch of photos, because I know that at least one person viewing this is going to ask if any of these stamps coordinate with any of Stampin Up's punches, such as the Full Heart Punch, Heart to Heart Punch, or the new Small Heart Punch from the occasions mini catty. The answer is yes, they do, and if anyone wants to see a photo explanation of this, leave me a comment, and I will do a separate post for that. So, the first photo below shows you all of the stamps included in the set. Is it cute or what?
The next photo is of the first card that I made with this set. I used the different hearts to create a very quick and simple cascade of hearts going down the card. The top heart is simply some SU DSP punched with their Full Heart Punch, and some Melon Mambo punched with the new Small heart punch and layered on top. The next two hearts were stamped with Melon Mambo and cut out by hand. The next three hearts are all on one stamp, inked with Melon Mambo again and punched with the Heart to Heart punch. The "Love" heart at the bottom was also stamped with Melon Mambo ink and then punched with the new Small Heart Punch. Happy Valentine's day was stamped on the inside of the card using a stamp from the SU set called Teeny Tiny Wishes.The next card uses three stamps in the same set. The three stripes are 1/4" grosgrain ribbon: Real Red, Rose Red, Pretty in Pink. I stamped all of them in Real Red ink, cut out the two on the right by hand, and popped them up with pop dots, the friend heart was punched out with the Full Heart Punch. Just for the heck of it, I added a Real Red small heart punch. The sentiment again is from the stamp set Teeny Tiny Wishes. Both cards have a Kraft card stock base.
Now, speaking of boredom, this one of the things that I did while I was resting on my sofa last week. My kitty, Mittens was by my side the whole time. Here she is taking very good care of me while sleeping on her bed next to me. How do they hold their legs and paws up like that while sleeping? Doesn't look comfy to me! I'm just sayin! She sure is funny though.
Well, that's my limit for one day! Thanks for all of the get well wishes from you fabulous blog readers. Take care, stay healthy, and
until next time...........Blessings, Lisa
Saturday, February 7, 2009
More fun with Chipboard!

Hello. I was in a chipboard mood again. So, I heat embossed 3 Stampin Up Chipboard hearts with Stampin Up Craft Ink and Clear Embossing powder, and added a red sticky gem to each of them. Next, I punched 3 circles from Stampin Up Pretty in Pink card stock, and 3 scallop circles also punching a 1/16" circle into each of the scallops. The chipboard hearts were adhered with Stampin Up Crystal Effects (love that stuff). The sentiment was heat embossed with the SU retired dark brown EP. The tiny heart buttons were adhered with SU crystal effects, and I am sorry, but I can't remember where the buttons came from. The base of the card is Stampin Up Kraft card stock, and the designer paper under the hearts is made by Provo craft. The scallop/circle border was made with a Martha Stewart border punch. Thanks for visiting my blog, and have a great weekend! Lisa
Sunday, February 1, 2009
Yeah, I'm digital again!

Yeah! I finally got to the store to get a new memory card for my digital camera, so I took a picture of my latest card creation and here it is:
This was inspired by a card that I saw on Splitcoast Stampers website, however, I can't remember who it was and I changed the layout about 50%.
Anyways, I used the spiral punch from Stampin Up to punch the border on both sides of the black card stock strip. The hearts were punched with an unknown paper punch that I have had in my stash for around 6-7 years. How weird there is no manufacturer listed on it. Then after punching each heart I did some tone-on-tone sponging on one edge of each heart with Stampin Up Classic inks then I adhered them. The happy Valentine's day stamp is a Hero Arts stamp, stamped in SU Real Red Classic Ink. That is all there is to it. Complete supply list to follow. I hope you like it.
Supplies Used:
Card stock ~ Stampin Up Basic Black, Whisper White, Yoyo Yellow, Only Orange, Unknown Red, Pink Passion, Lovely Lilac, Brilliant Blue.
Ink ~ Stampin Up Real Red, Yoyo Yellow, Only Orange, Pink Passion, Lovely Lilac, Brilliant Blue.
Accessories ~ Stampin Up Spiral Punch.
Monday, January 26, 2009
Easy Valentines Card

Hello. I was in the mood to make a simple valentine card last night, and this is what I came up with. I used one of the stamps from the Hero Arts "Patterned Hearts" stamp set. Pop on over to their blog, and check out their online catalog. They have some cute stamps. So, The picture quality is not too good, as I am still scanning instead of taking photos. I will correct that issue in the next few days, it is driving me nuts! How the heck did we survive without digital cameras? Anyways, I achieved the dotted square image by running the card stock through my cuttlebug with one of my small embossing folders. There are 4 square frames in a set. Then I took my Stampin Up Real Red Marker, and dabbed it on each raised dot. Next I stamped the heart on my versamark ink pad, then a real red classic ink pad, then on card stock (whisper white) and heat embossed with clear embossing powder. It is kind of hard to tell in the photo but I stamped the red ink lightly on the stamp, then again darker on the edges of the heart. I am sure you have all heard of this method called the "Rock and Roll" technique. Next I cut a panel of red card stock from my "Die Cuts With a View" stash. I couldn't get that heart border punch through the thick Stampin Up card stock. Bummer! After the border was finished, I added some cute satin offray ribbon to it that a friend gave me, and some red sticky gems that the same friend gave me. So easy, I had it made in a flash. I hope you enjoy.
Speaking of cute stamps, have you seen the new Stampin Up catalog? Oh, my gosh, they have so many new and adorable stamp sets, and some really fun new accessories, from glitter, to buttons, to corduroy buttons to new chipboard shapes and new cutting/embossing die cuts for the Big Shot machine. They also work in the cuttlebug if you already have that one. I am going to plan an open house soon to show off some of these new things, I just have to wait until they arrive at my door. Until then, click over to their website and view the catalog online. See link on my sidebar.
Blessings, Lisa
Subscribe to:
Posts (Atom)


 Posts
Posts


