Showing posts with label Stampin Up. Show all posts

Saturday, April 19, 2014

Easter Cards for the kiddos

I cannot believe Easter is almost here!!!  I have a great niece and nephew that live out on the West Coast and I am in Ohio, so I sent them each a little treat and a handmade card.  They are little tykes in Kindergarten and First Grade, my sweet angels Tristin and London.  Tristin loves Lego's and London loves Hello Kitty, two things that I adored when I was a kid also.  So, I had a great time making these cards.  I hope you like them.  Yes, Trisitn's name on the front is meant to be jumbled and not lined up evenly.  Here they are:


I cut out the rectangles on the lego card and used a 1/2" circle punch for the dots, and a white prismacolor pencil to add a little depth to them.  The letter stamps are from a retired Stampin Up set.

The hello Kitty card was made with some Sizzix Di-cuts, a Stampin Up trio flower punch, and a Spellbinder's label di-cut.  I forget which label, sorry.  

To my sweet little angels I just want to tell you once again, that even though I live so far away, I love you very much!!!!  Have a very happy and fun Easter and be good kids for your mom!!

Until next time..........Blessings,   Lisa

Friday, June 8, 2012

Stampin Up Stipple Shells

Hey, welcome to Friday! Yay! Everybody loves Friday, I love it this week because my wonderful daughter turns 13 on Saturday!!! I just want her to know how wonderful I think she is and how much I love her!!! She loves the beach, and like her father and I cannot wait to go visit it again someday after mom gets back to work and saves up for the trip! So, until then, she can come visit my blog and enjoy the following card: I saw a card very similar to this on the Hero Arts blog, and had to give it a try. I stamped randomly with the retired stamp set SU Stipple Shells with a Versamark pad on several different colors of card stock and heat embossed with white Embossing powder, sponged ink around the shells, then punched them out randomly with a 1 inch square punch. The rest is pretty self explanatory. I got about 4-5 cards out of my punched out shells. Hope you like it! Until next time..........Blessings, Lisa

Thursday, May 31, 2012

Stampin Up's Mixed Bunch

Hey, Happy Thursday. Funny finding me posting on a Thursday, huh? Well, I have lost a couple of followers, which makes me sad, so maybe if I post more often, I will get more of them. "Post, and they will come", a little voice told me. Yes, I know, I am just way too funny. As you know I love Stampin Up products along with many other products out there in the crafty world. I haven't posted anything Stampin Up in a looooooooooooooooooong time. They had this stamp set called Mixed Bunch, that has a coordinating punch! Yay, love punches! It just so happens that the Clean and Simple Blog has a sketch this week that works awesome with these stamps and it is very quick and simple to make. Here is the sketch:
Here is the card that I made with it:
Hope you like it! Until next time................Blessings, Lisa

Friday, December 23, 2011

One last Quick Christmas Card

Here is one last quick and Simple Christmas card to show you:


I used Delightful Decorations stamp set from Stampin Up, with gold embossing powder, and also Stampin Up's Ornament punch.

Hope you all like it, and that you have a very Merry Christmas!!!!

Until next time............Blessings, Lisa

Wednesday, October 26, 2011

Some Stampin Up Halloween and Thanksgiving!

Welcome back to my blog. I went to a Stampin Up workshop last week and made a couple of cards. Yay! I love when someone else does the design work and I just get to stamp. So, I cannot take the credit for the following cards, they were designed by my good friend, ex-SU leader, and current Stampin Up demonstrator...Teri Frietch! She does not have a blog, so I occasionally post her stuff here on my blog!

The first card that we made is a Halloween card. The stamp set is called Festive & Fun from the current SU Holiday Mini catalog. There are three stamps in the set, one for Christmas, one for Valentine's Day and this one for Halloween:


The next card is a Thanksgiving card and I apologize, but I cannot seem to find the name of the Stamp sets that these stamps are from. If I do find out, I will edit this post. I love the layout of the card, hope it inspires you to get crafting.


Now, keep coming back and visiting me because I went nuts with a card sketch from the clean and simple blog that I will be posting sometime on Thursday! I just can't stop making cards with this one. There is a link to their blog on my sidebar if you want a sneak peek of the sketch.

Until Next time...............Blessings, Lisa

Saturday, May 21, 2011

Stampin Up's Blooming with Happiness.......


Well, I don't really know if they are blooming with happiness at Stampin Up, but that is the name of the retired stamp set that I used to make a bridal shower card with. My cousin's daughter is getting married over the summer, so I first had to have a shower card ready. Her colors on her Wedding invitation were Dark Purple, Ivory, and Gold!!! Yay, anytime there is purple involved I am a happy crafter! So, here is what I created:


I stamped the image onto my versamark pad, then onto the new SU color called Concord Crush, then heat embossed it with Clear embossing powder. So, if the image looks a little blurry, sorry. I tried several angles with my camera, this was the best photo I could catch. Anyhoo, I ran a piece of Concord Crush card stock through my cuttlebug with my Petals a Plenty embossing folder, then matted it onto a piece of metallic gold card stock. Next I painted the raised dots on the pattern with some Gold Smooch metallic Shimmer paint. Next I added a little bit of organdy ribbon and a tiny flower to the piece with the stamped image and a gold sticky pearl to the center of the flower. The base of the card (SU Very Vanilla) was sprayed with a combination of Gold and Fully Purple Glimmer Mist from Tattered Angels.


Here below is a close-up to show off some of the shimmer:

Now that I have your attention, I would like to introduce the newest member of our family.....


Chibbles, the Guinea Pig!


Isn't he adorable? He is so sweet too! He is a slightly early birthday present for our daughter Amanda, who turns 12 in two weeks. I am in love with this little guy, he is so soft and sits so still when you hold and pet him.


Well, as always until next time......... Blessings, Lisa

Friday, February 18, 2011

Stampin Up Valentine's!!!

Welcome back. I have some super pretty Valentine's Day cards to share with you that I made at a Stampin Up workshop. Yes, I know, Valentine's Day is over, but I thought they were pretty, so I had to share them with you. The layouts would work great with other stamps as well, or you can case them as they are and save them for next year. Anyhoo, here they are.


The sparkly heart in the center was punched from one of the new Stampin Up Glimmer paper Sheets. This stuff is so awesome, it is absolutely stunning in person. I love bling, so I don't joke about it!


Notice the small heart in the "o", is actually punched with the small heart punch out of the glimmer paper. See close up below. Love the sparkle!
Although I did hand make the above cards, I cannot take the credit for the design of them, they were completely designed by my Stampin Up pals, Terri Frietch, and Teddy. Thanks ladies, it was so nice of you to invite me and what a relaxing time it was since for a change I didn't have to do any designing. I just came and played!

Now, to all of my Soft Pencil fans, I got word today form the owner that she will be back in business on March 1st, so we DT members will be showing and creating with her new images very soon! We are all very excited!

Until Next time................Blessings, Lisa

Saturday, August 21, 2010

Cute By The Inch ......

is the name of the stamp set that I used on these cards. There are nine stamps in this level two hostess set, and my dear friend was nice enough to loan this set to me so that I could create a few things with it. Each stamp image is only one inch square, so get out your square punches when you work with this one. It is too fun to use and very versatile.


As you can see in the first card I used the friends flower stamp, coloring the stamp with SU Markers then stamping. The embossed flower was made with the SU flower burst embosslit. I am so hooked on those embosslits, cutting and embossing at the same time! Me likey! The colors that i used here were Pacific Point, Bashful Blue and Garden Green. The bottom sentiment is from the SU stamp set Teeny Tiny Wishes.

Now, I must confess, that I cased most of this card layout from one that I saw on Splitcoast Stampers, except that I used a different ribbon. The colors here are Night of Navy and Old Olive. Keep coming back to visit me as I have more cards made with some other stamps in this set to show you.

I also have some photos and info from the Stampaway stamp convention that was here in the Cincinnati, Ohio Suburbs last Saturday. Tim Holtz was there!!!!! So much stuff to show and tell, not enough days in the week!

Until next time.....Blessings, Lisa

Sunday, July 18, 2010

Masculine Card from Stampin Up

Hello. Happy Sunday to everyone! Today's card was made with two Stampin Up stamp sets, the "Woodgrain" background stamp, and the tree image from the "Forest Friends" stamp set. I was trying to see what I could come up with that was masculine in nature. Like most women, I tend to purchase the "cute" stamp set, the "elegant" stamp set, stamp sets with flowers and/or butterflies, etc, etc, etc.... I am sure you can relate to this. So, masculine cards are a particularly difficult challenge for me. But, here is what I can up with:
I first stamped the woodgrain stamp onto some vanilla card stock with three different times with three different colors, all in the brown family of SU colors. Then, I took the tree stamp from "Forest Friends" and colored it with two different Stampin Up markers, and stamped it onto vanilla card stock. Next I cut out the tree out and punched out the woodgrain backgrounds with circle punches. Adhered all of this into the pattern you see above and stamped a sentiment! I have to admit, I absolutely love these quick and simple card layouts.
The tree was colored with Garden Green, and Chocolate Chip, and the card base is Kraft card stock, which Stampin Up recently renamed Crumb Cake. That sums it all up! I am off to chat with my peeps on facebook. Take care, and....


Until Next time...........Blessings, Lisa

Saturday, July 17, 2010

Masculine cards with "Fox and Friends"

Wow, happy Saturday! I hope everyone is having a safe and fun weekend. I am planning on swimming today, that is my fun! Well, as promised I have a card to show you that was made with Stampin Up's "Fox & Friends" stamp set, and it is even masculine in nature. That was not an easy task since that stamp set is so cute in nature. But it was actually made for my husband for Father's day and he is a huge animal lover of all kinds, just as I am. I know, Father's Day is over, but you could also put a Happy Birthday sentiment on it. So, without further wait, here it is:
This was a very quick and simple card to make. I simply stamped the fox three time with Close to Cocoa ink, close to the edge of the card stock, punched all three out at different locations of the image, mounted them on Night of Navy card stock. Next, I punched out the edges of my Close to Cocoa car stock strip with my spiral punch from SU, then added the images. Next I added a piece of DSP to my card base, and added the brown strip, stamped a sentiment, and that was it. I think this only took me about 10 minutes to make.
Now, come back to visit me on Sunday, I just may have another masculine card idea for you that is even more easy to make.
Until next time........Blessings, Lisa

Friday, July 16, 2010

Embrace Life from Stampin Up

Awe, I love this stamp set, so sad it had to retire, but, we can still stamp with it! I had no idea what I was going to make when I started this one. I wanted to stamp with this particular stamp on colored card stock, then color the flowers in with my white gel pen. When I finished with that, I still didn't know what I wanted to do, but for some reason punching the flowers out with my square punches and matting them with black card stock sounded good.

So, after staring at my three squares for awhile.....LOL...... I decided to get out some Retired SU DSP and came up with the above layout. The sentiment and square sticky gems were an afterthought that I decided to add. Sometimes that is how cards and scrapbook pages come together. One baby step at a time, with no clue as to what the final project will look like. Sometimes I will stamp something, color it in, then it sits on my table for weeks before I decide what to do with it. Sometimes, I know exactly what I want to do right away. I just go with whatever is flowing through my brain. My point......don't be afraid to just play around with your stamps and digi images, playing leads to ideas and ideas lead to finished creations! Well, that is my tiny bit of wisdom for today! Thanks for stopping by. Now, I am off to go schedule a post tomorrow with some more Stampin Up stamps, with the set "Fox & Friends"! Love that one, and yay it made it into the new catalog.

Until then......................Blessings, Lisa

Thursday, May 13, 2010

Soft Pencil Thursday!!!!!!

Hello everyone, it is my favorite day of the week, Thursday!!! Yay... I get to post something made with a Soft Pencil Digi image. I was drawing a blank on what to do, so I got out things in my favorite color, purple (lavender today), and I guess I truly am "Inspired by Purple", because an idea just hit me. I got out my relatively new border and corner punch combo from Stampin Up. I have only used them a couple of times, so I thought I should put them to work. I also decided to be probably the last person on Earth to try Copic markers, Marco's Paper in Dayton Ohio had the Caio version of them on sale for $3.89 ea. Of course I bought 2 purple and one blender pen, just so I could be able to say that I tried them out! OMG, I am in love........why do they have to be so expensive? If you think $3.89 is a good deal on them, and want to check it out, Marco's has a website that you can order from and you can find it here. They also have phone numbers listed on the main page, if you need them. Dayton is about an hour away from where I live, so I don't get up there very often, so the nice lady there told me that they would be more than happy to take phone orders and ship it to me. Oh yay, someone else willing to feed my obssesive hobby. LOL. So, here is my purple/lavender creation for today!


I have adopted the clean and simple look with my card making and scrap booking for that matter. I love to look at the more embellished projects, but it is just not in me to create with that style. I have come to the conclusion that when it comes to anything creative or artistic, we all have to develop/find our own style, and not try to be someone that we are not! The card stock that I used for the card base is SU's Barely Banana and the matting for the image is Almost Amethyst. The designer paper is a retired SU designer series paper. The image was colored with a combination of markers. Everything lavender is Copic, the rest is Stampin Up. The sentiment is from a Stampin Up set that I commonly use called Teeny Tiny Wishes. Of course the pearls are from Michael's craft store. I have also decided that I can't finish a card off without adding pearls, bling or buttons. LOL.

If you missed the Soft Pencil Blog Hop last week, just scroll down on my blog a little bit, and there is a list of blogs and links attached to them, so you just click the first one and start hopping. The contests are over, but you can still get some great inspiration from all of us DT girls.

Until next time.........................Blessings, Lisa

Sunday, May 9, 2010

Happy Mother's Day!

Happy Mother's Day to all of the mothers and mothers-to-be out there! I am getting the finest treatment today from my daughter and my husband! My daughter made me the most beautiful card with a totally sweet letter inside telling me all the reasons that I am the best mother in the world. My husband bought me a delicious ice cream cake from Dairy Queen. So yummy, I can't wait to taste it after dinner later today! I have some very last minute Mother's Day cards to show you, sorry I am so late with them. However, the layouts could be used for other cards as well, just change the stamps you use to fit whatever the occasion may be.

This first one was made with a stamp from a set made by Just Rite Stamp Company. I love their stamps, such cute designs. The sketch is an old sketch from Splitcoast Stampers, it is SC29. I added the little buttons to the sketch though. The buttons could be replaced with sticky Gems, pearls, many different embellishment options out there. I used Stampin Up markers to color the image, Spellbinder's Nestibilities to cut out the image and it's matting, the card stock is SU Pretty in Pink, and Rose Red, and the Designer paper is also from Stampin Up. The buttons are from an adorable little container filled with buttons that I found a the Michael's dollar bin.
This next card I cased from Lee Ann Gref's blog, which you can find here. I used a 3/4" square punch, then a corner rounder to round the corners of only 2 of each square. The centers are rhinestone brads from Stampin Up, the border was made with the new Stampin Up Scalloped Border punch, the ribbon is 1/4" Celery Grosgrain ribbon from Stampin Up, and the sentiment is from the SU stamp set Teeny Tiny Wishes. Just think of the color combos you could use with this design, and the several different occasions that the layout could be used for. Love versatile, and simple cards!


This next card design was also cased from Lee Ann Greff. Her blog; Flowerbug's Inkspot, is an awesome place for great ideas! I have tons of Designer Paper laying around, most of which was a gift from a couple of friends that I have that are way too sweet. The DSP that I used on this card is from DCWV Baby Boy 8x8 stack that I won as pat of some Blog candy over on Becca Feeken's blog "Amazing Paper Grace". She is the first one listed on my favorite blogs list over on my sidebar, take a peek at her wonderful creations when you are done here. She is one of the most talented people that I have ever met and soooooo sweet too. Oh, and when she gives away blog candy, she gives away some awesome stuff! Anyways, I changed the right bottom corner element on my version of this card. I used the Stampin UP/Sizzix sisslet di-cut called Floral Fusion to create the embellishment. The di-cut has 3 different sized flowers on it, and I cut 2 of it, curled it a bit with a stylus, and layered them together with an SU rhinestone brad in the center holding them all together. Then I adhered it with a stampin foam dimensional. The other three corners were punched out with my Stampin Up Scalloped Corner punch, the ribbon is from Stampin Up's last years Sale-a-bration promotion, and again the sentiment is from SU's Teeny Tiny Wishes stamp set.

Now, please remember that I am running a sale on all retiring color products from Stampin Up until the end of June, see this post here.
Also, to see the Soft Pencil Designs blog hop, and to enter to win Free digi images from them, see the post before this one, scroll down. The blog hop lasts until This evening, Sunday, at 8pm. I believe that after that all of us DT members will draw a name from our comments on the blog hop posts and give away the digi images that we each used on our blog hop projects.
Until Next Time...........Blessings, Lisa

Thursday, April 15, 2010

Soft Pencil Thursday and some Blog Awards!

Wow, I can't believe it is Thursday already! Time Flies. As you know, it is Soft Pencil Thursday for me plus I received two blogger awards! Yay! Believe it or not, these are my first blogger awards! The first one was from Elizabeth owner of Soft Pencil Designs, and the second was from fellow Soft Pencil DT member, Kerry. I can't thank you enough ladies, you made my whole week! So, on with the latest Digi image project from Soft Pencil.

This image is called, "Welcome to My Apple Home". Is that worm adorable or what? I decided that it would make a cute teacher thank you card for my daughter's teachers. We have been very blessed again this year that she has had such wonderful teachers, so I am getting a jump start on my thank you cards because summer break will be here before we know it.


I colored the image with my Stampin Up markers, mounted it on Real Red Card Stock, then again on some Stampin Up Designer Series Paper in Certainly Celery. The Border and corners were made with my Stampin Up border and corner punch, the tag sentiment was punched with SU oval punches and the sentiment is from the SU Stamp set Teeny Tiny Wishes. The Ribbon is from Making Memories, the rhinestone brad is from Stampin Up, and the sticky gems are from Michael's craft store. Oh yes, lets not forget the fiber that the tag hangs on, sorry I have no idea where it is from, it has been in my stash for years. Stay tuned to my blog, as I will be letting you know about a big blog hop that Soft Pencil Designs is having to celebrate it's anniversary!


This blogger award is from Elizabeth, owner of Soft Pencil Designs. Thanks Elizabeth you are so sweet.


This blogger award is from Kerry, fellow Soft Pencil DT member. Thanks to you too Kerry.


Now, I am supposed to pass these awards onto ten other ladies that have wonderful blogs, but I don't know that many bloggers so I will do the best that I can.

Donna (Butternut Sage Designs)

Cindy (Cindy's Inklings)

Lydia (Understand Blue)

Ann ( The Stampin Schach)

Jana (This Little Card of Mine)

Becca (Amazing Paper Grace)

Cat (Cat's Crafty Corner)

Now, if any of you ladies have already received these awards, please forgive me. I tried to make sure that you hadn't.

Until next time......... Blessings, Lisa

Monday, March 29, 2010

Inspirational Easter Card

Hello. I wanted to show you today an Easter card that I made that is more about the "reason for the season" as the saying goes. I used a stamp set from Stampin Up called "Abundant Hope". Here is a photo of the entire stamp set, it has a beautiful image of Daffodils, two sayings, and a fancy swirl image.

For the front of the card, I stamped the image on Watercolor paper, and colored it with Stampin Up ink refills dropped into the lid of the ink pad and I used a blender pen. The Designer paper is from a retired Simply Scrappin set, and the border was punched with SU's new Scalloped border punch. I cut out the image with an oval Spellbinder's Nestibility and mounted it onto Yoyo Yellow card stock cut out with a scalloped Oval Nestibility. The Sticky gems are from Michael's Craft Store, and the image is popped up a bit with some foam dimensionals from Stampin Up. The other card stock used is SU Garden Green, and Whisper White.

I decided to show you the inside of the card because I stamped the longer sentiment on the inside with the fancy swirl on the top and under the sentiment. Love that Swirl!

Now, this week is my first week back on the DT team over at Soft Pencil Designs, so among other things this week, I will be having "Soft Pencil Thursday" again for the month of April. I love working with Soft Pencil Designs, they are so adorable. I have another Easter card to show you tomorrow, with an oh so cute image that was a gift to me from a friend. I am still working on my blog remodeling, so keep excusing my dust.
So, until next time.............Blessings, Lisa

Saturday, March 27, 2010

Please Excuse my Dust....

because my blog is undergoing some changes. I am trying to perk it up a little, make some changes because quite frankly and I can't believe that I am saying this, but I am so tired of looking at that lavender background! Yes, you read that correctly, I am actually tired of looking at that background. Plus, a friend of mine is helping me create some awesome sidebar buttons. So, please be patient if the new stuff doesn't work correctly right away, I am working on it. Busy, busy, busy, plus I have been doing some much needed Spring cleaning and going through our "stuff" to get ready for a yard sale. But, while you are waiting to see some interesting Easter creations, chew on this masculine card for a bit:

I saw something similar to this somewhere......................oh I forget, sorry whoever you are. I had been wondering if the negative pieces to this SU/Sizzix Sizzlet die cut (Little Leaves) would look cute on a card anyways, so I put my own twist into it, and Voila. The negative piece is popped up just a bit with some foam dimensionals. Here is a list of supplies:

Card stock: SU ~ Chocolate Chip, Garden Green, Creamy Caramel

Punches: SU ~ 3/16" Corner Rounder Punch, Word Window Punch, Modern Label Punch
Accessories: Sticky gems from Michael's

Wednesday, March 17, 2010

Happy St. Patrick's Day!

Hello! I am back! Happy St. Patrick's Day to everyone even if you aren't Irish. I am a wee bit Irish, and my husband is approximately 75% Irish, so we decorate for this occasion around our house and I make shamrock shaped cookies. Beyond that.....no matter what ethnic background you carry in your genes, be proud of it, celebrate it, and don't let anyone tell you there is something wrong with it! I have a handful of different ethnic genes, and I like each and every one of them. Beyond the Irish genes, I am also part English, Czech, Swiss, and Italian (Venice). I guess you could say that I am a very European combination kind of girl. What brave ancestors I must have had to leave their homelands to come to America! I am very fascinated with every ones ethnic backgrounds, so if you feel like it, drop me a line and tell me your ethnic background(s), and if you are visiting me from another country, tell me a little bit about your homeland as I will probably never get to travel abroad in my lifetime.

Ok, on with the reason for this blog, paper crafting! I have three cards to share with you today! Yep, three! Elizabeth, the owner of my favorite digi company, Soft Pencil Designs, was sweet enough to grant my wish and ideas for a couple of St. Patrick's Day images and send them to me, so I made a couple of cards with them, and I also made a card with some Stampin Up supplies. So, Is the first one:

So, is this image cute or what? Michu the kitty is very excited as you can see to have found that big pot of Gold at the end of the rainbow (can you blame him?), and I think Ratiny is just happy to have found a mouse Girlfriend. Look at her cute little bow on her head, which I couldn't help myself but to color it purple. The Daisy DSP is from Provo Craft, ands the rest of the card stock is from Stampin Up. The sentiment is also from Stampin Up from their "Teeny Tiny Words" stamp set. The border at the bottom was made with the daisy border punch from Martha Stewart. Of course I couldn't resist embellishing it with some Sticky gems from Michael's craft store. The two shamrocks up in the right hand corner were made with a shamrock paper punch from EK Success. I colored the image with Stampin Up markers, and some Smooch shimmer paint.

The next image above is Michu and Ratiny dressed up as Leprechauns! Oh my gosh when I saw this one, I squealed with delight out loud, literally! It is is absolutely priceless! I used a sketch similar to one that I used on a previous post, except that I mounted the image on a scalloped square instead of a scalloped circle (scroll down and see the card with the Soft Pencil Mermaid on it). I made the scalloped square with my Sizzix/Stampin Up BigZ scalloped square die-cut, love that die-cut! The DSP was leftover from last year and it is from Provo Craft, I couldn't help myself again and added some Gold fake Pearls to embellish the scallops. The image was colored with a combination of Stampin Up's markers and their Watercolor wonder crayons and blender pens.

This last card above used the negative or left over piece from cutting out the scallop square, and I popped it up with some foam dimensionals. The shamrock was made by cutting out 3 hearts from Stampin Ups Sizzix Embosslit called Scalloped Heart of Hearts. I hand cut the stem. I am in a bit of a rush, so I didn't post the colors that I used. However, if you want to know what they are, just leave me a comment letting me know, and I can add them tomorrow. Thanks for visiting.
Until Next Time..................Blessings, Lisa

Tuesday, February 16, 2010

Bunnies in Windows

Hello. so sorry I am posting so late in the day, it is approx. 4pm here in Ohio, and very white outside. We had another winter storm, and my daughter's school closed for today. Urgh! They have missed so many days now, that they are going to have to add them on in June when the weather is awesome. Poor kids.

Anyhoo, I have a card to share today using Stampin Up's Eggcoutrements stamp set again. I decided to try a window card and see how I liked it. So, here is what I came up with:


I punched out 2 square windows, and stamped the bunny stamp, punched it out with my 1" circle punch, and placed them on the inside of the card. It is hard to tell in the photo, but I stamped the other two stamps with Melon Mambo ink on Pretty in Pink card stock. I know this is short, but I am off to do a family dinner thing with my in-laws. Please if you have any questions, leave me a comment, and I will add the answers to this post later.
Until next time..............Blessings, Lisa

Monday, February 15, 2010

One Blue Bunny!

Hello. Happy President's Day on Monday! I hope everyone had a fabulous Valentine's Day; and that none of you ladies had to cook dinner on Valentine's Day. I know I got taken out for dinner, and loved every minute of it! So, I have a photo of a new stamp set below from Stampin Up called "Eggcoutrements", that is so dog-gone adorable that I just had to have it. I assembled it as soon as I got it, sat down to work with it, went completely blank. So, I went to Splitcoast Stampers website, and every other website that I could think of to find samples to inspire me. Well, hardly anything could be found! Apparently everyone else either didn't buy it yet, or was just as confused as what to do with it as I was. I went to an SU upline meeting, and desperately wanted to make a swap sample with it to share and I made the most awful card as far as I was concerned. So, I decided not to share it on here. But, wouldn't you know, the next night after the meeting a couple of ideas came to my brain. Doesn't it always work that way? So, scroll down, and you will see one of them.
Tah dah!!!!!!!!!!!!!!!!!!!!!!!!!!!!!!!!! Simple, clean, and kind of cute! Who can resist that cute little bunny face! Why did I make one of them blue? Why not? I felt like it!


So, here is what I did. Several of the stamps in this set coordinate with Stampin Up's paper punches. The bunny goes with the 1" circle, the "For You on Easter" sentiment goes with the Designer Label Punch, the floral border stamp goes with the Scallop Edge Punch, the Easter Basket stamp goes with either the Small or Large Tag Punch (depending on whether or not you want a white border around the image), and the cute little Chickie doesn't coordinate with any punch. So, I stamped my bunnies, punched them with my 1" circle punch, then mounted them on shapes made with the Curly Label Punch, mounted them on some Kraft card stock, stamped my Happy Easter sentiment (Teeny Tiny Wishes stamp set) in Lovely Lilac, rounded the corners of the card base with my SU 3/16" Corner Rounder punch and that was it. Pretty darn quick and easy.

As always; until next time.................... Blessings, Lisa

Wednesday, February 3, 2010

Baby Cards with Fox and Friends

Hello. I have a couple of quick and simple baby cards made with Stampin Up's "Fox and Friends" stamp set to share with you today. I have not made any baby cards in awhile, and the cute animals in that set seemed appropriate today. Here is a look at the stamps in the set:


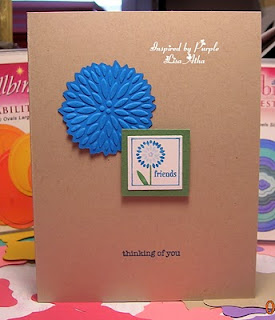
Here is my first card:


I couldn't get the colors to come out correctly in my photo today, the colors that I used are Bashful Blue, Ballet Blue, Certainly Celery, and Whisper White. The sentiment is from Stampin Up's stamp set called "Teeny Tiny Wishes". The ink that I used was Bashful Blue for the Lions, and Ballet Blue for the sentiment. The ribbon used is from a retired Stampin Up set, and the rhinestone brad is Stampin Up also.


The next card showcases the adorable Giraffe in the same stamp set, stamped with Apricot appeal ink, and I drew a shadow on one side with a Sahara Sand marker, because the apricot ink seemed so light. The ribbon is SU 1/4" grosgrain matching Apricot. The card stock colors used were Whisper White, Certainly Celery. The sentiment is obviously stamped in Basic Black ink.

I hope to have more cards made with this stamp set, but I am working on some swaps made with another new Stampin Up set called "Eggcoutrements" and also my creation for tomorrow's Soft Pencil Thursday. So, more stuff is coming so come back to visit again.
Until next time.........................Blessings, Lisa