Showing posts with label The Greeting Farm Stamps. Show all posts

Monday, August 31, 2009

Wild Things from The Greeting Farm

Hello. I hope all is well with all of you! I have been suffering from headaches from the lovely weather changes here in Ohio. However, I am still stamping. I have a couple of cards that I made with stamps from The Greeting Farm stamp company. Click on their name for a link to their store. You will also see a link to their blog on my sidebar. They have the most adorable stamp images/sets. They are definitely one of my favorite stamp companies. Ok, on with the cards:


The first card above is the lion image from their "Wild Things" stamp set. I was playing along with a challenge to make a circus themed card, and I though the Lion would be perfect. So there he sits on the podium roaring to the crowd. The podium was made with my Stampin Up Round Tab punch cut in half. The balloon bundle was made with the bunny and balloon stamp from TGF Lucky bunnies stamp set. I simply inked only the balloon three times, colored them and cut them out. The rectangle that the lion is on was cut with a Spellbinder's Large Rectangles Nestibility. The little popcorn embellishment was from A Sandilion Sticker Circus set from my stash, and the little stars were punched with a small star punch from Michael's with foil card stock .


I had a blast making this card too. I was looking at the monkey image that I had previously water colored, and the sentiment "swing at it" from the same "Wild Things" stamp set, and thought to myself that this monkey just had to be hanging from something. The vine that he is hanging on was cut with my SU Little Leaves die, and the other vines were made with my Creative Memories 12" curvy trimmer. I was going for a Clean and Simple Card on this one, so swinging monkey and his jungle vines were as far as I decide to take this. The leaves on the other vines were cut off of the die that the monkey is hanging on. The circle and its scallop layer are once again Spellbinder's Nestibilities.

Have a great Monday and until next time............... Blessings, Lisa

Wednesday, August 12, 2009

Snuggle with The Greeting Farm


Hello. I am working on some new things to show you with my Stampin Up Mini Catty stuff, but While I am finishing that, I have a card made with a stamp called "Snuggle"; from The Greeting Farm stamp company. Is she cute or what? This is actually my first card made with her. Of course I had to color her hair a medium brown to look like my daughter. Of course she also had to be dressed in Purple. Anyways.... I stamped her onto some watercolor paper with Versamark and black embossing powder. I then water colored her with some of my Stampin Up inks, watercolor wonder crayons, and my blender pens. Then I cut her out and set her aside for two weeks or so. I get in these coloring moods, so I color a bunch of images, and set them aside for later. Putting the card together was pretty simple. The DSP is Basic Grey, and the card stock base is unknown from my stash. I cut the quarter circles after I ran a Spellbinder's circle through my Cuttlebug, the image is mounted on some rectangles that I also cut with my Cuttlebug and some Spellbinder's dies. The ribbon is from American Crafts, the flowers are from Prima (what else?). Finally, the Faux Pearl accents are from Michael's. Oh, I have an enabler alert: If you like to use sticky faux pearls and gems on your projects, Michael's is expanding this section of their stock! Lots of new colors!


Until next time.......................... Blessings, Lisa

Monday, July 27, 2009

Watercoloring with Stampin Up Supplies

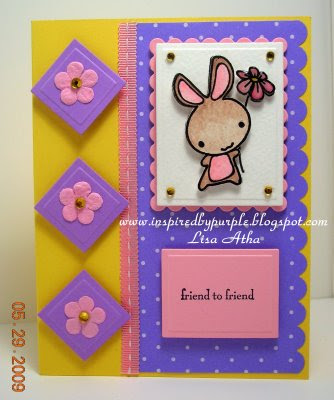
Hello. Sorry I am so late posting today, since it is almost dark out here in good ole' Ohio. Better late than never. Lately, I have been really into Clean and Simple cards. I have no idea why, but it is what it is. Tonight is no exception. I took a stamp from one of my sets from The Greeting Farm stamp company and did some detailed water coloring, then cut the image out and placed it on a very simple card base. Water coloring is very therapeutic mentally, it relaxes me, and makes me smile. It really isn't hard once you get the hang of it, and use the right tools. Stampin Up happens to have some awesome coloring tools to work with. So first here is the card, then I will provide some instruction.


Feel free to double click on the photo to enlarge it and see the detail of the water coloring. I was frustrated with the way my water coloring looked, so I did some digging and found some instructions somewhere on the Internet. We are so fortunate to have so many paper crafters that blog and are nice enough to show us how to do things. I do apologize, but I can't remember where I saw and read about water coloring. I do invite you to visit the Website and blog link for The Greeting Farm stamp company, as the owner always has some beautiful samples posted on weekdays that her design team has made and they are excellent examples of awesome water coloring. Just click on the store name above, I attached a link to take you right to their store.

Anyways, I use a variety of Stampin Up products and tools when I am coloring a stamped image. I always make sure that I have the following on my table or nearby when I color: Stampin Up Classic Ink pads and refills, SU Watercolor Wonder Crayons, SU Blender Pens and Aqua Painters, Sponge Daubers, Watercolor Paper (cold-pressed 140lb), old wash cloth, and scrap paper of any kind.

What I have learned is to start out with a light color, and gradually color with the darker hues. For instance, if you look at my flower centers above you will notice that the centers appear lighter than the edges. Same thing with the flower petals and leaves. For instance, when I went to color the flower petals, I got out all of my Yellows, tested them in a row next to each other on my scrap paper to see which ones would look best together, then started coloring with the lightest of them, working my way outward to the darkest. I know it sounds intimidating, because it did to me at first. However, the more you practice, the easier it gets and the better your outlined images will look on your cards. I still don't think of myself as an expert on this, I just wanted to share with you, what I do know. I hope I have inspired you to give water coloring a try. The old wash cloth, is for when you get a little too much color or moisture on your blending pen or more specifically your Aqua painter. This brings me to a tip about Aqua painters, a little water, goes a long way. There is no need to fill them up all the way, because then you will have more water than color. Now if you are coloring a sky background that you want really soft looking, then more moisture can be good. The whole thing is a lot of trial and error. I hope however that I have provided you with a good starting point. If you have any questions feel free to email me (see my side bar) or leave a comment. Of course if you need any supplies or tools from Stampin Up, I can help you out there as well. Don't forget to check Stampin Up's web site, to see what their deal of the week is this week! Also, don't forget to click on over to The Greeting Farm's website and blog to see the great colored samples.

Until next time................................Blessings, Lisa

Thursday, June 11, 2009

There is a Cute Little Mouse...

on the card that I made today. When you see her, I think you will agree with me.

See what I mean, isn't she cute sitting there in that little teacup? Setting aside my water coloring of course, she is just a too cute image to work with. She is part of a stamp set called "Cup of Stuff" from The Greeting Farm Stamp Company. You would think I were working for them with all of these cards that I made from only 2 different stamp sets, but no, I just love their stamps. Anyways, the card base is Stampin Up Ballet Blue, the 3 strips of patterned paper are from a retired pack of SU DSP. I stamped the image two times onto watercolor paper, so that I could cut out the one that I water colored and pop it up with foam dots. I water colored with Stampin Up Classic Ink and blender pens. The base that the mouse is on was cut with a Spellbinder's Nestibilities rectangle, and the mat with a scalloped rectangle. The sticky gems are from Hero arts, and the card layout is this weeks card sketch over on Splitcoast Stampers. Here is a photo of the layout. It is so versatile, it will definitely get used over and over in my crafty world.


Until next time..........Blessings, Lisa

Sunday, June 7, 2009

Blue Birthday Bunny

Ok, I have had a busy weekend, so I had to pull a card off the table that I finished when I was working with my Greeting Farm Bunny stamp set. I have a little something in the works with paper punches for my next post. In the meantime, here is today's card.


I stamped the bunny images two times on water color paper just as I did the other bunny images, so that I could cut him and the balloon out and pop them up. I also put a layer of Stampin Up Crystal Effects on the balloon, and let dry, then put another layer of CE on it and let it dry before cutting it out. You can see this a little on the photos, but the photos don't really do it justice. If you have never used Crystal effects before, you have got to try it. With the double layer on it; it looks like an epoxy embellishment or sticker. Awesome in person! Anyways, The royal blue dsp is from K & Co.'s recycled card stock pad, they come in Monochromatic color pads made completely from recycled paper. I got it at a Super-Walmart. They are double sided too, plain color on one side, patterned on the other. The scalloped corners and right side of the card were made with one of the new EK Success border punches. The bunny and his mat were cut with my Spellbinder's Nestibilities Rectangles and Scalloped Rectangles. The sentiment is from Stampin Up page 208 in the current catalog, but soon to be retired at the end of June. The sticky blue gems are from Michael's recollections collection. I think that covers it. If I left something out or you just have a question, click on the "contact me" on my side bar or leave me a comment. Enjoy the rest of your Sunday. Blessings, Lisa

Thursday, June 4, 2009

Bunny Birthday Card

Hello. I had another card made from The Greeting Farm stamp company lucky bunny set, so I thought I would share it. Here she is and holding a birthday present.

I started out like the other Bunny card stamping her two times on water color paper, then water coloring one of the bunnies and cutting it out. The plain bunny was cut out with a Spellbinder's Nestibilities rectangle, then mounted with foam pop dots onto a Nestibilities Scalloped Rectangle. The present is sparkly because I added Stickles glitter glue to it. The next thing that I did was to adhere the colored bunny on top of the plain one with foam pop dots. The frame around the bunny was made by running a scalloped and a plain nestibilities rectangle at the same time through my cuttlebug. I also ran them both through with some water color paper to ad to the back of the frame to make it stronger. The rest was pretty easy, I created a border with some DSP and some ribbon, then added the Prima flowers for embellishments. I gotta go for a bit, but I will be back to list the remaining supplies.

Sunday, May 31, 2009

The Greeting Farm Bunny Card

Hello! Is everyone having a great weekend! We had some storms here in Ohio last night, but Saturday, and Sunday afternoons have been gorgeous! Gotta love that sunshine! Well, I am back to brighten your day with a card made with another Greeting Farm Stamp set. I may not have explained their stamps very well on my post yesterday, if that is the case, I apologize. They are a rubber stamp, they just aren't wood mounted, they have a foam base that has a cling adhesive on it, that can be uses over and over and over, etc.. on acrylic blocks. This makes their quality so much more higher than clear stamps. I have argued so many times with ladies who insist that clear stamps are the only way to go. Well, so what if you can see through them! So what if you get more of them for your money! If you pay a cheap price, you get cheap stamps. I have several clear stamp set, and hardly ever use them. First of all, they only work with certain brands of ink, second, one of them cracked the very first time I used it. It has a tear all the way through the image forever distorting the image if I use it. I vote for wood mounted or rubber cling mounted as your best quality for your money. Ok, on with a card:


Now, isn't this the cutest bunny stamp image you have ever seen? It is from the "Lucky Bunnies" stamp set from "The Greeting Farm" stamp company! Bunnies do not have to be for Easter only. This stamp set has several different bunny images, that could be used for numerous occasions such as female birthday cards, baby gift cards, thinking of you cards, etc.. I have included a link to their store, just click on their name above, and look on the left hand side, click on the bar that says "animals", this will bring up all of their animal sets where you can view the whole Lucky Bunnies stamp set. Way too cute. Oh, they have some new releases coming up tomorrow, June 1st. I will be there checking them out.


Moving on with the card. I wanted to keep it somewhat simple and summery without making it boring, so that is what I came up with. I stamped the image twice on water color paper, so that I could water color one image, cut it out, and layer it on top of the other image. I am getting very hooked on doing that these days. The flower that bunny is holding has 2 layers of Stampin Up's Crystal Effects on it. I put one layer on, let it harden over night, then added the second layer, let it harden, then cut it out separately and popped it up with foam dot like I did the bunny. The lavender polka dot paper is a retired DSP from Stampin Up, the scalloped rectangle is SU Pretty in Pink card stock, as is the rectangle the greeting is on as well. The three lavender squares are SU Lavender Lace CS, with Prima Flowers and Hero Arts Sticky Gems. They are also popped up with foam pop dots. The pink ribbon strip is from AMM, which I believe stands for All My Memories and has been in my stash for years. The scallop border on the Lavender DSP was made with my SU scallop Border Punch. The lavender squares and the rectangles were all cut with some Spellbinders Nestibilities and my Cuttlebug. That sums it up . If you have any questions, drop me an email which you can find a link to on my side bar. Just click where it says, "contact me". Thanks a bunch for visiting my blog, have a happy Sunday! Blessings, Lisa


P.S. Stampin Up customers, please be aware that the retired stamps list will be available tomorrow, June 1st. I will email a copy of it to you if you are already on my email list. Also, some of the accessories that have the In-Colors in them, are already gone for good. One in particular that I am aware of is the 12x12 Baja Breeze DSP pack. Don't wait until the retired accessories list becomes available. If you want any items that have In-Colors in them, please submit your orders ASAP. I would hate to see you miss out on something you really wanted!

Saturday, May 30, 2009

Summer Flowers

Hello. Sorry I have been absent all week, I have been super busy. I have been stamping though, trying to get some things ready for something. I can't say what though at the moment. I have been having fun water coloring some stamped images from The Greeting Farm online stamp store. They have the cutest designs, besides Stampin Up, they are on my favorites list. I was trying to achieve the summery look with this card:

I started out stamping the image on water color paper two times; the second time I heat embossed it with black embossing powder. I water colored one of the images with Stampin Up ink in the ink pad lids and blender pens. Next, I cut out the first image with a Spellbinders Nestibilities Rectangles Large set, and mounted it onto a Nestibilities Scalloped Rectangle Large (SU Bashful Blue) with foam pop dots. Next I cut out the water colored image, and popped it up on top of the plain image with foam pop dots. The base of the card is Stampin Up's Summer Sun. The next layer with the colorful stripes is from Die Cuts With a View Glitter Stack. The next layer is from a small paper pad by SEI, and has a punched border at the bottom with Fiskers "Lazy Days of Summer" Border punch. The ribbon is Stampin Up's 1/4" Mustard Grosgrain. The Flower is from Paperbilities, the Flower center is a sticky gem from EK Success, and the "Hello" greeting is also a Greeting Farm Stamp. The Greeting Farm stamps are cling mounted stamps, that you cut from a sheet and then put on an acrylic block to stamp. Unlike clear stamps, These are much, much, much higher quality and will last longer. Their prices and shipping costs are very reasonable as well. Well, I think that about covers everything. I hope you enjoyed my card. Thanks, and enjoy your weekend.

Blessings, Lisa

Friday, March 20, 2009

Hello Bunny!

Check out this absolutely adorable bunny that I used on a card. She is part of a stamp set that I bought from The Greeting Farm online stamp store. Their stamps are all rubber cling mounted stamps sold in a sheet. So, you have to cut them out, then they stick over and over onto an acrylic block just like clear stamps, only the durability is far, far better than clear stamps. Their quality is very high just like my favorite stamps from Stampin Up!

Speaking of Stampin Up, they announced this week that they have been cutting costs everywhere that they can during this recession, but have finally decided that they are going to have to lay-off some employees at their offices in Utah! I feel so bad for the employees that will be the chosen ones. I have been there myself and I know how they feel. If you would, please take a moment and say a prayer for all of the home office employees.

Ok, so to cheer us up, look at this totally cute bunny. Is she the cutest bunny you ever saw or what? There were a few other bunnies in the set as well. I will put them on some cards as soon as I can fit them into my stamp schedule.

As usual, all card stock used is from Stampin Up. The half-circle that the bunny is on was made with Stampin Up's large scallop circle big shot die-cut. The bunny is colored with Stampin Up markers, The patterned paper under the circle is from Provocraft, the sticky gems are from Michael's along with the two sparkly brads. the partial flowers under the brads were made with Stampin Up's retired daisy punch. The flower ribbon is unknown; sorry. The border was made with a Martha Stewart Border Punch! STILL SEARCHING FOR THAT MS BUNNY BORDER PUNCH, BY THE WAY! I know, I sound like a broken record. That about sums it up, no complicated technique or anything involved here. However, if you have any questions, always feel free to contact me or leave a comment. Have a great weekend! Blessings, Lisa