Sunday, October 18, 2009

Fall Ornament Punch Vase

Happy Sunday evening. I was asked by a friend to make a Fall version of my Stampin Up Ornament Punch Vase from a previous post (click here). So, I thought that I would go ahead and post it on here. Stampin Up has a beautiful stamp set new to their current main Catalog called "Autumn Days". I thought of the "Pussy willow" stamp when I was asked to make this.

When I was a little girl in the 70's (oops just shared my age), my grandmother had a Pussy willow tree in her back yard. She used to cut some of them off and put them into a vase inside her house. I had the very big job of holding the ones that she cut while she was cutting more. I so loved those fuzzy soft little things, they felt like kitten fur. So here is the card I have been chatting about:

I used Stampin Up Soft Suede to stamp all of the Pussy willow branches. I stamped some of them two times before re-inking the stamp, so that some would look lighter. I stamped the Butterfly from the "Charming" stamp set with yellow, then didn't like it, so I colored over the yellow with my Soft Suede marker. The design on the vase is the same as it was on my previous post also from the stamp set "Charming", and the sentiment is from the stamp set "Teeny Tiny Wishes". The card base itself is Very Vanilla card stock, and the vase is Bravo Burgundy card stock. I think that covers it. For instructions on how I made that chubby vase please click on the link above for my previous post. Thanks for visiting my blog, and have a blessed Sunday evening. Lisa

Friday, October 16, 2009

Fall Trendy Trees

Well, my daughter has a soccer game on Saturday, so I am here posting tonight. Saturdays always get away from me to quickly during soccer seasons. I had said in my last post that I would have a Fall card to show you over the weekend, so here it is.
Ha! Fooled you! Only kidding. The above photo was the card sketch over on Splitcoast stampers this week. The actual card is pictured below:

I haven't used my Stampin Up "Trendy Trees" stamp set in awhile, so I decided to dust it off and stamp. Are these the cutest stinkin trees ever or what! Love this set. This card sketch was super easy to put together too. The 2009-2010 in-colors are great for fall cards too. My card base is Crushed Curry, then Dusty Durango, then Bermuda Bay, and of course the trees are mounted on Soft Suede and stamped on Whisper White. The inks are the coordinating colors of course. I used two square punches: 1-1/4" and 1-3/8"; and the Word Window punch. The sentiment is also from the Trendy Trees stamp set. That sums it up; short and sweet. I hope you enjoy! Blessings, Lisa


Thursday, October 15, 2009

Quick Christmas Tree Cards

I know, it is only October, and I am on a Christmas card kick. I seem to be particularly inspired by Christmas already. I have a couple of Fall cards to share with you over the weekend. So, here is my own handmade designed by me Christmas trees on cards.

What I did first was to take the snowflake background stamp from Stampin Up's "Serene Snowflakes" stamp set, and their White Craft ink, and stamped all over an entire piece of Garden Green 8-1/2X11 sheet of card stock. Then I cut it into sheets about 8-1/2" x 2-1/2", then at the end I had a large section that was approximately 8-1/2"x 3-1/2". The larger section is the one that I cut to make the first card you are seeing with one large tree on it. I just kept cutting these strips until I had a bunch of tree shapes. This idea makes some quick mass card production when you have waited til the last minute to make your Christmas cards.Now, the tree base is was made with my Word Window punch, and cut in half. So you can get two tree bases from one punch. The star at the top was made with my Stampin Up Star punch (the smaller one). Then my last touch was to add some bling with my favorite embellishment...sticky gems. You could just as easily use a red marker to add accents, a very small circle punch and red card stock, or even some Red Smooch, or Red Liquid Pearls (if they make that). The sentiment is from Stampin Up's "Teeny tiny Wishes" stamp set.


The next photo is my version made with the smaller strips that I cut. This one is my favorite of the two, but takes a little bit longer to make. This time, however, the SU star punch was too big, so I am used a mini star punch that I got a long time ago in some one's dollar bin. I am sure Michael's has them. I used the tiniest sticky gems on this one too. The tree bases on this one were made with my Stampin Up Small slot punch. The glitter used on the snowy hills is Dazzling Diamonds from Stampin Up. I think some chunky glitter would look better, but I don't have any of that yet, so I improvised.

I tried something new with my Picasa photo editing software today.......soft focus feature. I like this! The top photo didn't hold onto it's changes though, there is a little gremlin inside my Picasa I think. Oh well, it was free, what can we expect. I am not an expert on photo editing yet though, so if any of you have been working with Picasa or Photoshop for awhile and have any tips for me, please by all means leave me a comment. If I missed something or didn't explain it completely, please feel free to leave me a comment that I can respond to.

Until next time.......Blessings, Lisa


Tuesday, October 13, 2009

Christmas Stocking Card

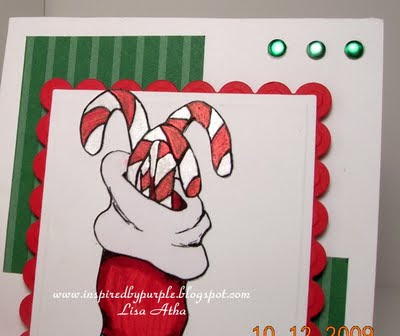
I used another digi image from McMahon Five Designs for my card today. I am getting so hooked on digi images lately. No worries, I still love the rubber stuff too. There are so many awesome things out there in the crafting world to fall in love with, too many I think. Anyhoo... here is my card:


The first thing that I did was to color my digi image with Stampin Up markers, then I found out that I printed the image to large for my Nestibilities (oops). So, I cut the image out then cut my Rectangle and Scalloped Rectangle out with my cuttlebug, then adhered my image to the rectangle. I actually thought it looked interesting to have the image hang over the edges of the rectangle a wee bit. Sometimes, what we think are mistakes, turn out interesting instead of yucky. I used some of that new Smooch shimmer paint on the candy canes to add a little extra interest. If you look at the close up photo below, you can see it better. It is of course on of those things that looks better in person than it does in a photo. All card stock is Stampin Up, the designer paper is also Stampin Up form one of the 6X6 DSP hostess packs, gotta love those things. Then I added some Mark Richards embellishments called metal nail heads that are self stick like the sparkle gems and faux pearls that I so love to use on cards. They were on clearance, so I am giving them a try. Me likey! How about you?


Speaking of Clearance or Deals in general........Stampin Up has brought back their "Deals of the Week" for this month. This week they are offering some Sizzix di-cuts at a reduced cost. Check it out on their customer page, and if you order online, please choose me as your demonstrator.

Until next time...................Blessings, Lisa

Wednesday, October 7, 2009

Happy Halloween

Hello. I decided to take another break from Christmas cards and go with a Halloween card. I used the owl stamp from Stampin Up's stamp set called "Halloween Frights", and the sentiment is from "Teeny Tiny Wishes". I also decided to go Clean and Simple. So, here is what I came up with:


The owl is stamped with Stampin Up's White Craft ink, on Elegant Eggplant, Really Rust, Old Olive, and Chocolate Chip card stock, then punched out with a 1-1/4" square punch, then mounted on a square piece of Basic Black card stock.

The sentiment is on Elegant Eggplant, and punched out with the Word Window punch, then mounted on some Basic Black punched out with the new Modern Label punch. Some orange sticky gems from Hero Arts tops it off.

Quick post for me today. I hope you enjoy. Blessings, Lisa

Monday, October 5, 2009

Punched Doxie

If you have been following my blog for very long, then you probably know that I have a very super sweet Miniature Dachshund dog. Her name is Brandy, she is 15 years old and still feisty. We have kept up on her regular maintenance, fed her good stuff, and just all around taken good care of her. She sleeps alot more than she used to, lost some of her teeth and piddles on the floor sometimes (yuck), but other than that still has a great zest for life, and loves giving wet kisses. I have been waiting very patiently for someone over on Splitcoast stampers to come up with a doxie punch art thingy, as there are so many cute punch art thingies over there, but nope, no-one has yet. So I put my little brain to work and started punching out some shapes with my Stampin Up punches, arranging them on a piece of scrap card stock to see what might work together. The photo below is what I came up with:
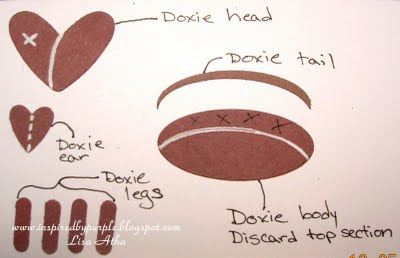
Ok, I am back, and I adjusted the Doxie body to be a bit more slim. I am challenging myself here to use only Stampin Up paper punches, as most of my punches are from Stampin Up. The legs look a little long, but this can be easily adjusted by cutting off a little bit, or simply attach them more underneath the body further. Below is a chart that shows what punched pieces are used to put together this ultra cute doggie. The doxie head is one of the hearts from the Heart to Heart punch, and so is the ear. The doxie legs were made with the Horizontal Slot punch. The body and tail were both made with the Small Oval punch. The white lines are where I cut them, the pieces with the X's can be thrown away.
Here is a close-up photo of how I cut the doxie body. The small oval was too chubby, so, I put it back into the punch, moved it around with my xacto knife until I had it where I wanted it (as shown in the photo below), then punched it.
Now, for the tail, the discarded doxie body piece was too wide for the tail, so to make the tail, punch out a small oval. Then place the negative space back into the punch, line it up as I have shown in the photo. Make sure it is real skinny at one end (left side of photo), and slightly skinny at the other end (right side of photo), then punch.
The photo below is my real Dachshund, Brandy. She is my sweetheart!


I hope you enjoyed my punch art, I so rarely do this. If you have any questions, leave me a comment that I can respond to.

Until next time...............Blessings, Lisa

Wednesday, September 30, 2009

Ornament Suspension Card

Sorry for my absence, I have been a tad bit under the weather for the past few days. Some extra sleep has been helping tremendously though.


I decided to post a technique that I have never posted before and that is a suspension card or rather in my case a double suspension card. Here it is:
I stamped one of the ornament stamps from the Delightful Decorations stamp set from the Stampin Up Holiday Mini Catalog. I stamped it two times with Rose Red ink, then punched it out with the coordinating ornament paper punch. Then, I punched a circle out of the center of both ornaments at the same time so that the circles line up afterwards. This was easier because I applied a very small amount of removable adhesive to the ornaments and placed them back to back before trying to punch the circles out of them. Next, I stamped one of the smaller stamps of the same set with Certainly Celery ink two times, and I hand cut those out because I couldn't find the correct size circle punch (I have got to organize my punch collection). Next, I applied some permanent adhesive (terrifically tacky tape works best) to all of the backs of the pieces that I wanted to suspend on the string. I used some retired gold cord from Stampin Up for mine, the Tutorial over on the Splitcoast Stampers Website, suggests dental floss. Click here for a link to their tutorial. Next, I laid my gold cord to the back center of one of each of my items to be suspended, then carefully lined up the other pieces on top of those. Then I laid this across the front card base which I had already punched a larger circle into. The final step was to place a piece of designer paper; I used some Retired SU Certainly Celery patterned paper here. As a final touch, I took one of the circles that I had punched out of the ornament center, cut it into fourths, and applied each one to each of the four corners on the front of the card for en extra embellishment. I added an enlarged photo of the card below to show you the suspended items better.


Well, I hope you liked it, and go check out the tutorial on Splitcoast, they added more photos that I did. Until next time................Blessings, Lisa

Saturday, September 26, 2009

Poinsettia from McMahon Five

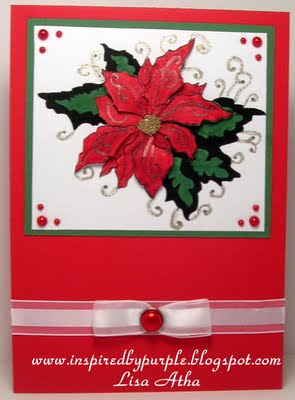
I was going for that "OOOoooo" kind of reaction while I was putting this card together. So, if I didn't achieve it, please don't tell me. Haha. This is a digital image from McMahon Five Designs designed by Sue McMahon herself. I have a link to her store on my side bar. Sue has not only great Digi images (some are free), but she also sells other products at her store as well. Right now, she has some Pearl embellishments that are absolutely gorgeous, and offers them lower than some of the chain stores such as Archiver's. Ok on with what I did on the card.
First I colored two of the same image with my Stampin Up markers, Garden Green and Real Red are used here. Then I colored the swirls with Stampin Up's new Shimmer paint. My next step was to cut one of the images flower petals, but left them attached to the center of the flower. Next I got out my different sizes and thicknesses of foam dimensionals and applied them under the petals, to create a dimensional look. This can be seen better in the close-up photo below. Oh, but I couldn't stop there, no, no, no.......I decided to add some Gold Micro beads to the flower center with some liquid glue. I shall warn you that these things are awesome, but messy. The final touches were the faux red pearls in each corner, and the white satin bow with red pearl brad (Recollections from Michael's). Just a wee bit more embellished than the cards on my previous post, don't ya think?


Oh, a tip on the digi images if you have never used them, but want to try them. I have found that printing them out on Georgia Pacific card stock from Wal mart is best for coloring purposes so that your computer ink doesn't smear. Tip No.2 is that I first copy/paste them into Microsoft Word, click on the image, then I can adjust the size to whatever I want before printing. If you have any questions, please leave me a comment that I can reply to.
Until Next time.......................Blessings, Lisa

Thursday, September 24, 2009

Ornament Punch Ideas

Hello. Well, I promised you some more ideas for the ornament punch that is in the new Stampin Up Holiday Mini Catalog. Here they are:


On this first one I stamped one of the snowflakes from the Stampin Up Holiday Mini Catty called "Serene Snowflakes", then while holding my ornament punch upside down, centered the snowflake and punched it out. The snowflake by the way, was stamped with the new Platinum shimmer paint that is also in the holiday mini. I found it easiest to paint the stamp with the shimmer paint with a paint brush, then stamp. Boy does that stuff shimmer! I highly recommend it. The scallop is also from Stampin Up/Sizzix Bigz die-cut called "Large Scallop Circle". The tree branch is from the stamp set "Bird on a Branch", and the sentiment is from the stamp set "Teeny Tiny Wishes". The ornament is popped up just a little bit with an SU Stampin Dimensional. The card stock used was Stampin Up Whisper White and Night of Navy.

The next card was super fun, and super easy. I punched out 3 ornament punches from Night of Navy card stock. Then, with a paint brush, I brushed some Champagne Mist (Gold) Shimmer paint on them completely covering them. I set them aside for a few minutes to let them dry. While that was going on, I ran my SU/Sizzix Sizzlet from the Holiday Mini Catty called "Merry Details" through my cuttlebug with some Whisper White card stock. Next, I simply attached them to the ornaments and assembled them onto a card base. The lines for the ornaments to hang from were obviously hand drawn with my black marker. Clean & Simple, and finished in about 10 minutes, if that! Don't ever be afraid to hand draw on your cards, it adds a special uniqueness to them. Oh, notice the shimmer from the paint on the ornaments. It looks really cool in person on that dark card stock. It looks equally nice on Handsome Hunter, and Bravo Burgundy, which are the only other two colors that I have tried this with so far.
Well, that is it for today. Until next time............. Blessings, Lisa

Tuesday, September 22, 2009

Christmas Ornaments

Hello. I struggled with ideas today with the stamp set that I wanted to use. Remember the ornament punch from Stampin Up that I used as a vase on a previous post? Well, Stampin Up sells a coordinating stamp set to go with that punch called "Delightful Decorations". It is featured in their current Holiday Mini catalog. I used two of the stamps in it for today's card. As I said, I was struggling for an idea for the card layout, so I borrowed one from my friend Lydia Fiedler over at UnderstandBlue. Click HERE to see her card. So, here is my card:


I decided to step out of my comfort zone and use a couple of non-traditional Christmas colors, and I was glad that I did. The lighter colored ornament is Stampin Up's Regal Rose, the other ornament is Rose Red. The sentiment is stamped with Rose Red ink on Whisper White card stock and punched out with a Stampin Up Word Window Punch, and layered on a piece of Rose Red card stock punched out with Stampin Up's Modern Label Punch. Ah, my second favorite thing after "bling" is my paper punches. I managed to work 3 of them into this card; which is not my personal best, but not too bad either. The string for the ornaments is the retired silver cord from SU; however the current elastic cord that is featured in the Holiday Mini Catty would work just as well. The middle panel is SU Garden Green card stock and is popped up just a little bit with some thin foam dimensionals from SU.

I have a couple of other cards in the works using the Ornament punch with other non-coordinating stamp sets (gotta show you again how to get the most out of your products), and a couple of requests that I am working on...so keep checking back for new projects.

I have to thank Donna, over at Butternut Sage Designs blog for referring her readers over to my blog after she found my Ornament Punch Vase card post from last week. Go check out her blog, she makes some awesome cards! Donna, my readers have doubled since you did that! YES!!!! Even if you don't leave a comment, each visit that I see on my counter inspires me to keep crafting and blogging. However, I won't deny the fact that I absolutely love getting comments, they make me smile!!!!!!!

Until next time...............Blessings, Lisa